Hand Drawing Ideas: How to Draw Hands From Every Angle
Hands are famously the hardest thing to draw — but not for the reason most people think. It isn’t the detail; it’s the angles and proportions. Once you can block a hand as simple shapes and get the knuckle arc right, every pose becomes possible. This is a complete visual reference of hand drawing ideas: 23 labelled diagrams that walk you from basic construction, through the same hand seen from every angle, into common gestures and step-by-step builds. Keep it beside your sketchbook, or grab the free printable practice pack at the end.
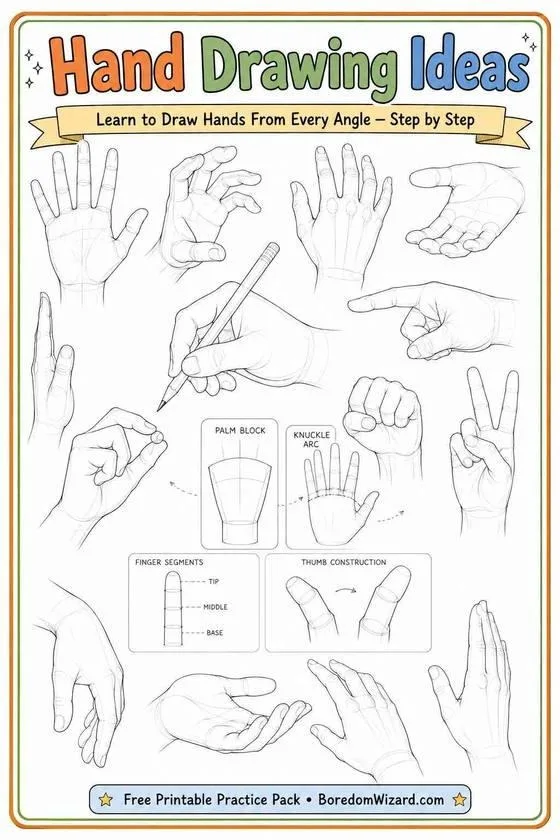
Quick answer: To draw a hand, block the palm as a simple rounded box, add the four fingers as cylinders sitting on a gently curved knuckle arc, set the thumb lower and to the side, then refine. Getting the palm-box and knuckle arc right first is what makes a hand look natural — the details come last.
New to drawing? Warm up with our easy things to draw first, then come back — hands are the single best skill to level up your whole sketchbook.
The Block-and-Fan Method (start here)
Ninety percent of a believable hand comes from two moves. Master these before anything else:
1. Block the palm. Draw the palm as one simple rounded box (or a soft square). This sets the size and tilt of the whole hand.
2. Fan the fingers off the knuckle arc. The four knuckles sit on a gentle curve, not a straight line. Fan the fingers off that arc as cylinders, each split into three segments, and set the thumb lower and to the side.
That’s the whole foundation. Every diagram below is built on it — start with the construction plates, then work down through the angles and poses.
Lesson 1 — The construction method
These four plates are the foundation. Learn them and you can build any hand from scratch.
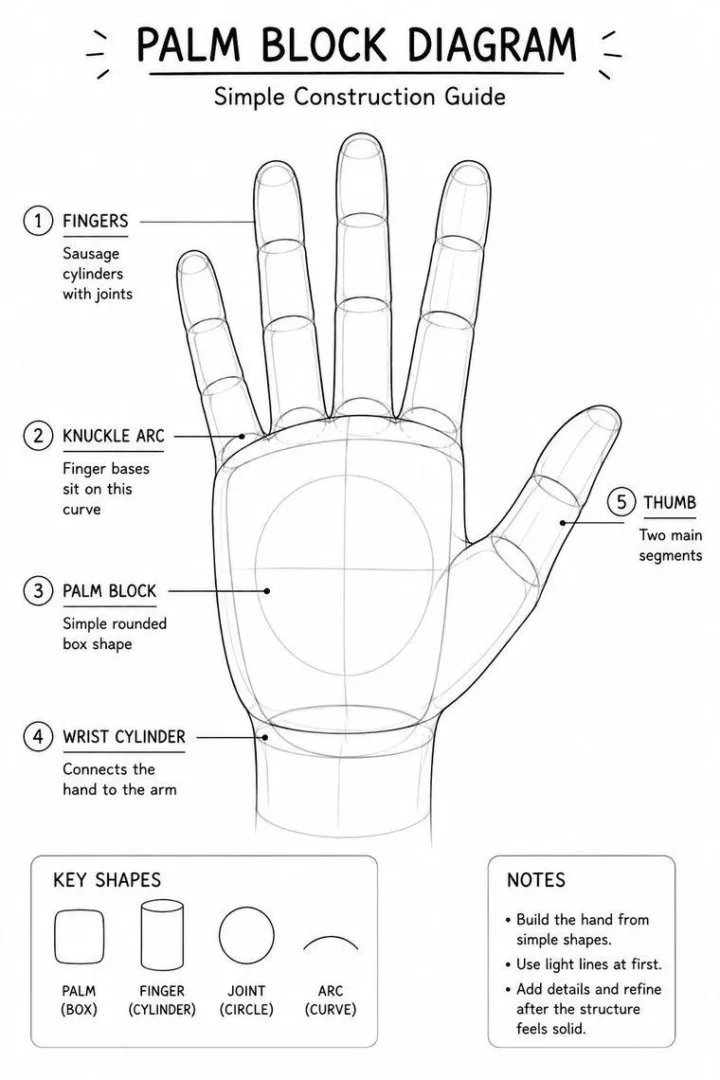
Palm Block Diagram — the simplest possible breakdown: palm as a box, fingers as sausage cylinders on the knuckle arc, wrist as a cylinder, thumb as two segments.
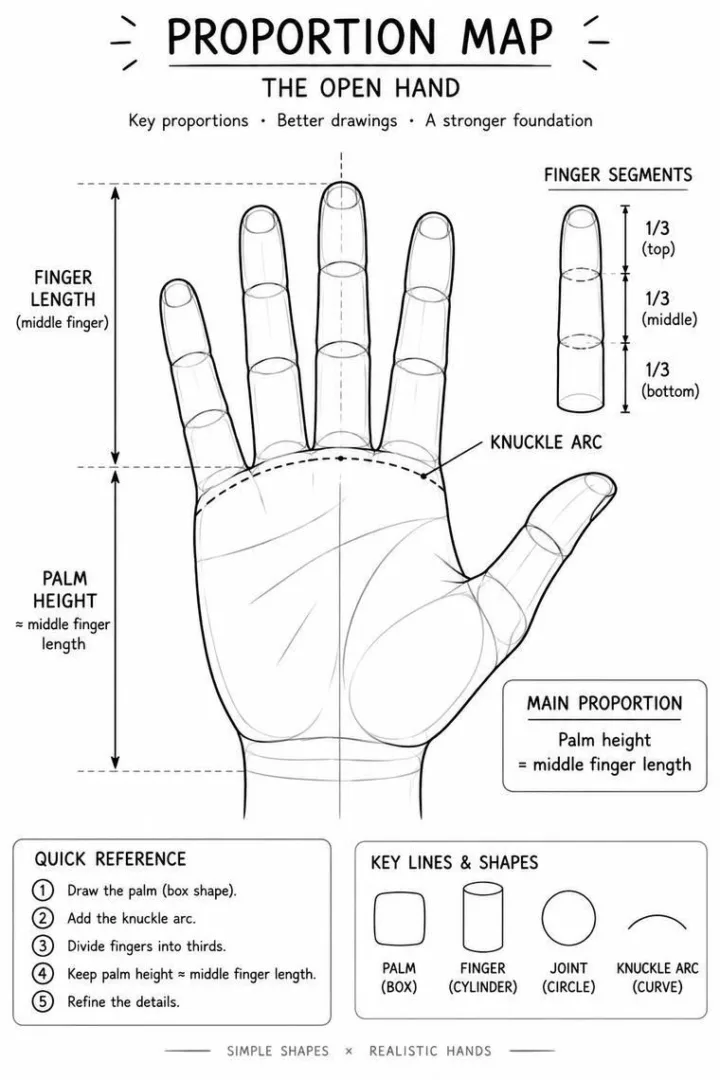
Proportion Map — the one measurement that fixes most bad hands — palm height roughly equals middle-finger length, and each finger divides into thirds.
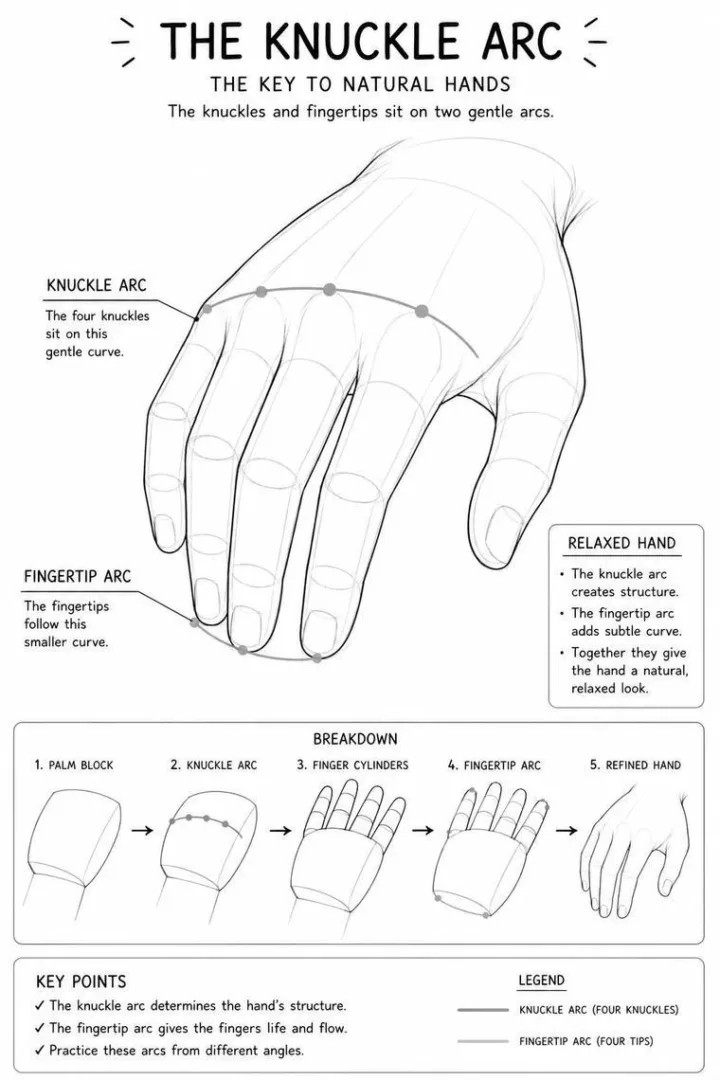
The Knuckle Arc — the single most important line in the hand. The knuckles sit on one gentle arc and the fingertips on a second smaller arc; get these curves right and the hand instantly looks natural.
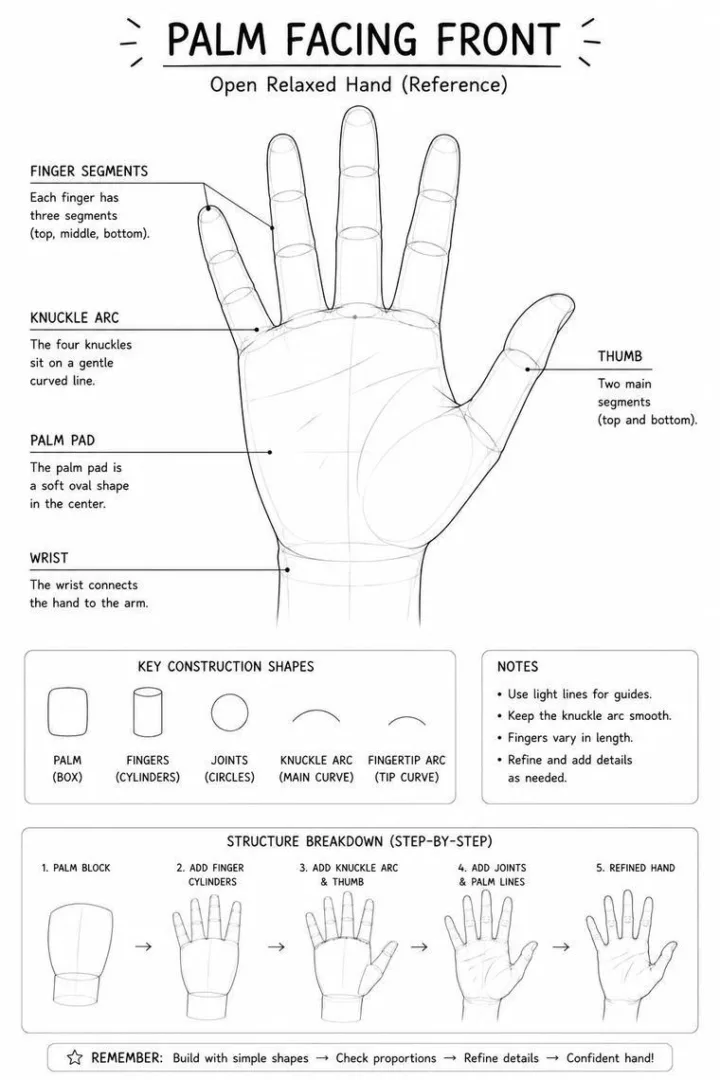
Palm Facing Front — a fully labelled reference of the open palm, with a five-step construction breakdown from blocked shapes to finished hand.
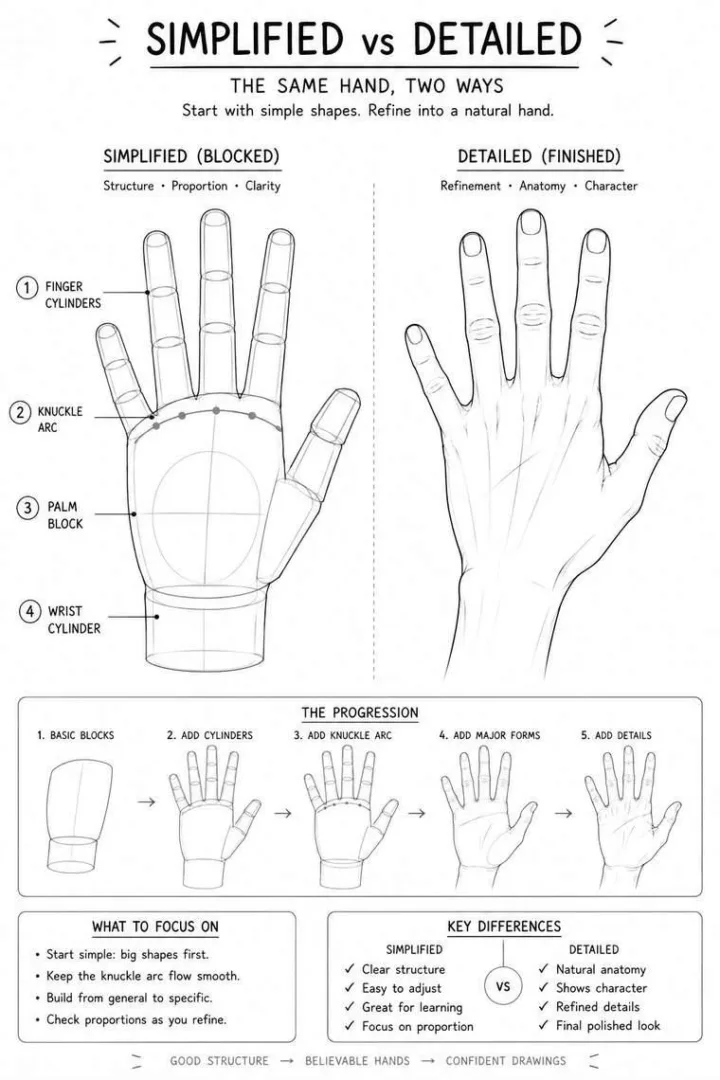
Simplified vs Detailed — the same hand shown as basic blocks beside the finished drawing, so you can see exactly how structure becomes a natural hand.
Lesson 2 — The same hand from every angle
This is the part every other tutorial skips — and the reason hands feel impossible. A hand looks completely different from each angle, so here is one hand rotated through the five you actually need to draw.
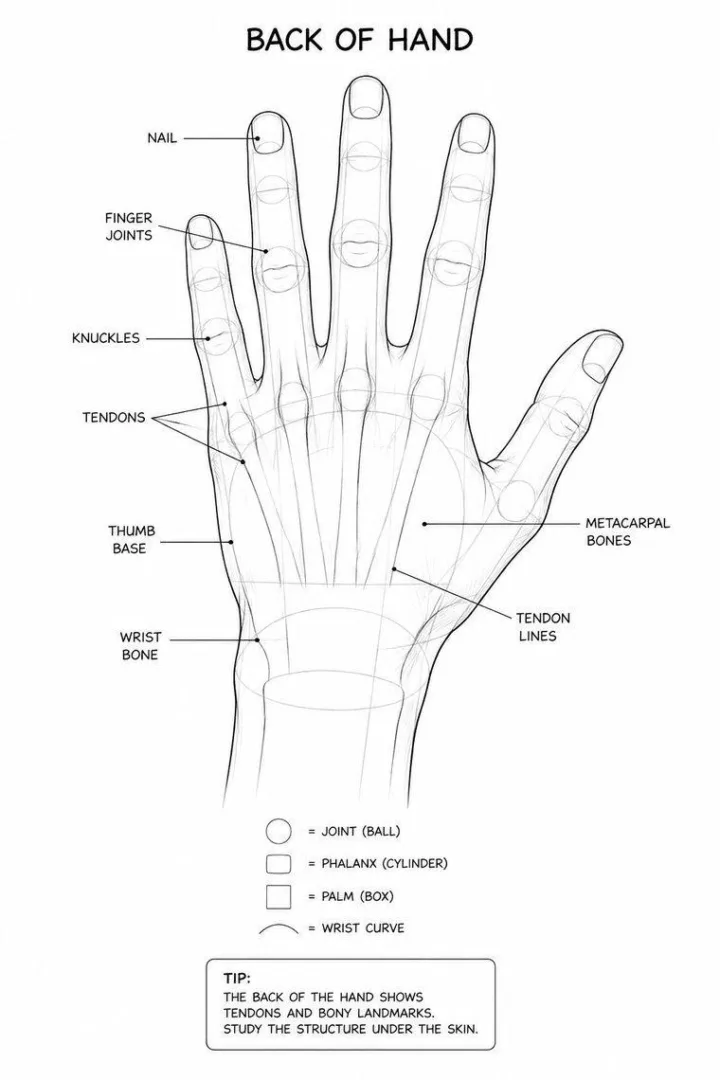
Back of Hand — shows the tendons and bony landmarks you can see under the skin — the structure that makes the back of a hand read correctly.
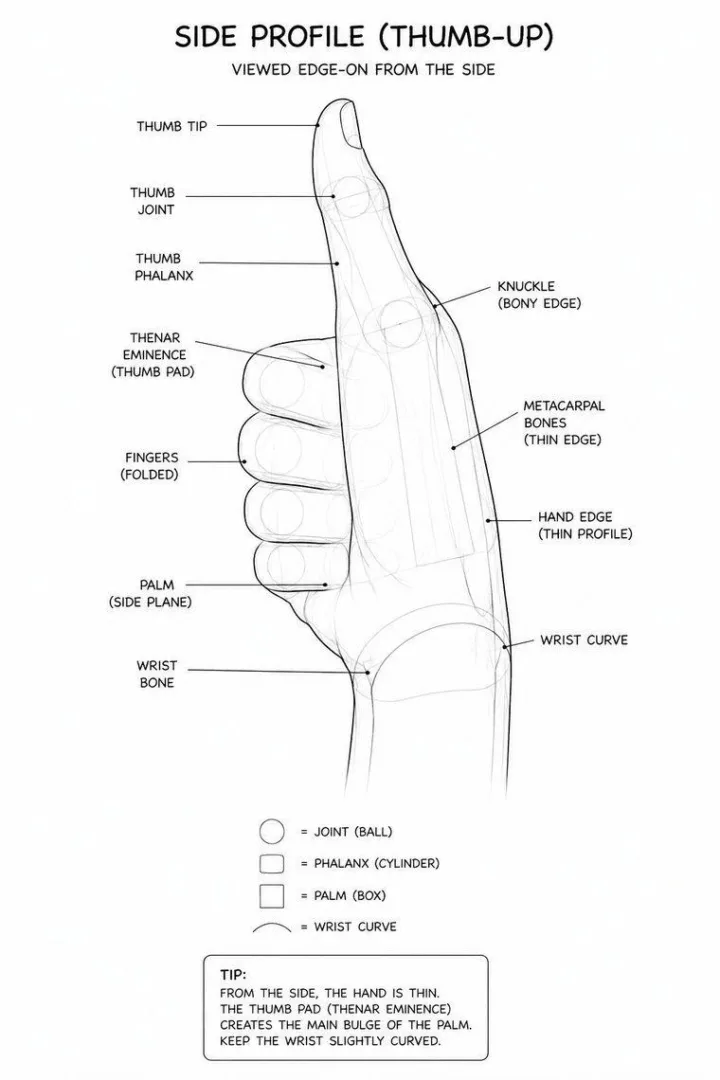
Side Profile (Thumb-Up) — seen edge-on, the hand is surprisingly thin — the thumb pad creates the main bulge. Essential for profile poses.
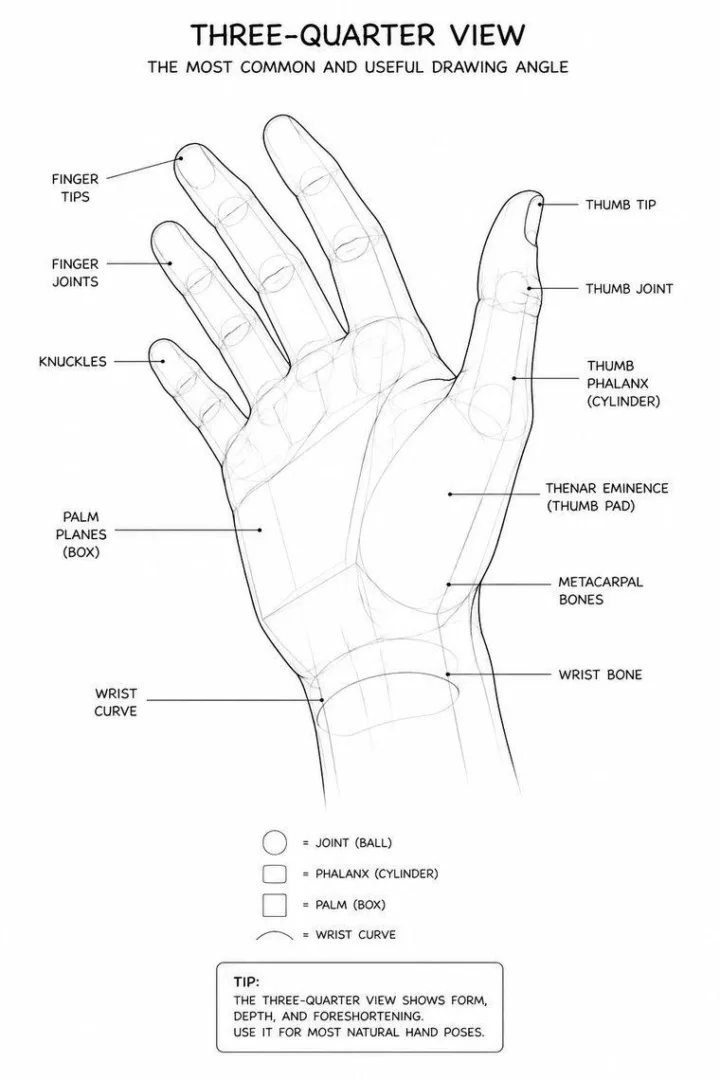
Three-Quarter View — the most common and useful drawing angle, because it shows form, depth, and a little foreshortening all at once. If you learn one angle, learn this.
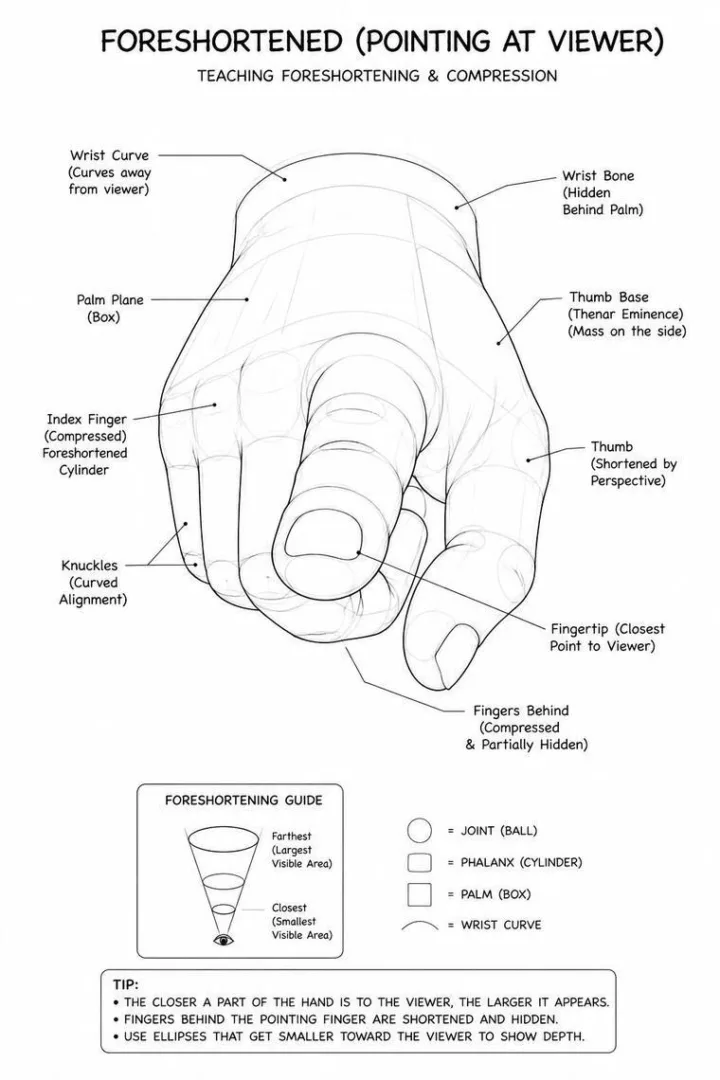
Foreshortened (Pointing at Viewer) — the angle people fear. The guide shows how parts closer to you appear larger and how the fingers behind compress — use ellipses that shrink toward the viewer.
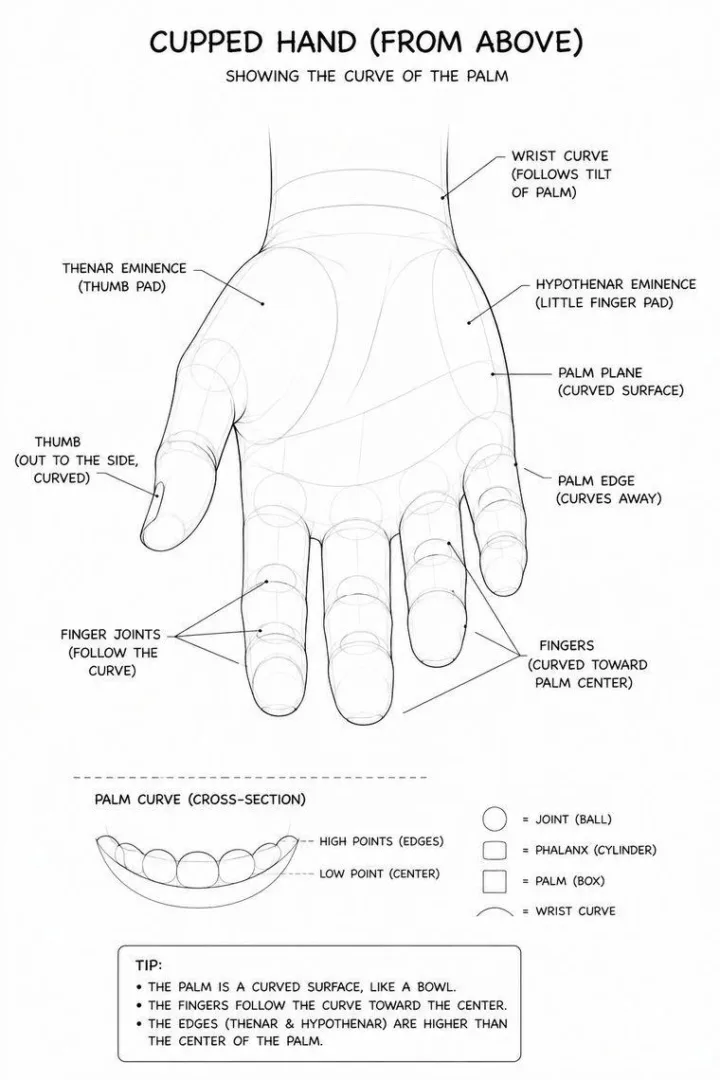
Cupped Hand (From Above) — shows the palm as a curved, bowl-like surface rather than a flat plane — the edges sit higher than the centre.
Lesson 3 — Common gestures & poses
Now the fun part: the hand shapes you’ll actually draw again and again. Each plate labels the pose and breaks it into the same five construction steps, so you’re always building on the method above.
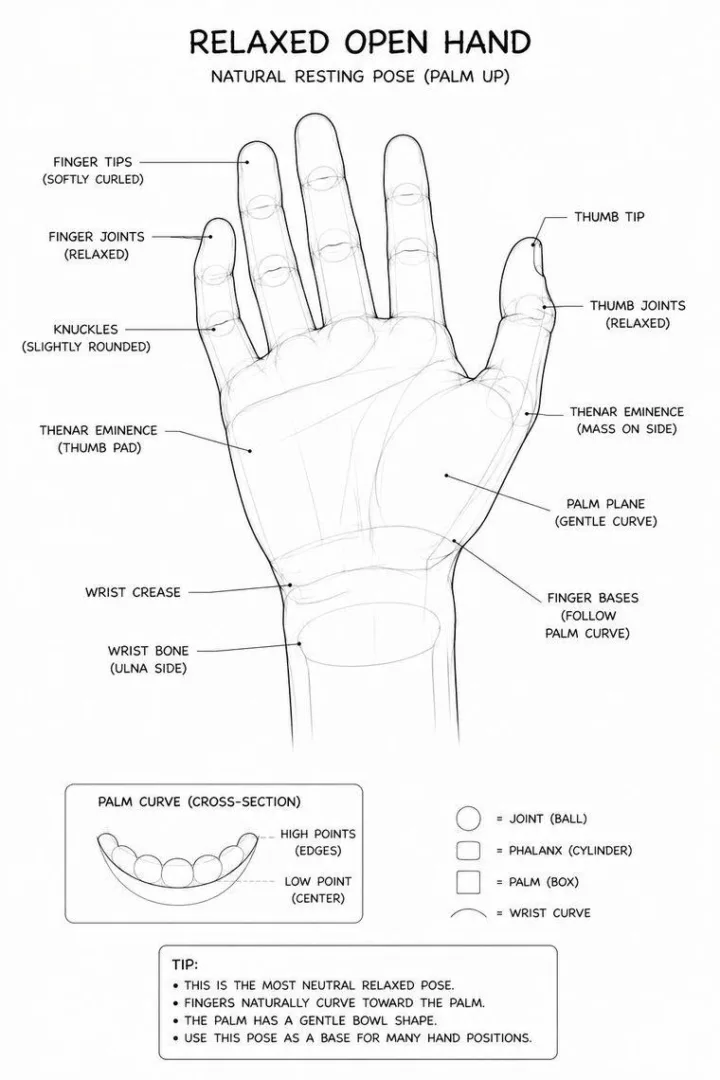
Relaxed Open Hand — the natural resting pose, palm up with softly curled fingers. Use this as the default base for many other positions.
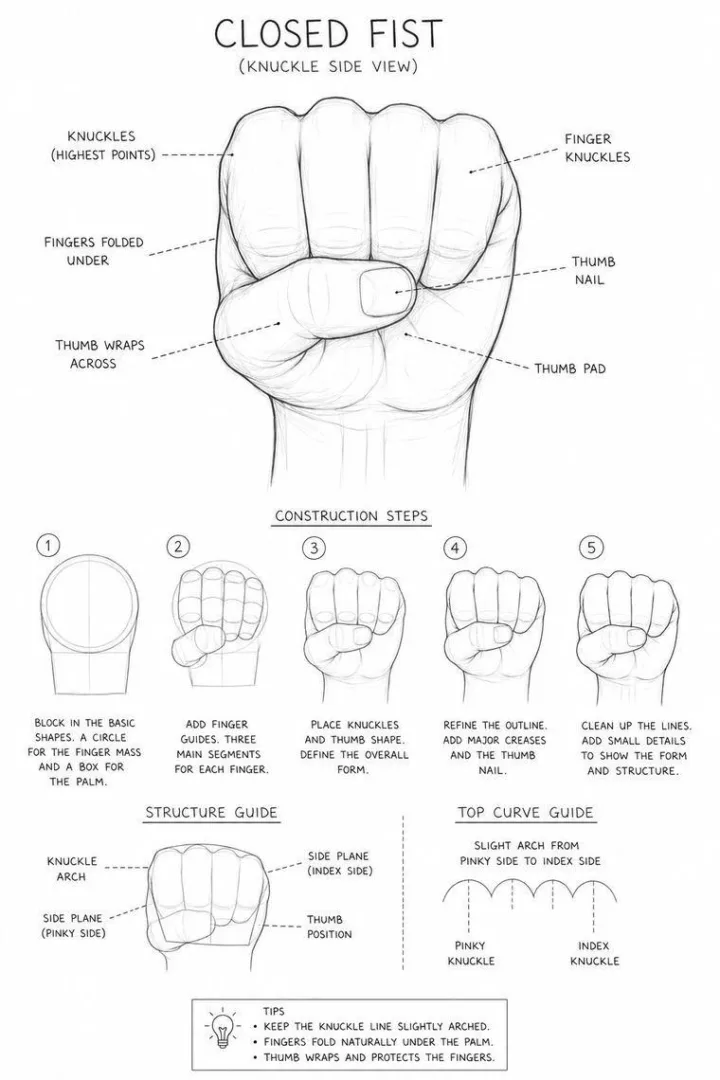
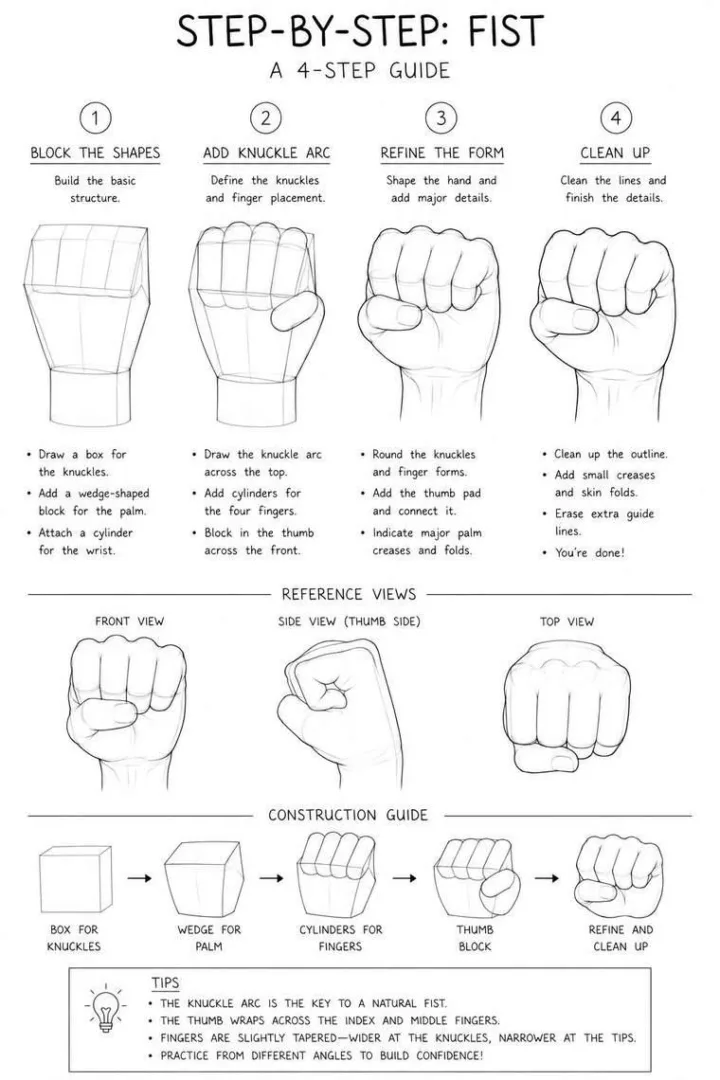
Closed Fist — shows how the fingers fold and the thumb wraps across. Keep that knuckle arc slightly curved and the fist reads instantly.
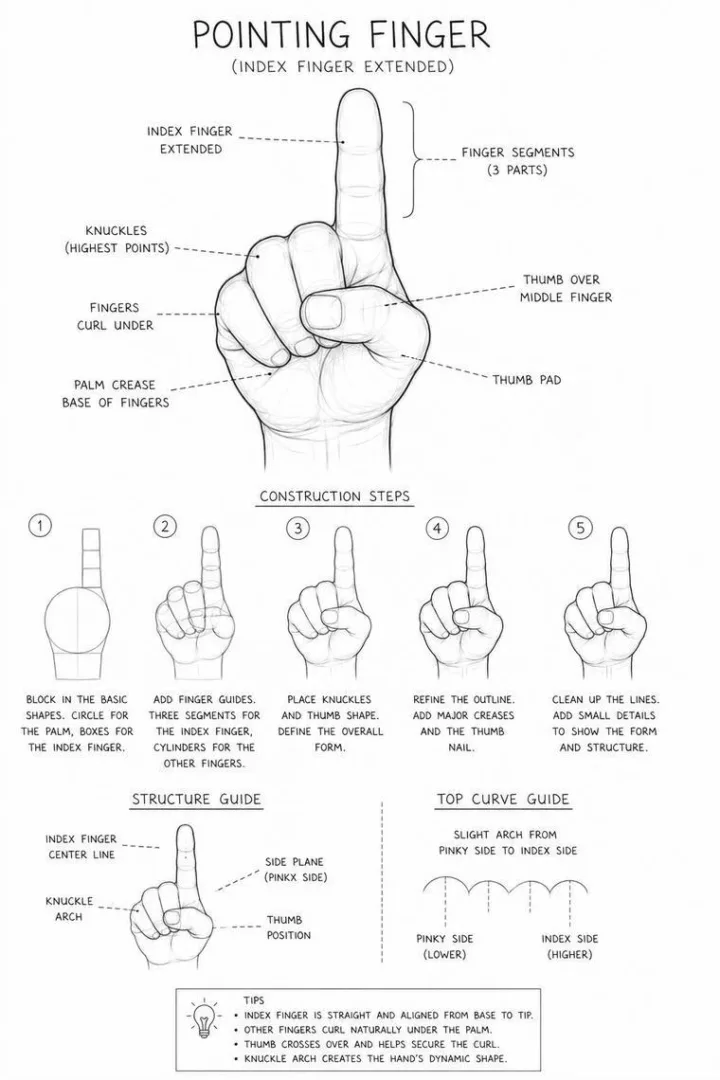
Pointing Finger — one finger extended, the rest curled under with the thumb crossing over — a great study in contrast between straight and folded fingers.
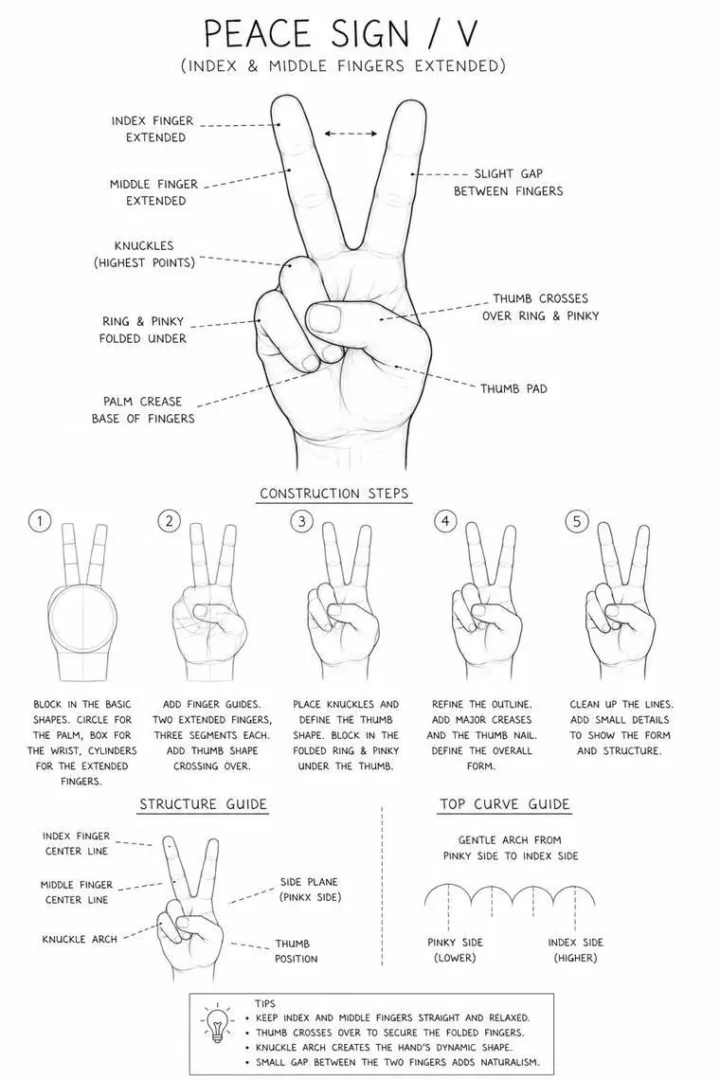
Peace Sign / V — two fingers up, ring and pinky folded under a crossing thumb, with a small natural gap between the raised fingers.
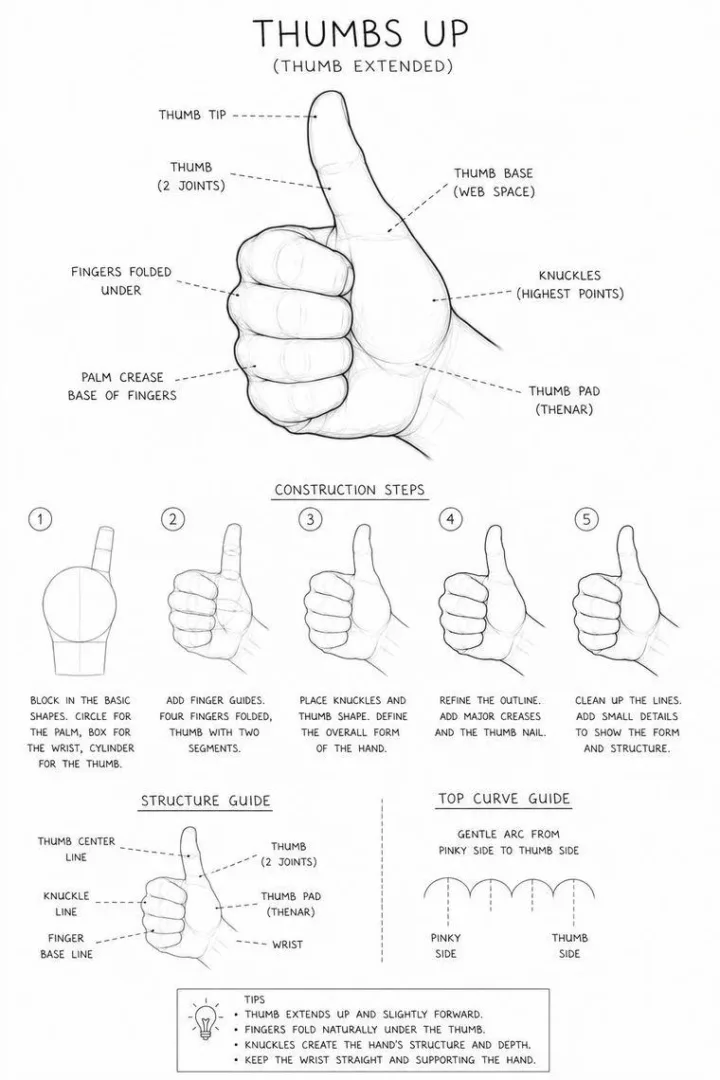
Thumbs Up — a folded fist with the thumb extended up and slightly forward — note how the fingers tuck naturally under the thumb.
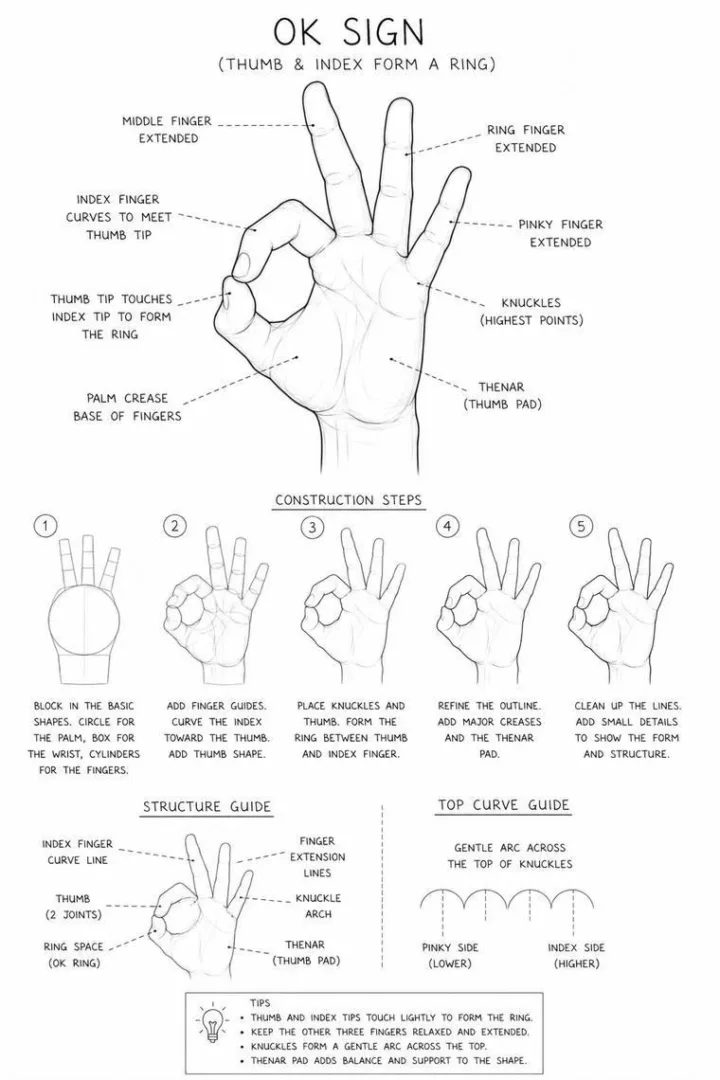
OK Sign — thumb and index form a ring while the other three fingers fan out — a good test of drawing a curve meeting a curve.
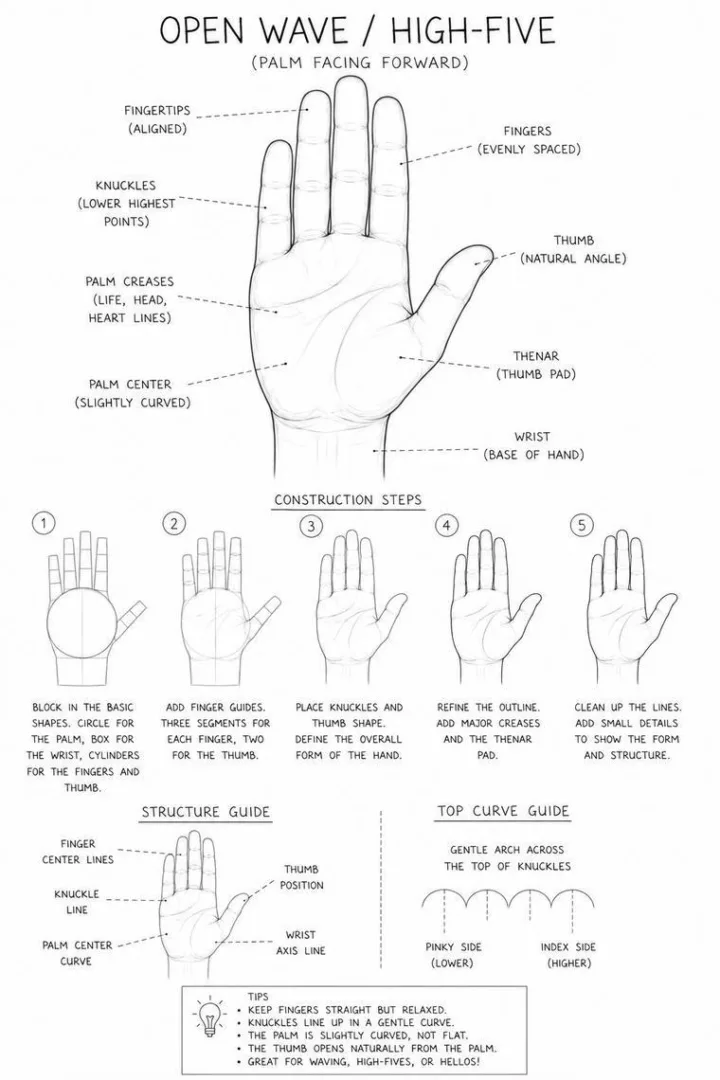
Open Wave / High-Five — the flat, forward-facing open hand, fully labelled with palm creases, thenar pad, and the gentle knuckle arch.
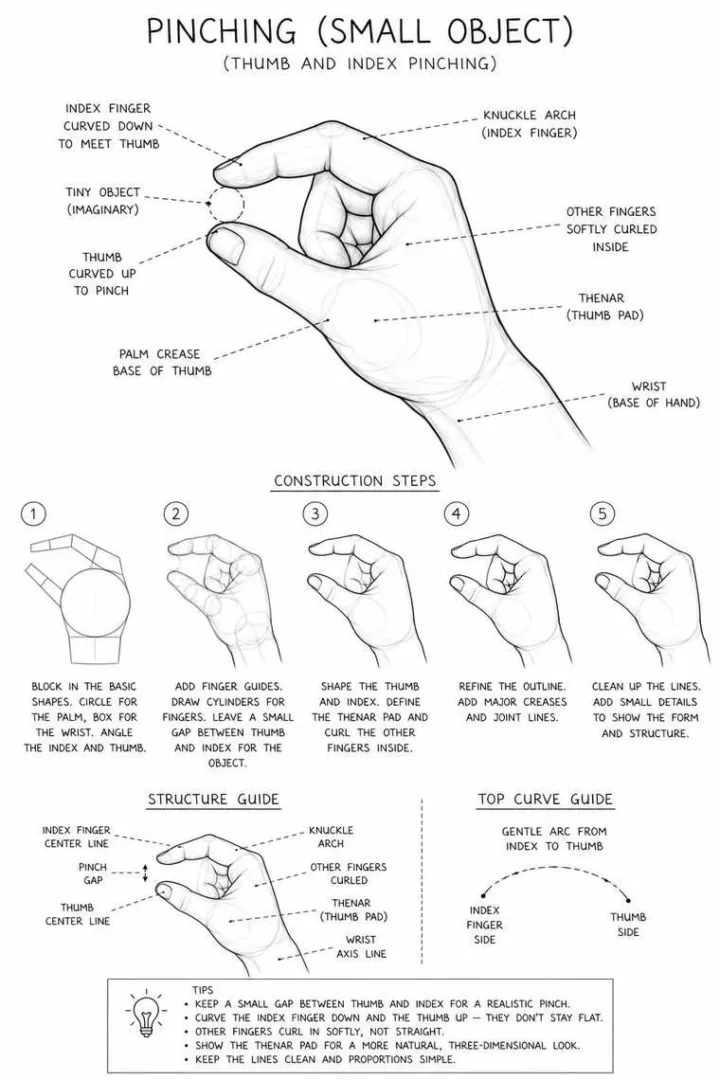
Pinching (Small Object) — thumb and index curving toward each other with a small gap, the other fingers softly curled — the base for any ‘hand holding something’ pose.
Lesson 4 — Fingers, thumb & nails up close
The small parts that sell the whole hand. Study these once and every finger you draw afterward improves.
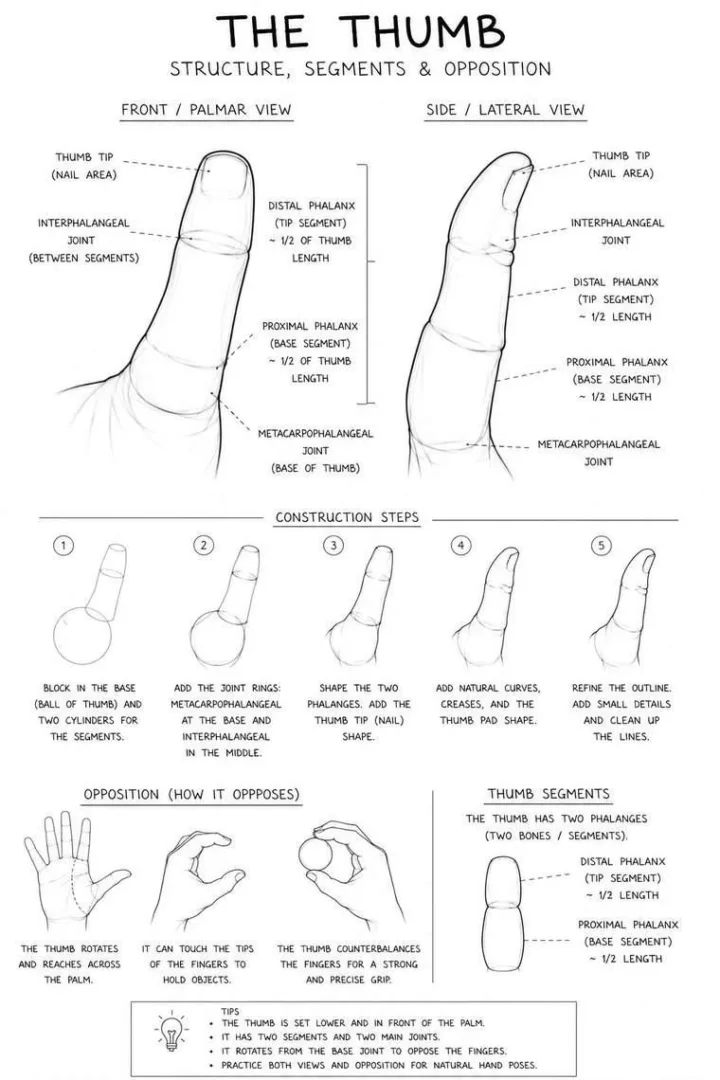
The Thumb — the thumb has only two segments and sits lower and in front of the palm — its opposition (how it rotates to meet the fingers) is what makes hands able to grip.
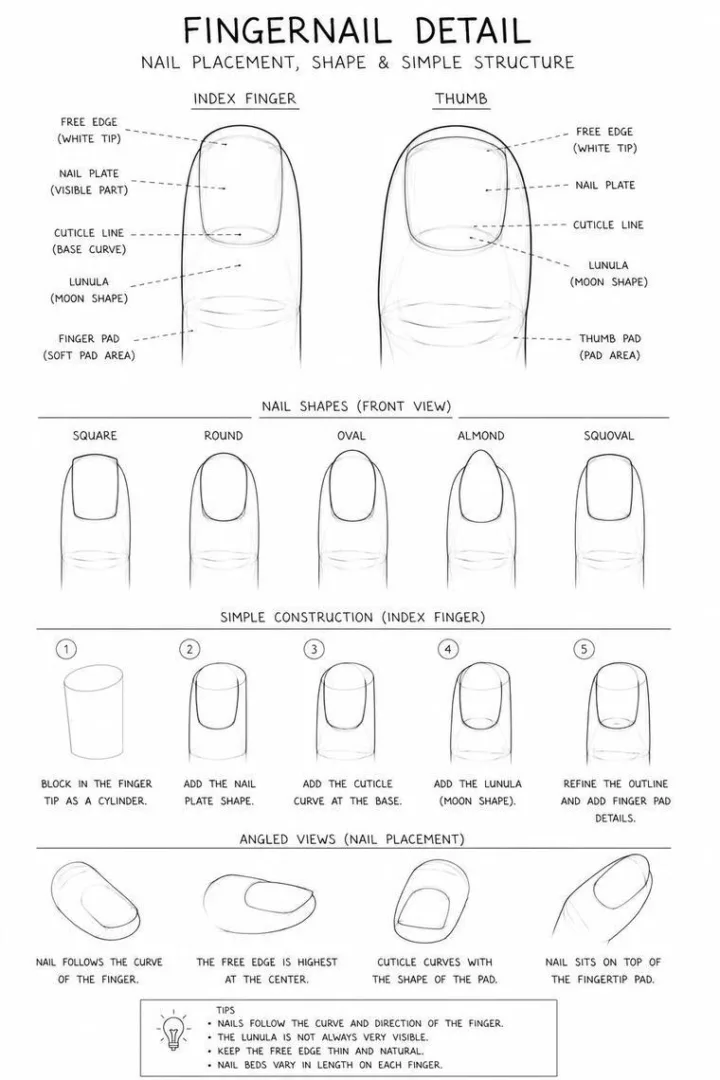
Fingernail Detail — how nails sit on top of the fingertip pad and follow the finger’s curve, plus five common nail shapes — a small detail that adds a lot of realism.
Lesson 5 — Step-by-step builds
Finally, three complete start-to-finish walkthroughs. Follow the numbered steps with a pencil and you’ll have a finished hand at the end.
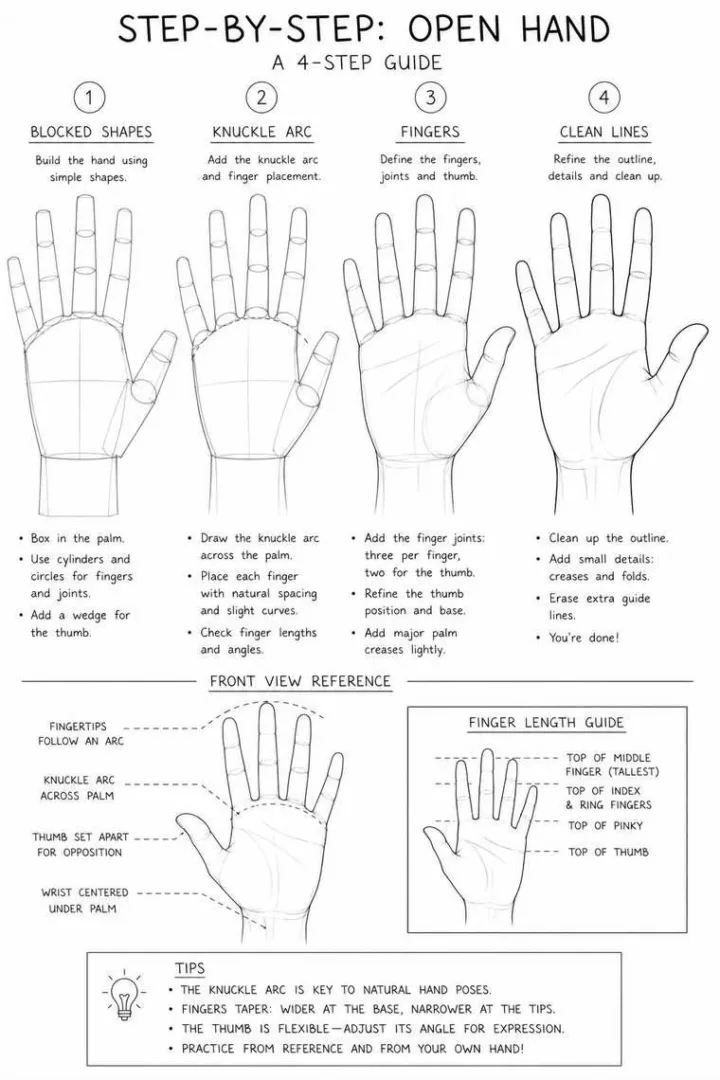
Step-by-Step: Open Hand — a four-step build of the open hand — blocked shapes, knuckle arc, fingers, then clean lines — with a finger-length guide.
Step-by-Step: Fist — the same four-step process for a fist, from box-and-wedge to finished, with front, side, and top reference views.
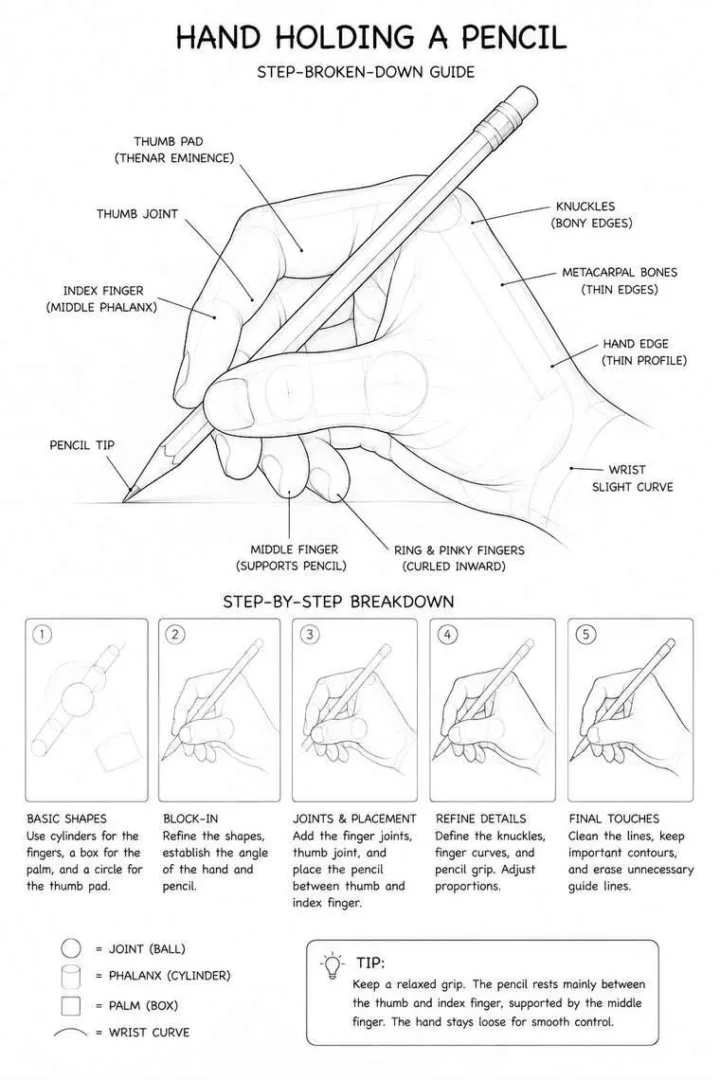
Hand Holding a Pencil — the single most-requested ‘hand doing something’ pose, broken down step by step — the grip rests between thumb and index, supported by the middle finger.
Prefer drawing ON your hand? (pen & tattoo-style ideas)
A quick note, because two very different searches share these words. If you came here wanting to draw ON your hand — pen doodles on your skin, henna-style patterns, or small hand-tattoo designs — that’s a different craft from drawing a hand. A few easy pen-on-hand ideas to start: tiny stars or a little moon on the wrist, a simple vine winding up a finger, a small heart or lightning bolt, initials, or a row of dots and lines like a friendship bracelet. Use a skin-safe pen, keep the lines light, and build up slowly. For designs you can also draw on paper first, the gesture and pose plates above double as great hand-tattoo references.
Bonus: fun things to make from a traced hand
The easiest hand drawing of all is the one you trace. Lay your hand flat, trace around it, and turn the outline into something: the classic hand turkey (thumb as the head, fingers as feathers) for autumn, a hand-print reindeer or wreath for a hand-drawn Christmas card, or a little hand-print bouquet for a birthday card. They’re simple, kid-friendly, and a fun warm-up before you tackle the real thing.
Free printable hand drawing practice pack
Want all 23 reference plates as one clean printable? Download the free Hand Drawing Practice Pack (no sign-up) — print it, keep it in your sketchbook, and draw along from every angle →
Frequently asked questions
How do you draw hands step by step?
Start by blocking the palm as a simple box, then add the four fingers as cylinders sitting on a curved knuckle arc, each finger split into three segments. Set the thumb lower and to the side, check the proportions (palm height roughly equals middle-finger length), then refine the outline and add details last.
Why are hands so hard to draw?
Hands are hard because they change shape completely from every angle and have complex proportions, not because of detail. Once you learn to block the palm as a simple shape and place the knuckle arc correctly, the difficulty drops sharply — which is why practising the same hand from several angles helps so much.
What is the easiest way to draw a hand for beginners?
The easiest way is the block-and-fan method: draw the palm as a rounded box, fan the fingers off the knuckle arc as simple cylinders, and add the thumb to the side. Beginners can also trace their own hand to understand the proportions before drawing freehand.
What angle is best to learn hands from first?
Start with the palm facing front and the three-quarter view. The front view teaches proportions and the knuckle arc clearly, while the three-quarter view is the most common and useful angle in real drawings because it shows form and depth at once.
How do you draw a hand holding something?
Begin from the pinching or relaxed-hand base, then wrap the fingers around the object’s shape. For a pencil, the grip rests between the thumb and index finger and is supported by the middle finger, with the ring and pinky curled softly inward — keep the grip relaxed.
Can I get these hand references as a printable?
Yes. All 23 labelled hand-drawing plates come as one free printable PDF pack with no sign-up. Download it, print it, and keep it beside your sketchbook to practise from every angle.
Keep drawing
Once hands feel manageable, keep building your skills with our easy things to draw, drawing ideas for beginners, and anime drawing ideas. Block the shapes, trust the knuckle arc, and draw the same hand from a new angle every day.