Salt Dough Ornaments: Easy 3-Ingredient Recipe + 25 Ideas (2026)
Salt dough ornaments are the easiest homemade Christmas ornaments there are. You need flour, salt and water, an oven (or a few days of patience) and some paint. They cost almost nothing, kids can make them start to finish, and a well-sealed handprint ornament can hang on your tree for decades.
This guide gives you the exact salt dough recipe for ornaments, how long to bake salt dough ornaments by thickness, how to seal them so they do not go soft or moldy, the no-bake method, a fix for every common problem and 25 salt dough ornament ideas. Use the free calculator to scale the recipe for any number of ornaments.

How do you make salt dough ornaments? Mix 2 cups all-purpose flour with 1 cup fine salt, then stir in about 3/4 cup warm water and knead for 5 to 10 minutes. Roll the dough 1/4 inch thick, cut shapes, poke a hole for hanging and bake at 250°F (120°C) for 2 to 3 hours, flipping halfway. Let them cool, paint with acrylics and seal every side with Mod Podge or clear varnish.
Yield: about 20 three-inch ornaments | Bake: 250°F, 2-3 hours | Not edible
Salt dough recipe for ornaments
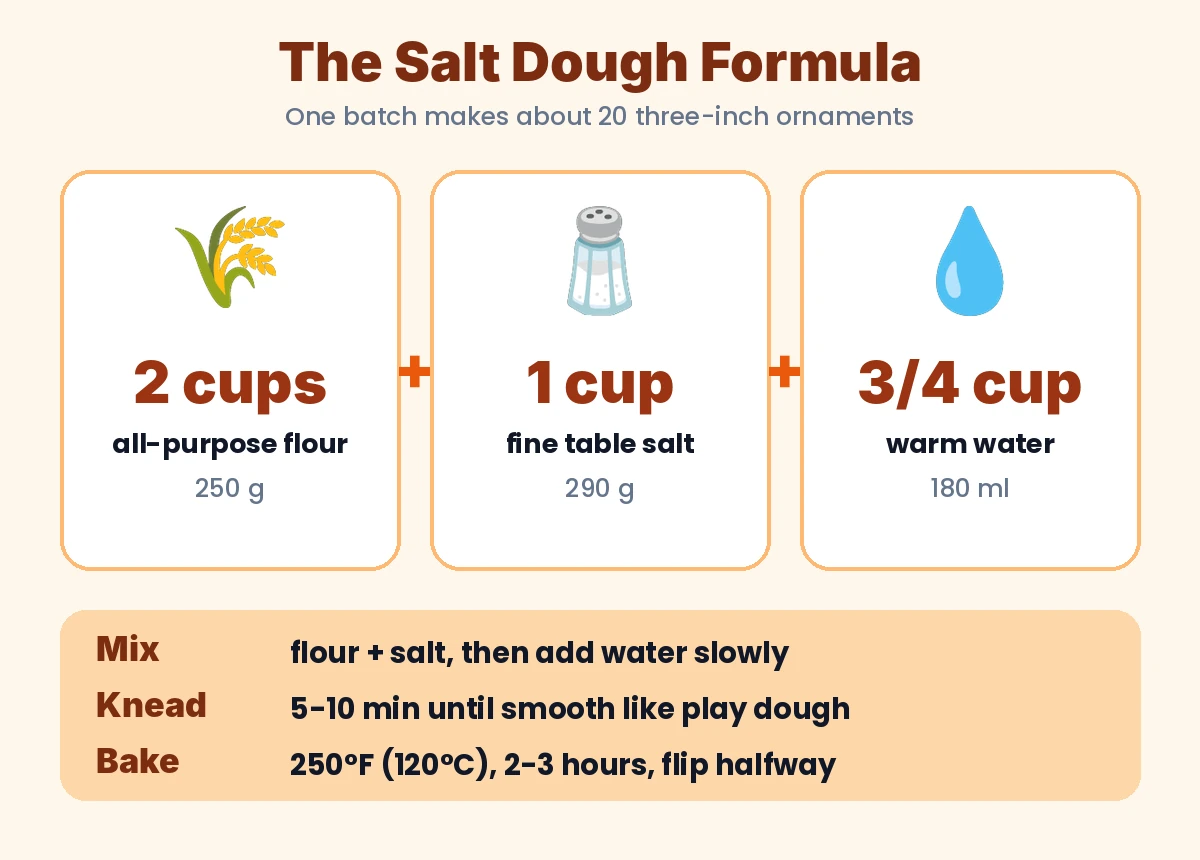
The classic ratio is 2 parts flour to 1 part salt, with just enough water to make a smooth dough. Use plain all-purpose flour (not self-rising, which puffs) and fine table salt (coarse salt leaves a gritty surface).
| Ingredient | Amount | Why it matters |
|---|---|---|
| All-purpose flour | 2 cups (250 g) | Structure. Self-rising flour makes ornaments puff. |
| Fine table salt | 1 cup (290 g) | Hardens the dough and keeps it from rotting. |
| Warm water | 3/4 cup (180 ml), up to 1 cup | Warm water dissolves the salt for a smoother finish. |
| Optional: ground cinnamon | Replace 1/4 cup flour | Brown color and holiday scent. |
| Optional: 1 tbsp oil or glycerin | Add with the water | Softer, more elastic dough that cracks less. |
How to make salt dough ornaments, step by step
Make salt dough ornaments with flour, salt and water, then bake, paint and seal them.
Total time: 200 minutes
Mix the dry ingredients
Whisk 2 cups all-purpose flour and 1 cup fine salt in a large bowl.
Add water slowly
Pour in 3/4 cup warm water a little at a time and stir until a shaggy dough forms. Add a tablespoon more if it is crumbly, or a little flour if it is sticky.
Knead until smooth
Knead on a floured counter for 5 to 10 minutes until the dough feels like play dough. Smooth dough means fewer cracks later.
Roll and cut
Roll the dough about 1/4 inch thick between two sheets of parchment. Cut shapes with cookie cutters or press in handprints, lace or leaves.
Make the hanging hole
Poke a hole near the top with a straw or skewer. Make it a bit bigger than you think, since it shrinks a little as it dries.
Bake low and slow
Bake on a parchment-lined tray at 250°F (120°C) for 2 to 3 hours, flipping halfway. They are done when they are hard and sound hollow when tapped.
Cool, paint and seal
Cool completely, paint with acrylic paint, then seal the front, back, edges and hole with Mod Podge, clear acrylic spray or varnish.
Salt dough ornament calculator
Making ornaments for a class, a party or every grandparent? Pick how many you want, the size and thickness, and the calculator scales the recipe and tells you the bake or air-dry time. Tap Print for a recipe card you can stick on the fridge.
🎁 Salt Dough Batch & Bake Calculator
Tell us how many ornaments you want. Get exact amounts, oven temperature and drying time.
How many ornaments?
Ornament size
Thickness
Drying method
How long to bake salt dough ornaments
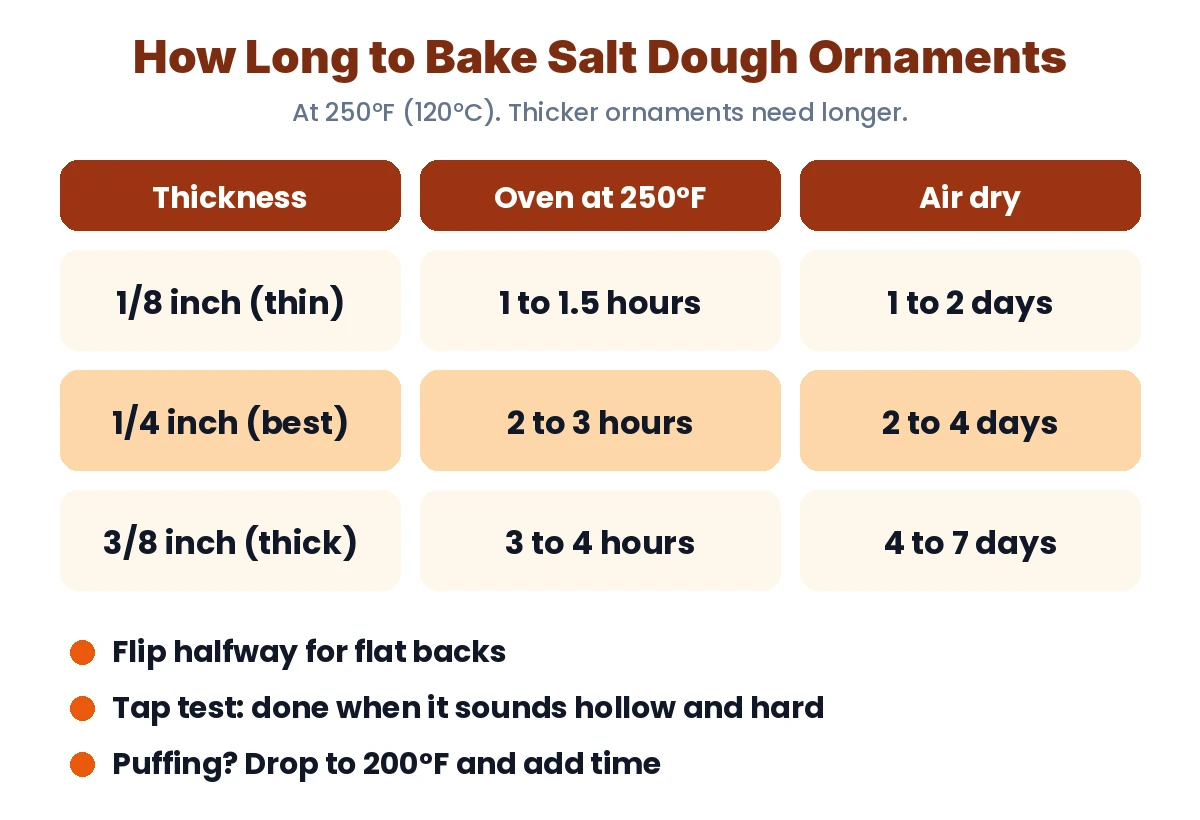
Bake time depends on thickness. At 250°F (120°C), 1/4-inch ornaments usually take 2 to 3 hours, thin 1/8-inch ornaments about 1 to 1.5 hours and thick 3/8-inch handprints 3 to 4 hours. Ovens vary, so check early and use the tap test: a finished ornament is hard all the way through and sounds hollow. If the back is still soft, flip it and keep baking.
- Too hot is the number one mistake. Above 300°F the dough puffs, bubbles and browns. Low and slow keeps ornaments flat and pale.
- Flip halfway so the bottom dries and the ornament stays flat.
- Let them cool in the oven with the door open to avoid cracking from a sudden temperature change.
No-bake salt dough ornaments (air dry or microwave)
No oven time? Air drying works. Lay ornaments on a wire rack in a warm, dry room and flip them twice a day. Thin ornaments dry in 1 to 2 days, standard ones in 2 to 4 days and thick handprints can take a week. Air-dried ornaments are a little more fragile, so seal them well.
The microwave is fast but tricky: heat one or two small ornaments at a time in 20 to 30 second bursts on a microwave-safe plate, letting them rest between bursts, until firm. Watch closely, because they puff and scorch easily. For a dough that air-dries harder, see our air-dry clay ideas.
How to paint and seal salt dough ornaments
Paint only when the ornaments are completely dry and cool, or the paint can crack. Acrylic craft paint works best. Paint pens are great for names, dates and fine details.
Sealing is what makes salt dough ornaments last. Salt pulls moisture from the air, so an unsealed ornament can go soft, sticky or moldy in a damp basement. Seal every side, the edges and the inside of the hole with one of these:
- Mod Podge (matte or gloss): easy to brush on and kid-friendly. Use 2 to 3 thin coats.
- Clear acrylic spray sealer: fast, even coverage. Spray outdoors.
- Water-based polyurethane or varnish: the toughest finish for heirloom handprint ornaments.
How long do salt dough ornaments last? Fully dried and sealed on all sides, and stored in a dry place, they can last for many years. Wrap them in tissue and store them in an airtight box with a silica gel packet, not in a damp garage or attic.
25 salt dough ornament ideas

Start with the easy ones, then try the crafty projects once you have a feel for the dough. Ideas marked kid-friendly are great for preschool through elementary age.
- Handprint keepsake (Easy, kid-friendly): Press a child’s hand into a 5-inch circle, add the name and year with letter stamps, then paint the background and leave the print natural.
- Baby footprint ornament (Easy, kid-friendly): Press a baby’s foot into a rolled oval while the dough is soft. Bake low and slow so the print stays crisp.
- Lace-texture snowflake (Easy, kid-friendly): Roll a doily or lace scrap into the dough, cut with a snowflake or round cutter and leave it unpainted for a white-on-white look.
- Cinnamon “gingerbread” men (Easy, kid-friendly): Swap 1/4 cup of the flour for ground cinnamon. They look like cookies and smell like the holidays (still not edible).
- Stamped name ornaments (Easy, kid-friendly): Use alphabet stamps to add names to stars or hearts. Great as gift tags and place cards.
- Pressed-leaf imprint (Easy, kid-friendly): Roll a fern or evergreen sprig into the surface, peel it off and dry-brush gold or white paint over the imprint.
- Minimalist white stars (Easy): Leave the dough unpainted, seal with matte varnish and hang with jute twine for a Scandinavian look.
- Candy cane twists (Medium, kid-friendly): Roll two thin ropes, paint one red after baking (or add red food coloring before), twist and bend into a hook.
- Mini wreaths (Medium, kid-friendly): Braid three thin ropes into a circle, bake, then paint green with tiny red berry dots.
- Gingerbread house ornament (Medium, kid-friendly): Cut a house shape, poke windows with a straw and pipe white paint “icing” on the roof. Pairs with our gingerbread ideas.
- Reindeer faces (Medium, kid-friendly): Cut circles, add a red pom-pom or painted nose and thin antlers made from dough ropes.
- Santa hat hearts (Medium, kid-friendly): Turn a heart upside down: the point becomes Santa’s beard. Paint the hat red and the beard white.
- Mitten pairs (Medium, kid-friendly): Cut two mittens, paint matching patterns and tie them together with a short ribbon.
- Dot-art mandalas (Medium): Paint a solid base color, then build circles of dots with the end of a paintbrush or a toothpick.
- Marbled ornaments (Medium): Swirl two acrylic colors on a plate with a little pouring medium and dip the front of each ornament.
- Gold-leaf edges (Medium): Brush adhesive size along the edges and apply gold leaf for an expensive look on a plain white ornament.
- Year-stamped family ornament (Easy, kid-friendly): Stamp “2026” and every family member’s initial into one large circle. Make a new one each year.
- Birth flower ornaments (Medium): Paint each family member’s birth flower, like narcissus or holly for December birthdays.
- Pressed-flower ornaments (Medium): Press small dried flowers into the soft dough, bake low and seal with matte Mod Podge.
- Snowman trio (Medium, kid-friendly): Stack three small balls, flatten slightly and bake. Paint scarves and button eyes after.
- Woodland animal shapes (Medium, kid-friendly): Foxes, bears and owls from cookie cutters, painted in warm browns and oranges.
- Pet paw print ornament (Medium): Press your pet’s paw into the dough, then keep the ornament high and sealed. Salt dough is dangerous if pets eat it (see safety below).
- Glitter-dipped stars (Easy, kid-friendly): Brush glue on the tips of baked stars and dip them in fine glitter.
- Stained-glass cutouts (Crafty): Cut a window in the center, bake, then fill the hole with clear glue tinted with food coloring for a stained-glass effect.
- Photo frame ornament (Crafty): Shape a small frame around a 2-inch square opening, bake, paint and glue a tiny printed photo to the back.
More holiday crafts: our Christmas crafts for kids, gingerbread house ideas, paper snowflakes and popsicle stick crafts. For birth flower ornaments, see our guide to the December birth flower, and for flower imprints, our pressed flower ideas.
Salt dough ornament problems and fixes
| Problem | Likely cause | Fix |
|---|---|---|
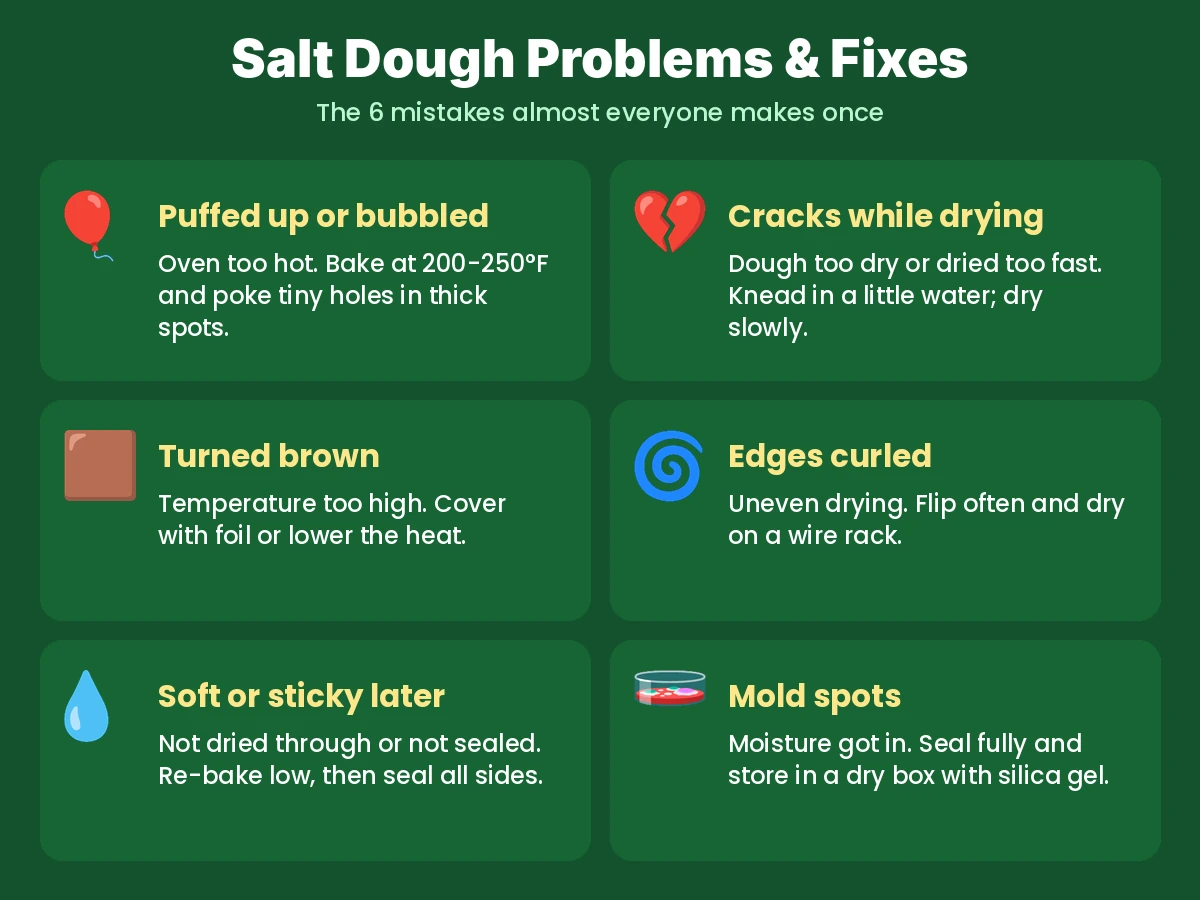
| Puffed or bubbled | Oven too hot or self-rising flour | Bake at 200 to 250°F; use all-purpose flour |
| Cracks | Dry dough or drying too fast | Knead in a little water or 1 tbsp oil; dry slowly |
| Brown edges | Too much heat | Lower the temperature or tent with foil |
| Curled edges | One side dried first | Flip often; dry on a wire rack |
| Soft later | Not fully dry or not sealed | Re-bake low, then seal every side |
| Gritty surface | Coarse salt | Use fine table salt and warm water |
Salt dough safety: kids and pets
Salt dough is not food, even when it looks like a cookie. Supervise toddlers, who may taste it. Be extra careful with dogs: the Pet Poison Helpline warns that as few as one or two salt dough ornaments can make a dog very sick from salt poisoning. Keep drying ornaments out of reach, hang them high on the tree and call your vet or the 24/7 helpline at (855) 764-7661 if your pet eats one.
Salt dough ornament trends for 2026 and 2027
- Natural and unpainted: white lace stars, fern imprints and jute twine fit the cozy Scandinavian look that keeps growing.
- Keepsakes with a date: families make one year-stamped handprint or family ornament every year and build a collection.
- Personalized gifts: stamped names for teachers, neighbors and gift tags. Some crafters turn them into a small holiday side hustle; see our crafts to make and sell.
- Mixed media: gold leaf, pressed flowers and stained-glass centers make salt dough look boutique-made.
More cozy winter ideas
Snowed in? Try our snow day ideas or our winter bucket list. Hosting the family? Pick from our Christmas games, print our Christmas coloring pages or paint the windows with our Christmas window painting ideas.
Want matching handmade cards? Paint a set with our watercolor Christmas card ideas.
Salt dough ornaments: FAQ
How do you make salt dough ornaments?
Mix 2 cups all-purpose flour and 1 cup fine salt, add about 3/4 cup warm water and knead for 5 to 10 minutes. Roll the dough 1/4 inch thick, cut shapes, poke a hole for hanging and bake at 250°F for 2 to 3 hours. Cool, paint and seal them.
How long do you bake salt dough ornaments?
Bake 1/4-inch salt dough ornaments at 250°F (120°C) for 2 to 3 hours, flipping halfway. Thin ornaments need about 1 to 1.5 hours and thick handprints 3 to 4 hours. They are done when hard all the way through.
What is the salt dough recipe for ornaments?
The classic salt dough recipe for ornaments is 2 cups all-purpose flour, 1 cup fine table salt and 3/4 to 1 cup warm water. It makes about 20 three-inch ornaments.
How do you seal salt dough ornaments?
Once fully dry and painted, seal salt dough ornaments on every side, including the edges and hanging hole, with 2 to 3 thin coats of Mod Podge, clear acrylic spray sealer or water-based varnish.
Can you make salt dough ornaments without baking?
Yes. Air dry them on a wire rack in a warm, dry room for 2 to 4 days, flipping twice a day, or microwave small ornaments in short 20 to 30 second bursts. Seal air-dried ornaments well.
How long do salt dough ornaments last?
Salt dough ornaments that are fully dried, sealed on all sides and stored in a dry, airtight box can last for many years. Unsealed ornaments can soften or mold in humid places.
Why did my salt dough ornaments puff up?
Salt dough ornaments puff when the oven is too hot or when self-rising flour is used. Bake at 200 to 250°F with plain all-purpose flour and prick thick areas with a toothpick.
Are salt dough ornaments safe for pets?
No. Salt dough contains a lot of salt and can cause salt poisoning in dogs, even from one or two ornaments. Keep them out of reach and call your vet or the Pet Poison Helpline if your pet eats one.