How to Make Paper Snowflakes (2026): Easy Folds + 20 Free Patterns
Paper snowflakes are the best kind of boredom cure: one sheet of printer paper, a pair of scissors and about five minutes, and you get something that looks far harder to make than it is. They are the classic snow day activity, a calm screen-free craft for kids, and a surprisingly relaxing hobby for adults once you discover how addictive the unfolding moment is.
This guide shows you exactly how to make paper snowflakes with the 6-point fold (the one that matches real snow), then gives you 20 tested paper snowflake patterns, each shown folded and unfolded so you know what to cut. You will also find a free Snowflake Maker that lets you design and print your own template, a 3D paper snowflake tutorial, the best paper to use, and quick fixes for the mistakes almost everyone makes on their first try.

How do you make a paper snowflake? Fold a square of paper into a triangle, fold it in half again, then fold it into thirds to make a narrow wedge with 12 layers. Trim the top, cut small shapes from both folded sides without cutting all the way across, and unfold. This fold gives six points, just like a real snowflake.
Time: 5 to 10 minutes | Cost: almost free | Ages: 5+ with help | Best paper: printer paper or coffee filters
What you need to make paper snowflakes
- Paper: plain printer paper (20 lb) is perfect. Coffee filters, origami paper and tissue paper also work (see the paper guide below).
- Small, sharp scissors: short blades give you more control in tight corners. Kids do best with sharp-tip safety scissors.
- A pencil (optional): sketch your cuts on the folded wedge first, just like the gray areas in our templates.
- Tape, string or a glue stick: to hang your snowflakes on a window, a garland or the tree.
- Craft knife and cutting mat (adults only): for tiny windows in the middle of the paper that scissors cannot reach.
How to make a paper snowflake step by step (the 6-point fold)
Almost every paper snowflake that “looks wrong” was folded wrong, not cut wrong. This is the fold used by most craft teachers because it gives a true six-pointed snowflake from a single square.
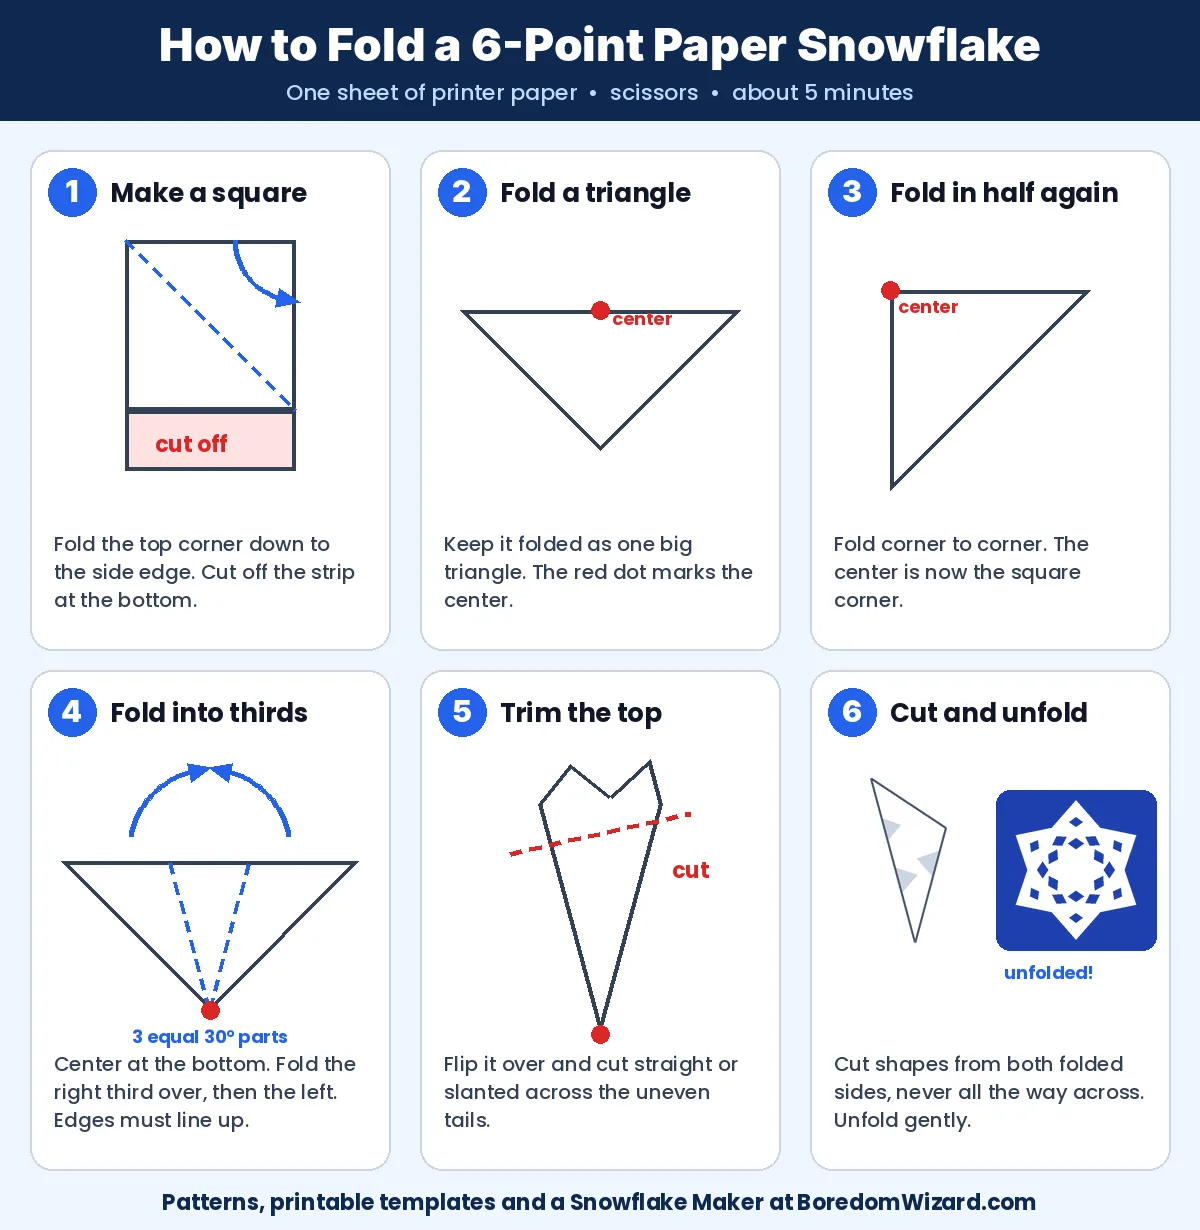
Make a six-pointed paper snowflake from one sheet of printer paper using the triangle, half and thirds fold.
Total time: 10 minutes
Make a square
Fold the top corner of a sheet of letter paper down to the opposite side so the top edge lines up with the side edge. Cut off the leftover strip at the bottom and keep the paper folded.
Fold a triangle
You now have one large triangle. The middle of its long folded edge is the center of your snowflake.
Fold in half again
Fold the triangle in half, corner to corner. The square corner of this smaller triangle is the snowflake center.
Fold into thirds
Turn the triangle so the center points down. Fold the right side over by one third, then fold the left side over on top. Adjust until both outer edges line up exactly, then crease firmly.
Trim the top
Flip the wedge over and cut straight or at a slant across the top to remove the uneven tails. A slanted cut makes pointed tips, a straight cut makes a flat-edged snowflake.
Cut your design
Cut small triangles, curves and slits from both long folded sides. Never cut all the way from one folded side to the other, or your snowflake will fall apart.
Unfold gently
Open the layers slowly, starting from the outside. Press it flat under a heavy book for a few minutes for a crisp finish.
The “thirds” trick that fixes most snowflakes: the square corner at the center is 90 degrees, so each third must be exactly 30 degrees. Fold the right third first, then lay the left third over it. If the left edge sticks out past the fold or falls short of it, unfold and nudge until the edges match. Equal thirds give six equal arms; uneven thirds give a lopsided, lumpy snowflake.
Why paper snowflakes should have 6 points
Real snowflakes always grow with six arms. Water molecules lock together in a hexagonal pattern when they freeze, so every ice crystal starts as a tiny six-sided plate and grows outward from its six corners. That is why the 6-point fold looks “right” and the easier 4-point fold looks more like a doily or a lace mat.
People have studied snowflake shapes for a long time. Wilson Bentley, a farmer from Vermont, took the first known photograph of a single snowflake in 1885 and went on to photograph more than 5,000 of them. Today Caltech physicist Kenneth Libbrecht grows snow crystals in the lab and explains on his site SnowCrystals.com that the temperature and humidity in the cloud decide whether a crystal becomes a simple plate, a needle or a branching star. When you cut long, branching teeth into your paper (like pattern #8 below), you are copying those star-shaped crystals.
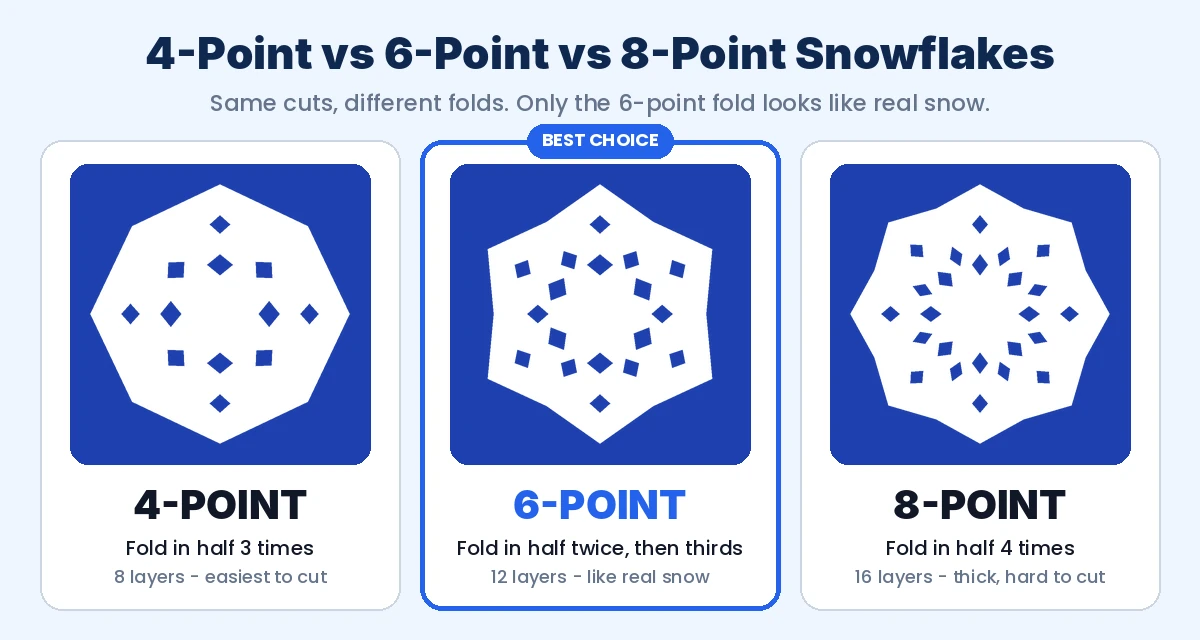
| Fold | How to fold | Layers | Result |
|---|---|---|---|
| 4-point | Fold a square in half 3 times | 8 | Easiest to cut, looks like a doily |
| 6-point | Fold in half twice, then into thirds | 12 | Looks like real snow (best choice) |
| 8-point | Fold a square in half 4 times | 16 | Thick and hard to cut, very lacy |
Free paper snowflake maker: design, preview and print your own
Want to see what a cut will do before you pick up the scissors? Use our free Snowflake Maker. Choose any of the 20 patterns below or tap Start blank, drop points on the folded wedge and press Cut. The finished snowflake unfolds instantly on the right. When you like it, press Print template to get a full-size paper snowflake template you can trace, or download a PNG.
❄️ Paper Snowflake Maker
Pick one of the 20 patterns or design your own. Tap the folded paper to drop points, then press Cut. Your snowflake unfolds live.
1. Your folded paper
2. Unfolded snowflake
Using a Cricut or Silhouette? Press Cricut PNG to get a solid black snowflake on a clear background. In Cricut Design Space, choose Upload, pick the file, select the complex image type and it will turn into a cut file you can size to any window. It is a fun way to cut a whole set of matching snowflakes from glitter cardstock or vinyl.
20 paper snowflake patterns (easy to Christmas)
Every pattern below was built on the same 6-point fold, and each one was checked to make sure it opens as one piece. In each template, the white area is the paper you keep and the gray areas are the parts you cut away. The left long side is the first fold and the right long side is the second fold; the point at the bottom is the center of the snowflake.
Easy paper snowflake patterns for kids and beginners
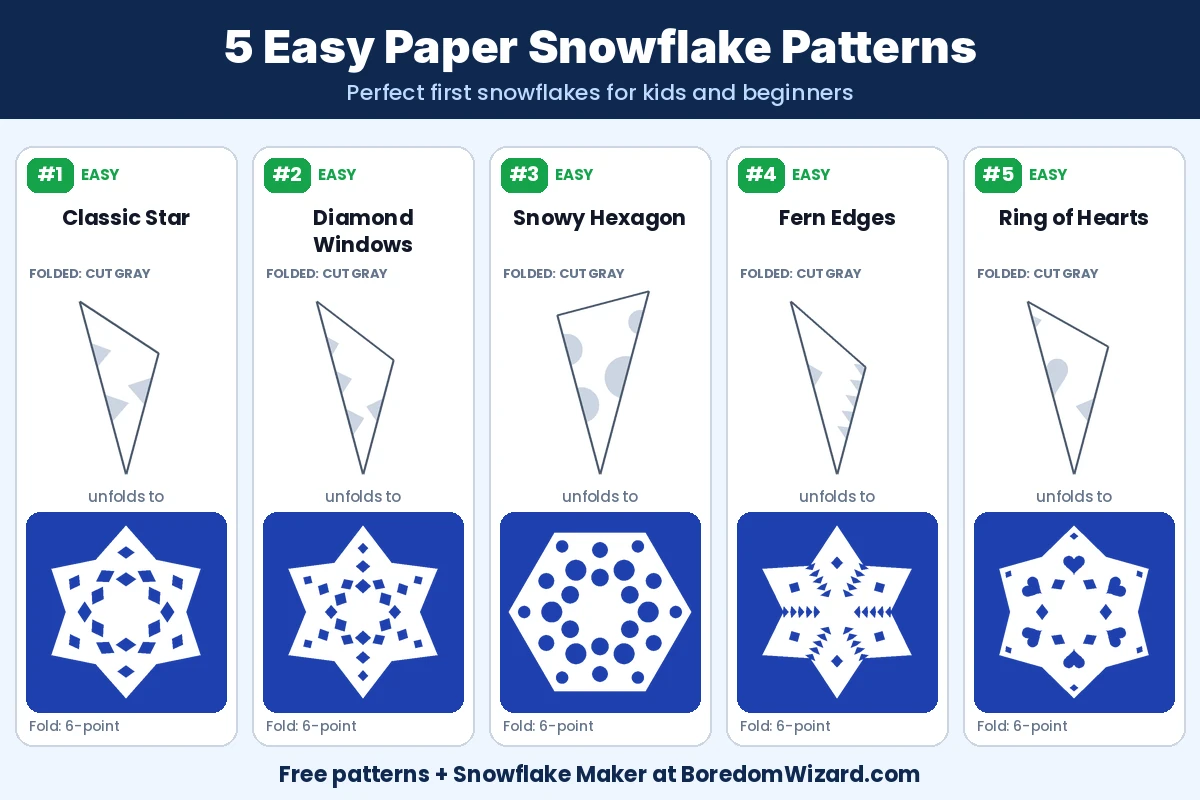
- Classic Star: Cut a slanted top, then snip two triangles from the left fold and one from the right fold.
- Diamond Windows: Keep a pointed top. Cut three small triangles along the left fold, getting smaller toward the tip.
- Snowy Hexagon: Cut the top straight across, then round bites out of both folds with small curved snips.
- Fern Edges: Cut a pointed top, then a row of small zigzags all the way up the right fold.
- Ring of Hearts: Draw half a heart against the left fold and cut it out. Each arm gets a whole heart.
These are perfect for a classroom or a rainy afternoon with kids. Younger children can draw the gray shapes in pencil and let an adult help with the first cut.
Medium paper snowflake patterns
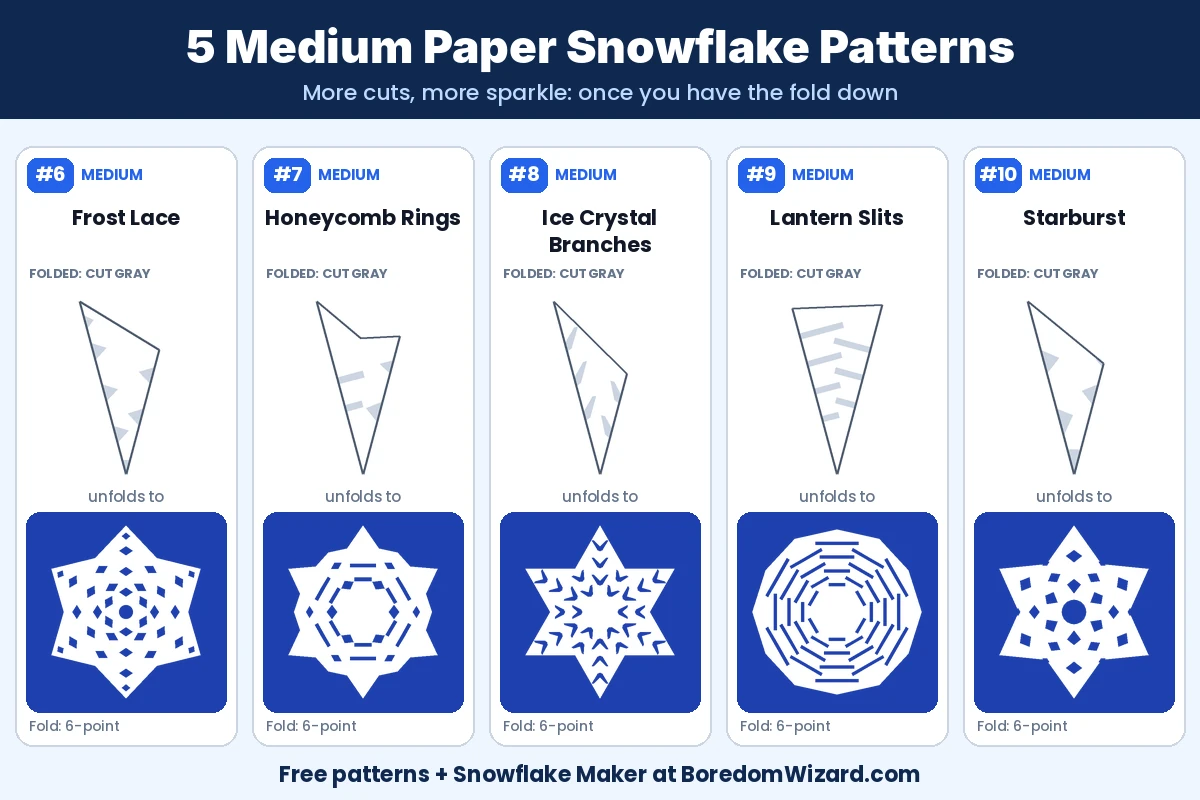
- Frost Lace: Alternate small triangles on both folds, then nip off the tip of the folded point.
- Honeycomb Rings: Cut a small dip into the top edge, then snip thin slits in from both folds. They open into rings of hexagons.
- Ice Crystal Branches: Cut long slanted teeth on both folds, angled toward the tip, like a real stellar crystal.
- Lantern Slits: Cut thin rectangles in from both folds, like the ribs of a lantern.
- Starburst: Snip the folded point off to open the center, then cut deep triangles near the middle.
Fancy and intricate paper snowflake patterns
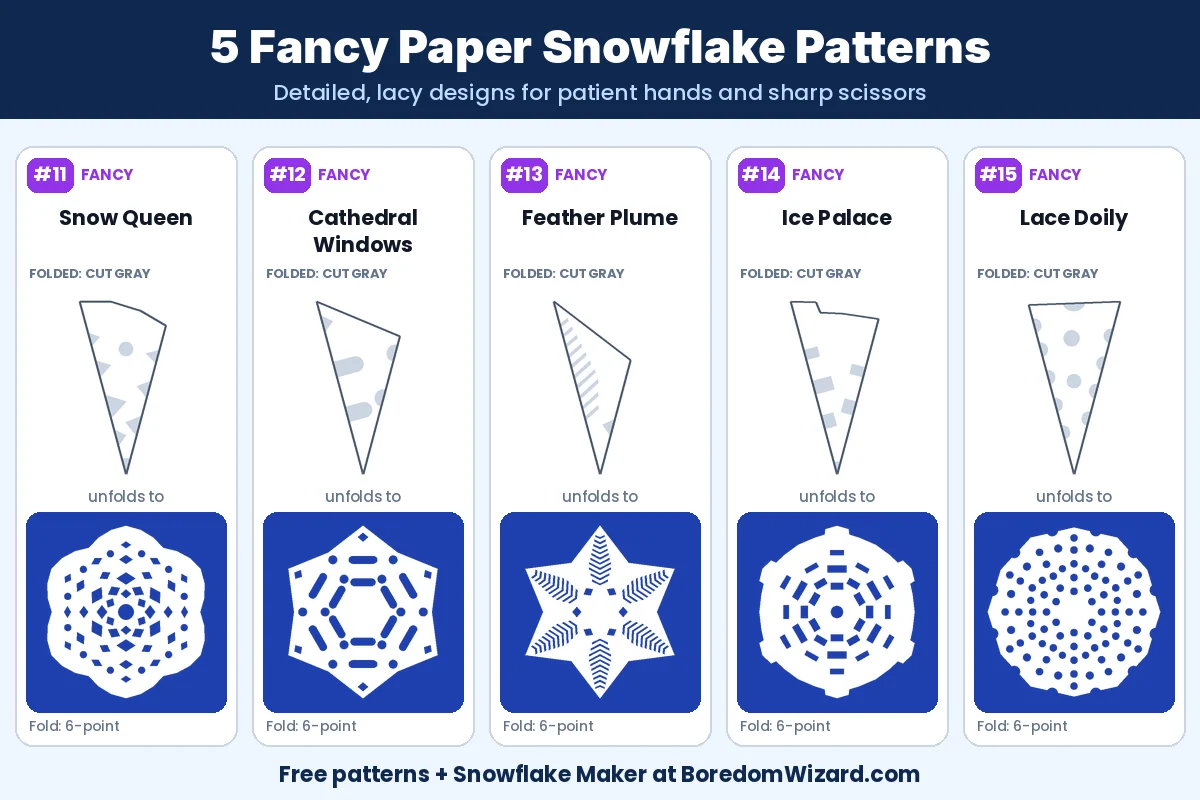
- Snow Queen: Layer three sizes of triangles on both folds, round the outer edge with a curved cut and open the center.
- Cathedral Windows: Cut tall arched windows from the left fold and small half-moons from the right fold.
- Feather Plume: Cut many thin slanted feathers along the left fold, tapering toward the tip.
- Ice Palace: Cut square towers into both folds and a castle-step pattern into the top edge.
- Lace Doily: Punch rows of small circles along both folds and scallop the outer edge.
For the finest lace, use thinner paper such as origami paper or tissue paper, and cut the smallest shapes first while the wedge is still stiff.
Christmas paper snowflake patterns (trees, stars, hearts and more)
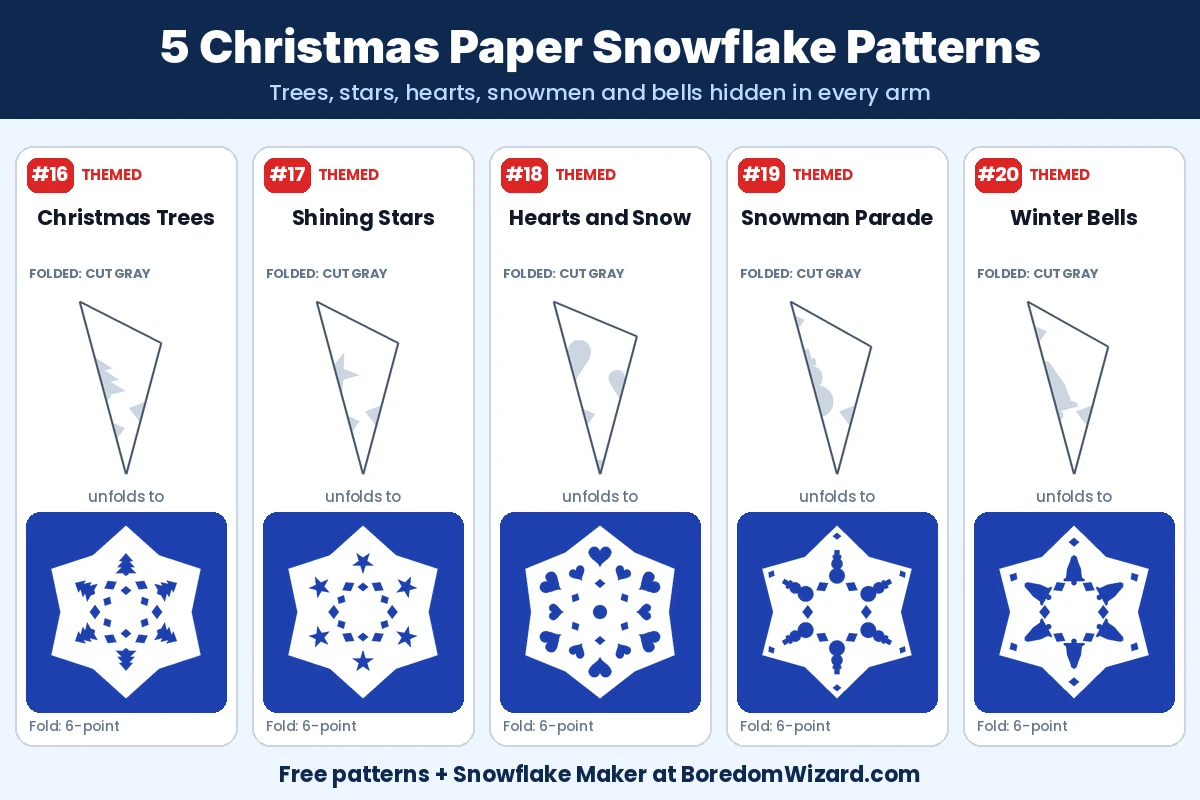
- Christmas Trees: Draw half a pine tree against the left fold. When you open it, a full tree appears on every arm.
- Shining Stars: Cut half a five-point star against the left fold for a star window on each arm.
- Hearts and Snow: Cut half hearts on both folds. Big hearts sit on the arms and small hearts fill the gaps.
- Snowman Parade: Cut half a snowman (two circles and a hat) against the left fold.
- Winter Bells: Cut half a bell shape against the left fold, plus a small notch for the clapper.
The secret to every themed pattern is the same: draw half of the shape with its middle line on the fold. When you unfold, the two halves meet and a whole tree, star or heart appears on every arm. Pair them with our Christmas crafts for kids or a batch of gingerbread houses for a full holiday craft day.
Want a pattern at full size? Pick it in the Snowflake Maker above and press Print template. It prints the folded wedge at actual size for a sheet of letter paper, with the cut areas shaded so you can trace them.
Best paper for paper snowflakes
| Paper | Best for | Good to know |
|---|---|---|
| Printer paper (20 lb) | Every pattern, beginners | Cheap, crisp folds, cuts through 12 layers easily |
| Coffee filters | Young kids | Already round and very thin; color with washable markers and mist with water for a tie-dye look |
| Origami paper | Fancy, lacy patterns | Thin and square already, so you skip step 1 |
| Tissue paper | Window displays | Super delicate; fold gently and cut with very sharp scissors |
| Wax or parchment paper | Frosty window effect | See-through, so light glows through the cuts |
| Construction paper or cardstock | 4-point snowflakes only | Too thick for 12 layers; use a Cricut for cardstock snowflakes |
Love paper crafts? Try our things to make with paper, fold a bouquet of origami flowers, or challenge the kids to a paper airplane contest.
How to make a 3D paper snowflake
A 3D paper snowflake looks spectacular hanging from a ceiling and uses only six squares of paper, scissors and tape or a stapler. Plan about 30 minutes for your first one.
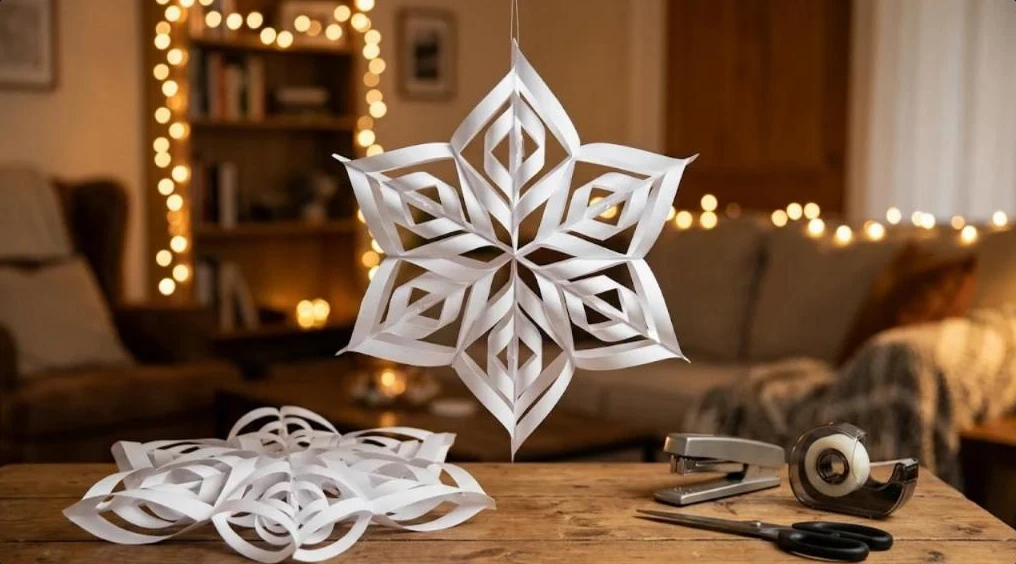
- Cut six squares. Six 6-inch or 8.5-inch squares of printer paper work well. All six must be the same size.
- Fold and cut. Fold one square diagonally into a triangle, then in half again. Hold it with the long side at the bottom and make three evenly spaced cuts from one short side toward the other, parallel to the long side. Stop each cut about 1/4 inch (6 mm) before the edge.
- Unfold and curl the center. Open the square flat and turn it like a diamond. Pull the two smallest center strips together so they overlap, roll them into a tube and tape them.
- Flip and repeat. Turn the square over and tape the next pair of strips together the other way. Keep flipping and taping until every pair is joined. That is one arm.
- Make all six arms. Repeat with the other five squares.
- Join them. Staple three arms together at their tips, then the other three. Staple the two groups together in the center, then staple each arm to its neighbor where their sides touch.
Make it in white for a winter look, or in silver and gold for the winter bucket list holiday party. 3D snowflakes are also a great easy craft for adults to make while you listen to a podcast.
Common paper snowflake mistakes (and how to fix them)
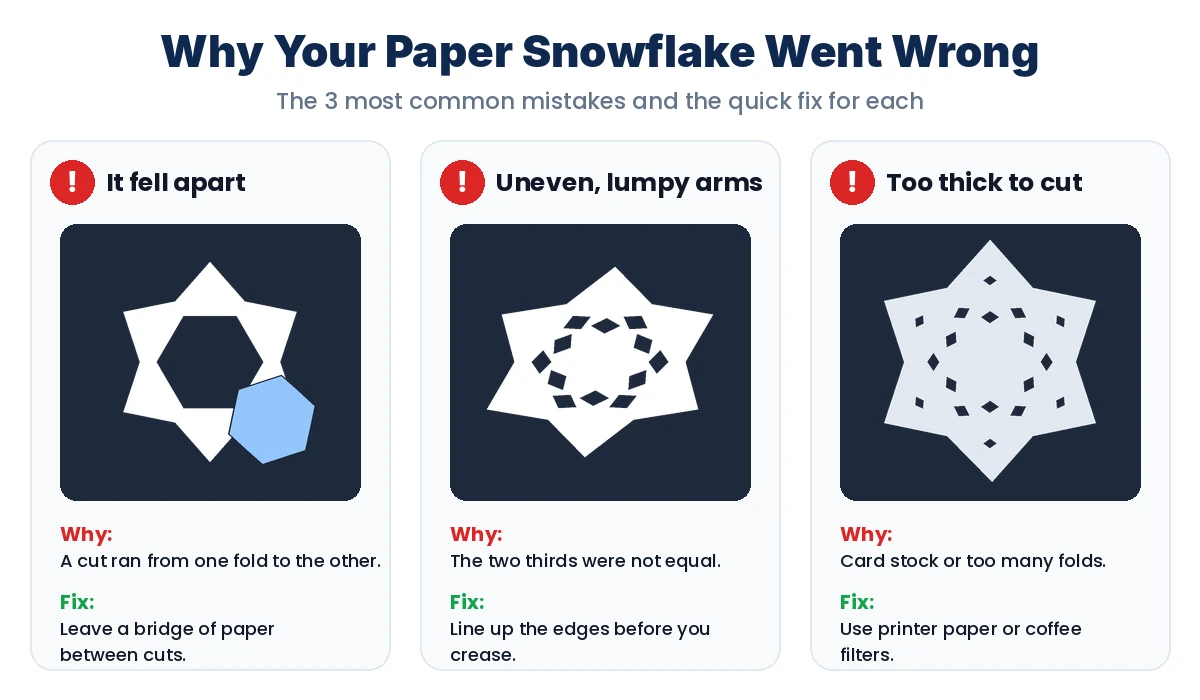
- It fell apart when I unfolded it. One of your cuts reached from one folded side to the other. Always leave a bridge of paper between cuts on the left fold and cuts on the right fold.
- The arms are uneven or lumpy. Your thirds were not equal in step 4. Line up the outer edges before you crease.
- It has 8 points instead of 6. You folded in half one more time instead of folding into thirds. Use the thirds fold for six points.
- The scissors will not cut through. Your paper is too thick. Switch to printer paper, coffee filters or origami paper, or make a 4-point snowflake with fewer layers.
- My cuts look tiny when I open it. That is normal: every cut is copied 12 times. Make shapes a little bigger and bolder than you think.
- It tore at the center. Unfold slowly from the outside in, and if you cut the tip off for an open center, keep the cut small.
Ways to use your paper snowflakes in 2026
- Window display: stick snowflakes to glass with a dab of washable glue stick or a loop of tape. It wipes off with warm water. Add our Christmas window painting ideas for a full winter scene, or browse more window art.
- Snowflake garland: tape a dozen snowflakes along a length of string or fishing line and hang it across a mantel, doorway or bed frame.
- Gift tags and cards: glue a small snowflake to the front of a folded card or a gift tag.
- Ceiling mobile: hang 3D snowflakes at different heights with clear thread for a falling-snow effect.
- A snowflake a day: cut one new pattern every day in December and fill a window by Christmas. It is a calm daily ritual for the whole family.
- Cutting machine sets: turn your favorite design into a cut file and make matching snowflakes from glitter cardstock or vinyl. You can even sell handmade crafts like these at winter markets.
Looking for more ways to beat winter boredom? See our fun things to do when bored in winter, print some Christmas coloring pages, or turn sticky notes into sticky note origami. Popsicle sticks make great snowflakes too: see our popsicle stick crafts.
Paper snowflakes FAQ
How do you make a paper snowflake step by step?
Make a square of paper, fold it into a triangle, fold it in half again, then fold it into thirds so you have a narrow wedge. Trim the uneven top, cut small shapes from both folded sides without cutting all the way across, and unfold gently.
How do you fold paper to make a snowflake with 6 points?
Fold a square diagonally into a triangle, then fold that triangle in half. With the center corner pointing down, fold the right third over and the left third over on top so the outer edges line up. This divides the paper into 12 equal layers, which unfold into six points.
What is the best paper for paper snowflakes?
Plain printer paper is the best all-round choice because it holds a crease and cuts through 12 layers easily. Coffee filters are best for young kids, and origami or tissue paper is best for very lacy designs.
Why did my paper snowflake fall apart?
A cut went all the way from one folded side of the wedge to the other, which separates the paper into pieces. Leave a strip of uncut paper between the cuts on each folded side.
Do real snowflakes have 6 points?
Yes. Water molecules join in a hexagonal pattern when they freeze, so snow crystals grow with six sides or six arms. That is why a 6-point paper snowflake looks more realistic than a 4-point or 8-point one.
How do you make a 3D paper snowflake?
Cut six equal squares. Fold each into a small triangle, make three parallel cuts that stop short of the edge, unfold, then tape the strips together into curled tubes, flipping the paper each time. Staple the six arms together at the center and where they touch.
Where can I get free paper snowflake templates?
Use the free Snowflake Maker on this page. Pick one of the 20 patterns or design your own, then press Print template to print it at full size for a sheet of letter paper.
How do you hang paper snowflakes on a window?
Use a small dab of washable glue stick or a loop of clear tape on the back. Both peel or wipe off easily. For hanging snowflakes, use clear fishing line or thin string taped to the top point.