Tie Dye Patterns: 30 Step-by-Step Designs from Easy to Advanced (2026)
The tie dye pattern is decided before the dye ever touches the fabric. The spiral, the bullseye, the sunburst, the geode — every pattern is created by how you fold, twist and bind the shirt, not by how you apply the colour. Learn the fold and you control the pattern. Skip the fold and you get a random blob.
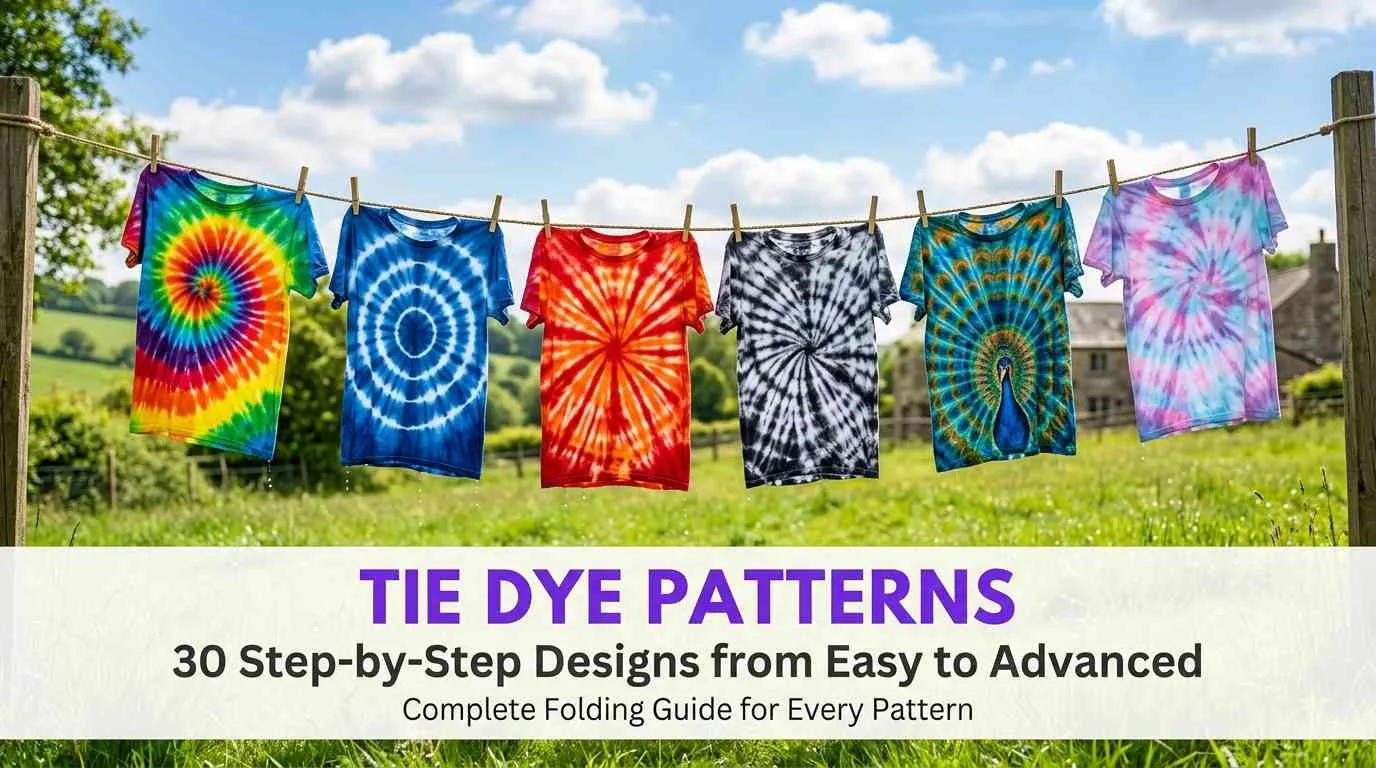
This guide has 30 tie dye patterns with the exact folding method for each one — step by step, with diagrams, ranked from the easiest five-minute folds to advanced symmetrical designs. Every pattern tells you how to fold it, how to dye it, and what the finished result looks like when you unfold it. If you have a white t-shirt, rubber bands, and a tie dye kit, you can start with pattern 1 right now.
The 5 most popular tie dye patterns in 2026 are: the spiral (the classic swirl, easiest to learn), the crumple (random texture with zero folding skill needed), the bullseye (concentric circles from a centre pinch), the sunburst (multiple small bullseyes scattered across the shirt), and ice dye (ice cubes melted over powder dye for a watercolour effect). All five are beginner-friendly and produce impressive results on the first attempt.
What you need to tie dye
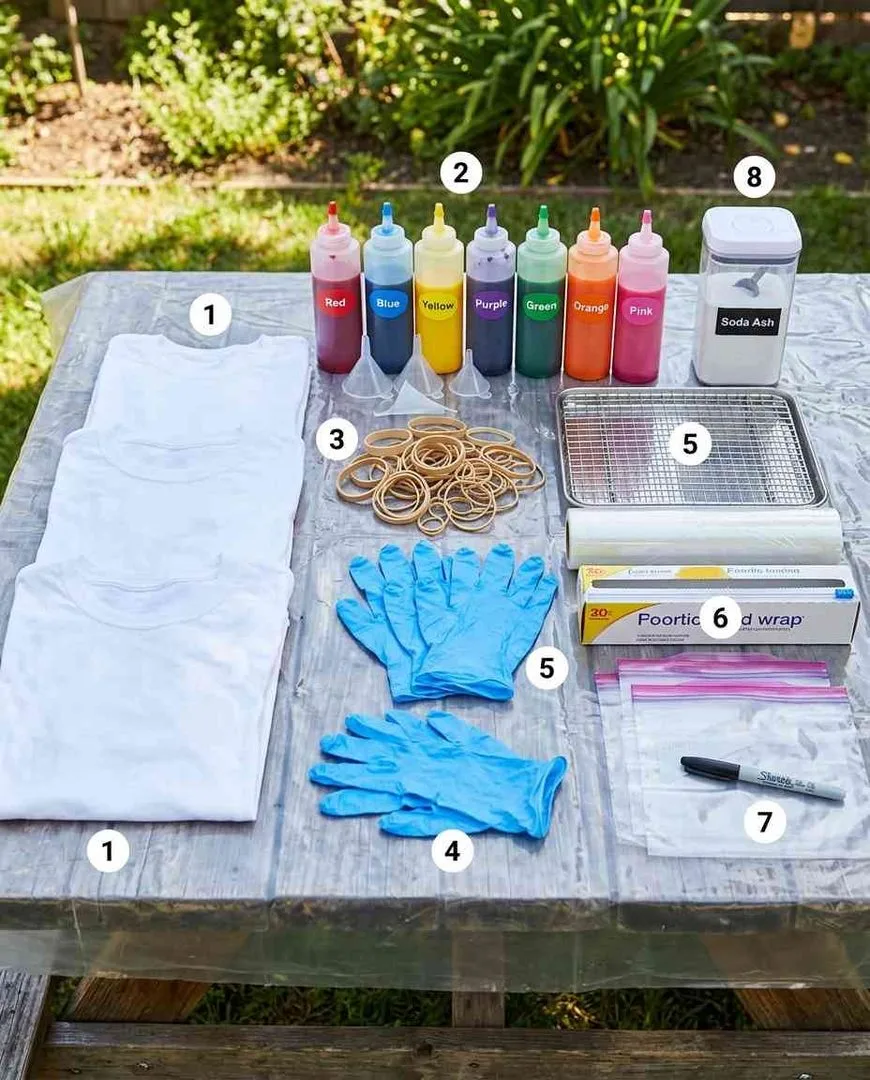
- White cotton garments. 100% cotton absorbs dye best. Pre-wash to remove sizing. Soak in a soda ash solution (1 cup soda ash per gallon of warm water) for 20 minutes before folding — soda ash is the fixative that makes colours permanent and vibrant.
- Tie dye kit or individual dyes. Procion MX fibre reactive dyes are the professional standard. Pre-mixed squeeze bottle kits (Tulip, Jacquard) work perfectly for beginners. Mix powder dye with warm water in squeeze bottles.
- Rubber bands. Thick rubber bands hold folds in place during dyeing. The placement of rubber bands determines where white lines appear in the finished pattern. More bands = more defined pattern sections.
- Plastic gloves. Dye stains skin for days. Wear gloves for the entire process. Cheap disposable gloves from a pharmacy work fine.
- Plastic wrap and zip-lock bags. Wrap the dyed shirt in plastic to keep it moist during the 6–24 hour setting period. The dye needs moisture and time to bond with the cotton fibres.
- Wire rack and tray. Set the folded shirt on a wire rack over a tray so excess dye drains rather than pooling. Pooled dye creates muddy colours where you wanted clean separation.
- Soda ash (sodium carbonate). The chemical fixative that makes fibre reactive dye permanent. Without soda ash, colours wash out to pale ghosts of themselves. This is the single most important supply that beginners skip.
✨ THE RULE THAT PREVENTS MUDDY COLOURS: Apply colours that are next to each other on the colour wheel next to each other on the shirt. Red next to orange is fine. Red next to green creates brown mud. The safe neighbours: red-orange-yellow, blue-purple-red, green-blue-teal. Keep complementary colours (red-green, blue-orange, yellow-purple) on opposite sides of the fold.
Easy tie dye patterns for beginners
These patterns use simple folds that take under 5 minutes. If you have never tie dyed before, start with the spiral — it is the most forgiving pattern and produces the most recognisable result.
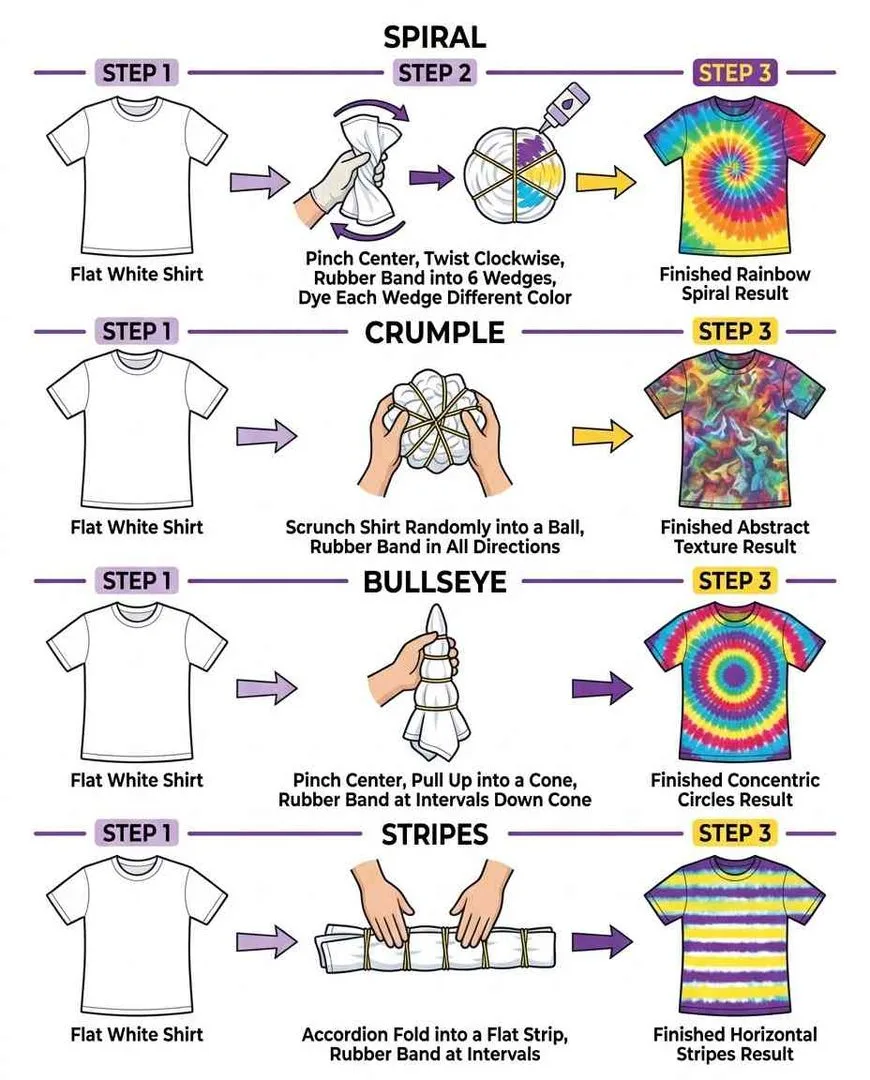
1. Classic spiral
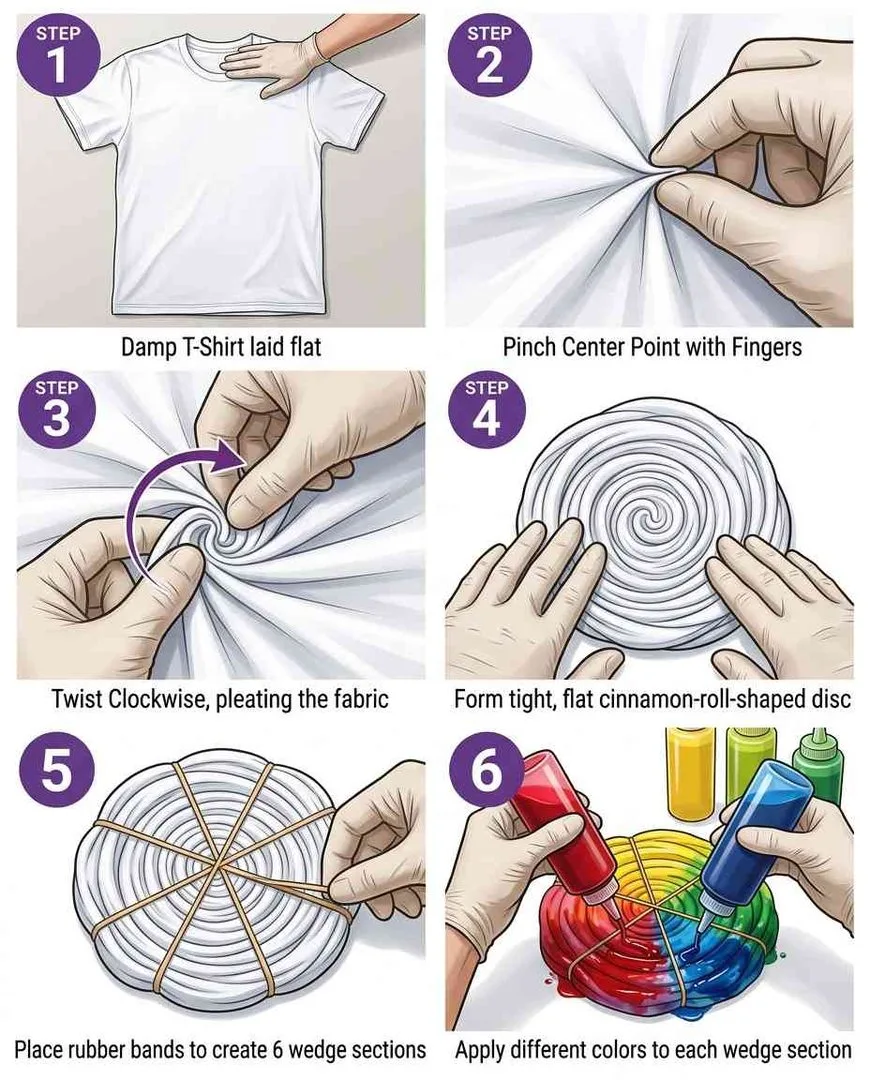
📌 HOW TO FOLD: Lay the shirt flat. Pinch the centre of the shirt and twist clockwise, pulling the fabric with you as you turn. Keep twisting until the entire shirt is wound into a flat disc shape (like a cinnamon roll). The disc should be tight and flat, not a loose ball. Secure with 3–4 rubber bands crossing through the centre, dividing the disc into 6–8 wedge sections.
How to dye: Apply a different colour to each wedge section, squeezing the dye deep into the folds. Keep complementary colours (red/green, blue/orange) on opposite sides of the disc so they do not bleed into each other and create brown.
The result: A classic spiral radiating outward from the centre in alternating colour sections. The tighter the twist, the more defined the spiral arms. This is the most iconic tie dye pattern and the best first project because even an imperfect spiral still looks intentional.
2. Crumple (scrunch)
📌 HOW TO FOLD: No folding required. Scrunch the entire shirt into a random, compact ball. Squeeze it tight and secure with rubber bands in multiple directions to hold the crumpled shape. The more random the crumple, the more organic the texture.
How to dye: Apply multiple colours across the top and sides of the scrunched ball, letting the dye seep into the creases. Leave some white space — the undyed creases become the lightning-bolt veins of white that define the crumple pattern.
The result: A random, organic texture of colour with white veins running through it. No two crumple dyes are ever the same. The lowest-effort, highest-reward pattern for complete beginners because there is no wrong way to scrunch a shirt.
3. Bullseye (target)
📌 HOW TO FOLD: Lay the shirt flat. Pinch the exact centre of the shirt and pull it up into a tall cone shape, with the fabric hanging down like a teepee. Run rubber bands horizontally around the cone at 2–3 inch intervals from the tip down to the base, creating horizontal sections.
How to dye: Apply a different colour to each horizontal section. The tip (centre of the shirt) gets one colour, the next band section gets another, and so on outward. For a classic red-white-blue bullseye: dye the tip red, skip a section (leave white), dye the next section blue.
The result: Concentric circles radiating outward from the centre point. The bands create clean colour separations. More rubber bands = more rings. Fewer bands = wider colour bands.
4. Horizontal stripes
📌 HOW TO FOLD: Lay the shirt flat. Starting from the bottom hem, accordion-fold (fan-fold) the shirt in horizontal pleats, each pleat about 2 inches wide, all the way to the neckline. The result is a long, flat, folded strip. Secure with rubber bands at regular intervals along the strip.
How to dye: Apply a different colour between each pair of rubber bands. The rubber bands become the white stripe lines separating each colour block.
The result: Clean horizontal stripes running across the shirt from side to side. The regularity of your accordion folds determines how even the stripes are. Uneven folds create wonky stripes, which some people prefer as a handmade aesthetic.
5. Sunburst (multiple bullseyes)
📌 HOW TO FOLD: Lay the shirt flat. Pinch small sections of fabric at 4–6 random points across the shirt. Pull each pinch up into a small cone and rubber-band each one individually near the base. The rest of the shirt stays flat between the pinched sections.
How to dye: Dye each small cone a colour (all the same colour or each one different). Apply a contrasting background colour to all the flat fabric between the cones.
The result: Multiple small bullseye circles (sunbursts) scattered across the shirt on a solid-colour background. The random placement creates a polka-dot-meets-bullseye effect that looks more complex than it is.
6. Heart
📌 HOW TO FOLD: Fold the shirt in half vertically down the centre (left side on top of right side). Starting from the fold edge, draw half a heart shape with a washable marker. Accordion-fold the fabric along the marker line so the fold follows the heart shape. Rubber-band tightly along the folded line.
How to dye: Dye one side of the fold (inside the heart) one colour and the other side (background) a different colour. For a red heart on a blue background: red inside the fold line, blue outside.
The result: A heart shape in the centre of the shirt. The symmetry comes from the centre fold. The heart’s sharpness depends on how precisely you folded along the marker line.
7. Diagonal stripes
📌 HOW TO FOLD: Same as horizontal stripes, but fold the shirt diagonally from one corner to the opposite corner instead of bottom to top. Accordion-fold along the diagonal, creating a long diagonal strip. Rubber-band at intervals.
How to dye: Apply colours between each rubber band section.
The result: Diagonal stripes running from one corner to the opposite corner. A simple twist on the horizontal stripe that looks more dynamic and modern.
8. V-shape (chevron)
📌 HOW TO FOLD: Fold the shirt in half vertically. Starting from the fold, accordion-fold diagonally upward from the bottom-left to the top-right, creating angled pleats. Rubber-band along the folded strip.
How to dye: Apply different colours between each rubber band.
The result: V-shaped or chevron stripes pointing upward from the hem to the neckline. The vertical fold creates bilateral symmetry, making the diagonals mirror into Vs.
9. Ombre dip dye
📌 HOW TO FOLD: No folding needed. Dip the bottom third of the shirt into a bucket of concentrated dye. Hold for 5 minutes. Dip the bottom half (going higher than the first dip) into a diluted version of the same dye. Hold for 5 minutes. The result is a gradient from dark at the bottom to light in the middle to white at the top.
How to dye: Use one colour only. The gradient comes from dye concentration and dip depth, not from multiple colours. Darker at the bottom (longer soak, more dye), lighter toward the middle (shorter soak, diluted dye), white at the top (no dye).
The result: A smooth colour gradient from intense colour at the hem fading to white at the neckline. The simplest pattern that looks the most sophisticated. Perfect for single-colour elegance.
10. Rubber band circles
📌 HOW TO FOLD: Lay the shirt flat. Grab small pinches of fabric at random points across the shirt and wrap a rubber band tightly around each pinch, close to the base. Each rubber band creates a small circle of undyed fabric.
How to dye: Submerge the entire shirt in a single colour dye bath, or apply dye over the surface with a squeeze bottle. The rubber-banded sections resist the dye.
The result: Small white circles scattered randomly across a solid-colour background. The tighter the rubber band, the more defined the white circle. Quick, graphic and beginner-proof.
Cool intermediate tie dye patterns
These patterns require more precise folding and deliberate colour placement. Allow 10–20 minutes for the fold and plan your colour scheme before applying any dye.
11. Geode
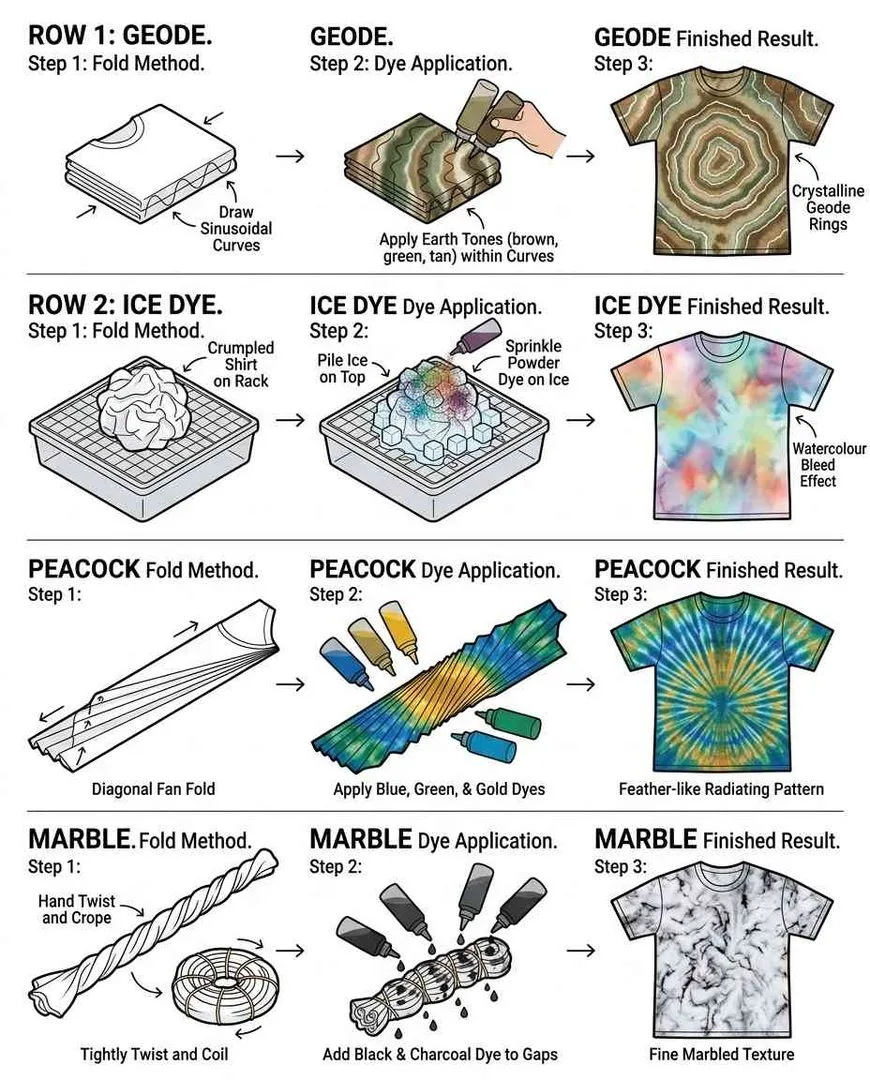
📌 HOW TO FOLD: Accordion-fold the shirt into a rectangle about 4 inches wide. Along one edge of the folded strip, draw a curved line with a washable marker (a wave, a semicircle, or a series of arcs). Fold along the marked line so the curve bunches together. Rubber-band along the curved fold line.
How to dye: Apply dark colours (black, navy, deep purple) to the fold line itself, and lighter colours (teal, gold, rust) to the areas on either side. The dark fold line becomes the geode’s crystal rings, and the lighter sections become the stone background.
The result: Concentric curved bands that look like a cross-section of a geode crystal. The pattern has a natural, geological quality that is unlike any other tie dye design. One of the trendiest patterns of 2024–2026.
12. Ice dye
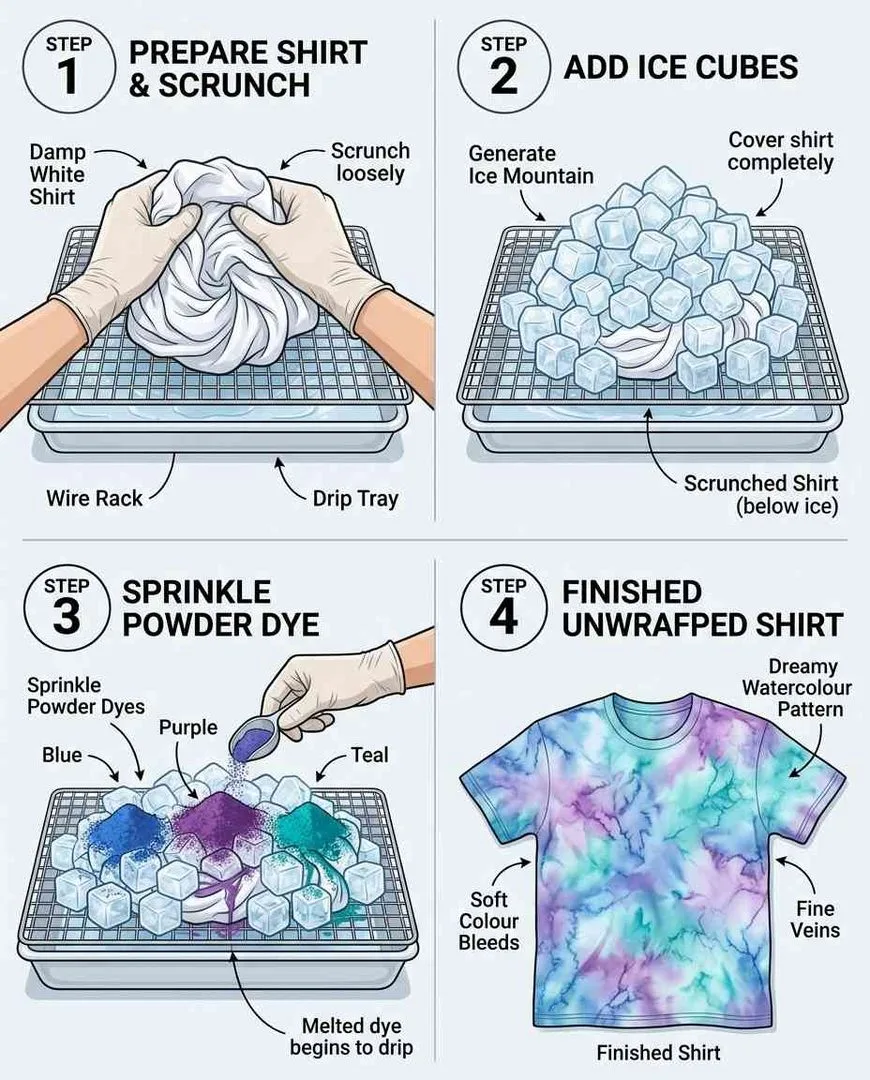
📌 HOW TO FOLD: Scrunch the shirt and place it on a wire rack over a tray. Pile ice cubes on top of the shirt until it is completely covered. Sprinkle powdered dye (not pre-mixed liquid — dry powder) directly onto the ice. Multiple colours can be sprinkled in sections. Walk away and let the ice melt slowly over 4–8 hours.
How to dye: The slow melt creates organic, watercolour-like bleeds as the dye dissolves and seeps through the fabric. Do not touch it while the ice is melting. The randomness is the art.
The result: A dreamy, watercolour effect with soft colour transitions, fine veins of concentrated colour, and an organic quality that looks hand-painted rather than dyed. Ice dye produces results impossible to achieve with any other method. Every piece is unique.
13. Peacock fan fold
📌 HOW TO FOLD: Lay the shirt flat. Starting from one bottom corner, fan-fold (accordion fold) the entire shirt diagonally toward the opposite top corner, creating a long triangular strip. The point of the triangle is the centre of the peacock. Rubber-band at 2-inch intervals.
How to dye: Apply colours in the peacock palette: deep blue at the point (centre), emerald green in the middle sections, gold/yellow toward the outer sections, and touches of purple between the blue and green. Each rubber band section gets one colour.
The result: A radiating fan of colour that resembles a peacock feather display. The colours flow outward from a central point in iridescent bands. One of the most visually dramatic patterns and a crowd favourite at craft nights.
14. Shibori (Japanese resist dyeing)
📌 HOW TO FOLD: Shibori uses binding, folding, twisting or clamping instead of rubber bands. The simplest shibori technique: fold the shirt into a neat square, place two wooden blocks (or thick pieces of cardboard) on either side of the folded square, and clamp tightly with rubber bands or C-clamps. The clamped area resists the dye.
How to dye: Submerge the clamped shirt in a single-colour indigo dye bath for 10 minutes. Remove, unclamp, and rinse. The clamped sections stayed white; the exposed sections dyed.
The result: Geometric white shapes on an indigo background. Traditional shibori uses only indigo, and the graphic simplicity of dark blue and white is timeless. The most sophisticated tie dye technique, practised in Japan for over 1,000 years.
15. Galaxy
📌 HOW TO FOLD: Lay the shirt flat. Scrunch sections loosely and rubber-band in a random, loose crumple. The key difference from a standard crumple: the scrunch should be LOOSE, not tight, leaving air channels for the dye to penetrate unevenly.
How to dye: Apply black dye liberally over the entire surface. While the black is still wet, squeeze small amounts of bright blue, purple and magenta into the creases and gaps. Finally, flick tiny drops of white fabric paint or bleach gel across the surface for star effects.
The result: A deep-space galaxy effect with black background, nebula clouds of blue and purple, and white star speckles. The most dramatic single-colour-family pattern. Works best on darker garments or with a heavy black base.
16. Mandala
📌 HOW TO FOLD: Fold the shirt in half, then in half again to create a quarter. Fan-fold the quarter from the corner point outward in small accordion pleats, creating a tight triangular fan. Rubber-band at intervals along the fan.
How to dye: Apply 3–4 colours in radiating sections from the point (centre of the mandala) outward. Use related colours (blue-teal-green or red-orange-yellow) for harmony.
The result: A symmetrical circular mandala pattern radiating from the centre of the shirt. The four-fold symmetry creates a repeating design that looks like it was mathematically calculated. One of the most impressive patterns to unfold.
17. Marble texture
📌 HOW TO FOLD: Tightly twist the entire shirt into a rope. Then coil the rope into a flat spiral (like a rolled garden hose). Rubber-band the coiled shape tightly in multiple directions so it holds its compact form.
How to dye: Apply dye sparingly — the tight twist means most fabric is hidden inside, so dye reaches only the outer surfaces. Use 1–2 colours.
The result: A fine marbled texture with thin veins of colour running through white. The tight twist creates the fine, intricate pattern. Less is more with colour application — heavy dyeing turns the marble into a solid blob.
18. Tie dye socks
📌 HOW TO FOLD: Scrunch each sock into a tight ball and rubber-band. Or accordion-fold for striped socks. Or pinch-and-band the toe for a bullseye on the toe.
How to dye: Dye with squeeze bottles, applying different colours to each section of the balled sock. Or submerge in a single-colour bath for all-over colour.
The result: Matching (or deliberately mismatched) tie dyed socks. The small canvas means every fold shows up dramatically. A 10-minute project with a wearable result.
19. Tie dye bandana
📌 HOW TO FOLD: Fold the bandana in half diagonally to form a triangle. Accordion-fold the triangle from the point, creating a narrow strip. Rubber-band at intervals.
How to dye: Apply 2–3 colours between the rubber bands.
The result: A symmetrical pattern across the diagonal fold with clean colour sections. The smaller canvas (compared to a shirt) makes patterns bolder and more graphic. A bandana dyes in 5 minutes.
Advanced tie dye patterns
These take 20–45 minutes to fold and require precise rubber band placement. The results are the designs people photograph, frame and post online.
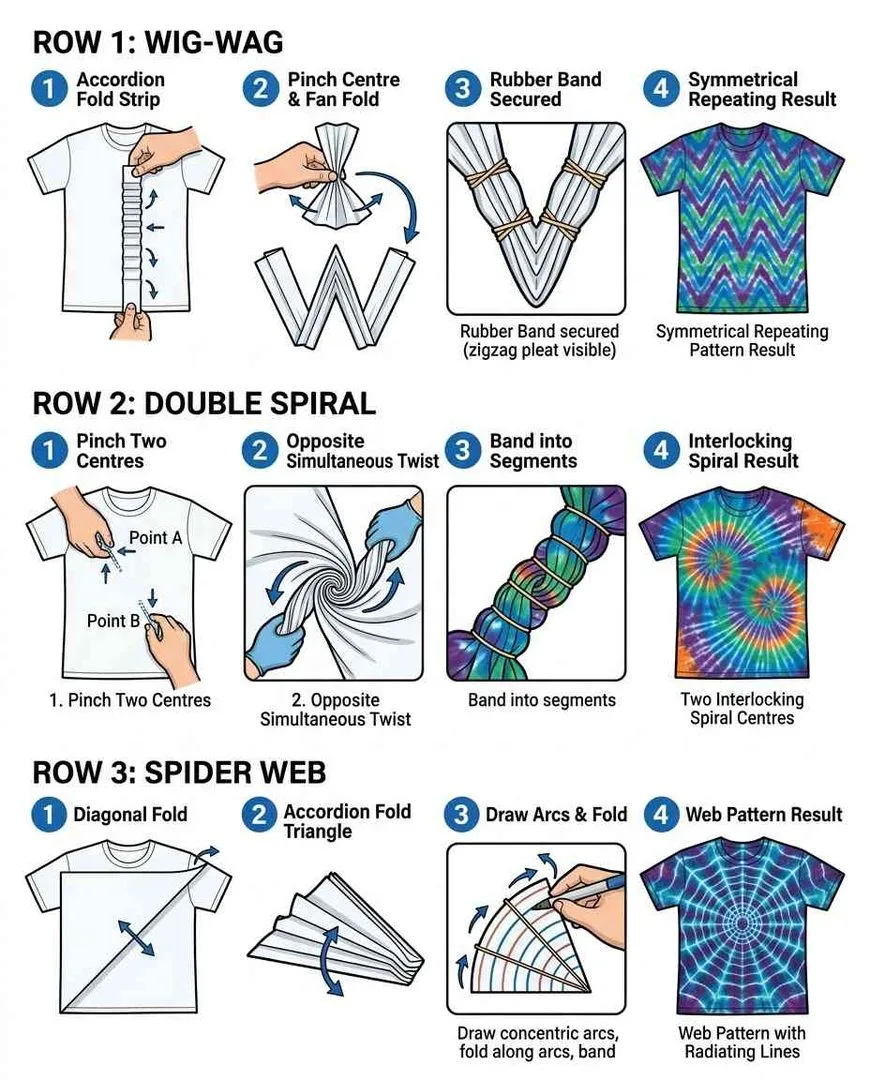
20. Wig-wag
📌 HOW TO FOLD: Accordion-fold the shirt into a narrow horizontal strip (2–3 inches wide). Pinch the exact centre of the strip and fan-fold alternating left and right from the centre, creating a zigzag pleat that compresses the strip into a compact square. The alternating left-right folds create the symmetrical repeating pattern. Rubber-band tightly.
How to dye: Apply 2–3 colours in alternating sections of the folded square. Precision matters: each colour section should align with the zigzag folds so the colours repeat symmetrically when unfolded.
The result: A symmetrical, kaleidoscopic repeating pattern that looks like it was printed by a machine. The wig-wag is considered the benchmark test of tie dye skill because the fold precision directly determines the pattern quality. A perfectly executed wig-wag is the flex of the tie dye community.
21. Double spiral
📌 HOW TO FOLD: Lay the shirt flat. Pinch two points, one on the left side and one on the right side, about 6 inches apart. Twist BOTH points simultaneously but in opposite directions (one clockwise, one counterclockwise), pulling the fabric between them taut as you twist. The shirt forms a figure-eight shape. Rubber-band each spiral separately.
How to dye: Dye each spiral centre a different colour. The surrounding fabric gets a third colour or is left white.
The result: Two interlocking spiral centres on a single shirt. The figure-eight fold creates a symmetry that single spirals cannot achieve. A visual conversation piece.
22. Spider web
📌 HOW TO FOLD: Fold the shirt in half diagonally. Accordion-fold the half into a tight triangle shape, starting from the fold corner. Draw concentric semicircles (arcs) on the folded triangle surface with a washable marker, each arc 1–2 inches apart. Fold along each arc line, bunching the fabric. Rubber-band along each fold line.
How to dye: Apply one colour to the fold lines (these become the web strands) and a different colour to the sections between the folds (these become the spaces between the web strands).
The result: A spider web pattern radiating from one corner of the shirt. The concentric arcs become the web rings, and the accordion fold lines become the radial web strands. Dramatic, graphic and unmistakably intentional.
23. Psychedelic mandala
📌 HOW TO FOLD: Fold into quarters, then fan-fold from the corner into a tight triangle. Draw 3–4 concentric arcs and a diagonal line from base to tip. Fold along ALL lines. Band each fold line separately.
How to dye: Apply 5–6 colours, one per fold section, choosing adjacent-colour-wheel neighbours to avoid muddy mixing.
The result: An intricate, multi-layered mandala with both concentric rings and radial divisions. The most colour-saturated pattern on this list and the one most likely to end up framed on a wall.
24. Symmetrical starburst
📌 HOW TO FOLD: Fold the shirt in half vertically, then in half horizontally (creating a quarter). Pinch the corner where all folds meet (this is the centre of the shirt) and pull upward into a cone. Accordion-fold the cone from the point, creating tight angled pleats. Band at intervals.
How to dye: Apply colours from the tip outward: dark at the centre, medium in the middle bands, light at the outer edge. The gradient creates a dimensional starburst effect.
The result: A symmetrical explosion of colour radiating from the exact centre of the shirt with four-fold symmetry. The gradient colouring adds depth, making the centre appear to glow.
Bleach tie dye patterns (reverse tie dye)
Reverse tie dye starts with a dark-coloured shirt and removes colour with bleach instead of adding colour with dye. The results are dramatic, high-contrast and impossible to achieve with regular dye on dark fabric.
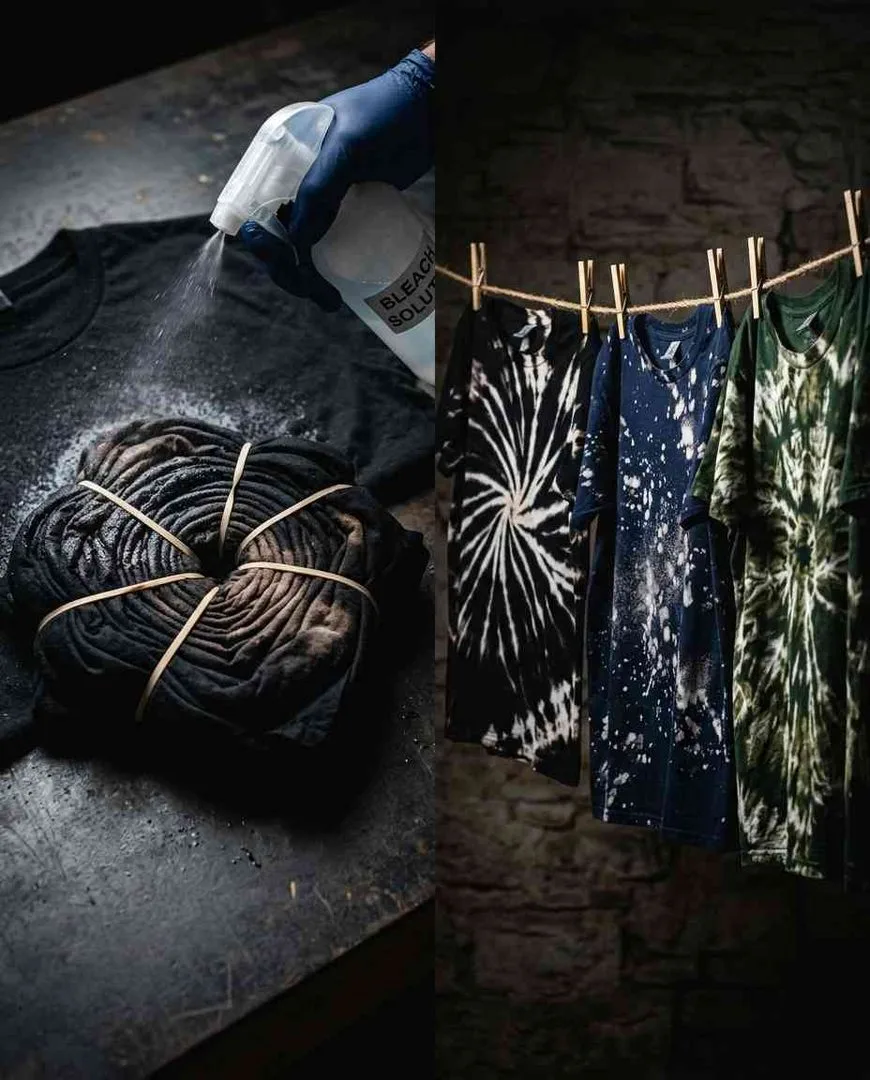
25. Bleach spiral
📌 HOW TO FOLD: Fold exactly like the classic spiral (pattern 1). Instead of dye, spray or squeeze a 50/50 bleach-water solution onto the folded disc. Watch the colour lift in real time — the process takes 10–30 minutes depending on the fabric.
How to dye: Apply bleach to alternating wedges, leaving other wedges untouched (they stay the original shirt colour). The bleached sections lighten to tan, peach, pink or white depending on the original shirt colour. Neutralise the bleach immediately after reaching your desired lightness by soaking in a cold water + hydrogen peroxide bath.
The result: A spiral pattern in the shirt’s original dark colour and bleached light sections. Black shirts bleach to orange-tan. Navy shirts bleach to peach-pink. The colour transformation is unpredictable and unique to each fabric.
26. Bleach splatter
📌 HOW TO FOLD: No folding. Lay the dark shirt flat on a protected surface. Dip a toothbrush or stiff brush into undiluted bleach and flick it across the shirt to create a fine splatter of bleach droplets. For larger spots, drip bleach from a squeeze bottle at random points.
How to dye: The splatter creates a constellation effect — small dots and larger blotches of lightened colour on a dark background. Work quickly and neutralise once the lightest spots reach your desired brightness.
The result: A cosmic, star-field effect on a dark background. The randomness is the aesthetic. Each splatter is unique. The simplest bleach technique with the most dramatic result.
27. Bleach crumple
📌 HOW TO FOLD: Scrunch the dark shirt into a ball exactly like the regular crumple (pattern 2). Place on a wire rack. Apply bleach solution to the outer surface of the crumpled ball with a spray bottle. The creases resist the bleach.
How to dye: The bleach penetrates the outer surfaces and leaves the inner creases dark, creating the same lightning-vein texture as a regular crumple but in reverse: light veins on a dark background instead of dark veins on a light background.
The result: A reverse crumple with light-coloured organic textures on a dark background. The effect is moodier and more dramatic than a standard crumple. Works especially well on black, charcoal and forest green shirts.
28. Bleach stencil
📌 HOW TO FOLD: No folding. Cut a shape from cardboard or thick paper (a heart, a star, a letter, a silhouette). Lay the stencil on the dark shirt. Spray bleach around the stencil, covering the exposed fabric evenly. Remove the stencil.
How to dye: The stencil blocks the bleach, leaving the shape in the original dark colour surrounded by bleached fabric. Reverse the technique by spraying ONLY through the stencil opening for a light shape on a dark background.
The result: A clean shape or silhouette in the original shirt colour on a bleached background (or vice versa). The most controlled bleach technique and the only one that produces a specific, planned image.
What to tie dye besides shirts
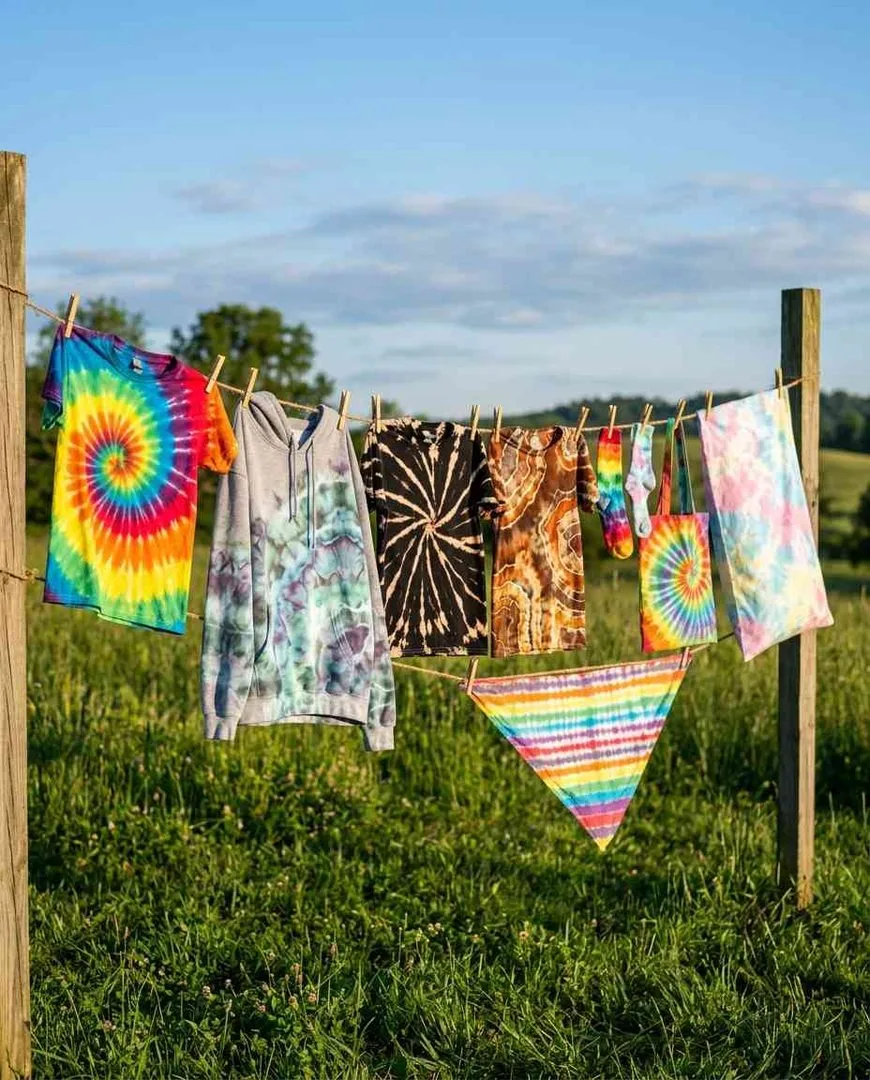
Every pattern above works on any cotton fabric, not just t-shirts. The best non-shirt tie dye projects:
- Socks — small canvas, fast dye, instant wearable result. The best craft-night tie dye item.
- Tote bags — flat canvas surface takes patterns beautifully. Spiral and bullseye patterns read especially well.
- Pillowcases — bedroom decor in one dye session. Ice dye produces the most elegant pillowcase results.
- Bandanas — small, fast, every pattern shrinks to a bolder scale on the smaller fabric.
- Hoodies and sweatshirts — thicker fabric needs more dye and longer setting time (24 hours minimum) but the results are dramatic.
- Canvas sneakers — white canvas shoes take tie dye beautifully. Use the rubber band circle technique around the toe for a bullseye effect.
- Bed sheets — the largest tie dye canvas. Ice dye on a king-size flat sheet creates a genuine art piece for a bedroom.
For a group tie dye activity, our girls night craft ideas guide includes a full tie dye night setup with hosting tips, supply lists and per-person cost estimates.
Tie dye patterns: FAQ
What is the easiest tie dye pattern?
The crumple (scrunch). No folding technique needed — scrunch the shirt randomly, rubber-band it, and apply dye. The result is an organic, abstract texture that looks intentionally artistic even though the process is entirely random. If you want a recognisable pattern, the classic spiral is the easiest structured fold: pinch the centre, twist clockwise into a disc, band, and dye each wedge.
What is the most popular tie dye pattern?
The classic rainbow spiral. It is the most recognisable tie dye design in the world, the first pattern most people learn, and the one most commonly associated with tie dye culture. In 2026, ice dye and geode patterns are the fastest-growing trends, overtaking the spiral in popularity on TikTok and Pinterest.
How long do you let tie dye sit before rinsing?
6–24 hours. Wrap the dyed item in plastic wrap, place it in a zip-lock bag, and leave it at room temperature. Longer setting time = more vibrant, more permanent colours. The minimum for decent results is 6 hours. The sweet spot is 12–18 hours. Leaving it for 24 hours maximises colour saturation.
How do you stop tie dye from fading?
Three steps: 1) Pre-soak in soda ash before dyeing (this is the most important step — soda ash bonds the dye permanently to cotton). 2) Rinse in cold water until the water runs clear before the first wash. 3) Wash the dyed item separately in cold water for the first 2–3 washes. After that, the colour is permanent and the item can be washed normally.
Can you tie dye with food colouring?
Technically yes, but the results wash out almost completely. Food colouring is not a fibre reactive dye — it does not bond permanently to cotton. For vibrant, permanent tie dye, use Procion MX fibre reactive dyes (Tulip, Jacquard, Dharma Trading Co). The cost difference is minimal ($10–15 for a kit that dyes 10+ shirts) and the quality difference is night and day.
What colours should I use for tie dye?
The classic rainbow (red, orange, yellow, green, blue, purple) is the most popular colour scheme. For more sophisticated results, try: ocean (teal, navy, seafoam), sunset (red, orange, gold on black), pastel (diluted versions of any colours using less dye powder), earth tones (rust, olive, brown, cream), or monochrome (different concentrations of one colour for an ombre effect). The golden rule: keep complementary colours separated or they mix into brown mud.
Pick a fold, twist the shirt, and make something nobody can buy in a shop
The crumple takes 2 minutes to fold. The spiral takes 5 minutes. Either one produces a result in your first session that looks like something you would see at a festival or a boutique — because every tie dye piece IS a one-of-one original. Nobody else on earth will ever own the exact pattern that your fold, your dye and your hands created. That is the entire point.
For more hands-on craft projects, air dry clay ideas has 50 no-kiln projects, perler bead ideas has 60 pixel-art patterns, things to bedazzle has 50 rhinestone projects, and things to do when bored is the master list. For a group tie dye party, girls night craft ideas has the full hosting setup.