Sticky Note Origami (2026): 12 Easy Post-it Folds, Step by Step
That pad of sticky notes on your desk is a whole origami kit. Every note is already a perfect square, it fits in a pocket, and the sticky strip holds your finished model to a monitor, a notebook or a lunchbox. When boredom hits in a meeting, a class or a long phone call, two minutes of folding beats two minutes of scrolling.
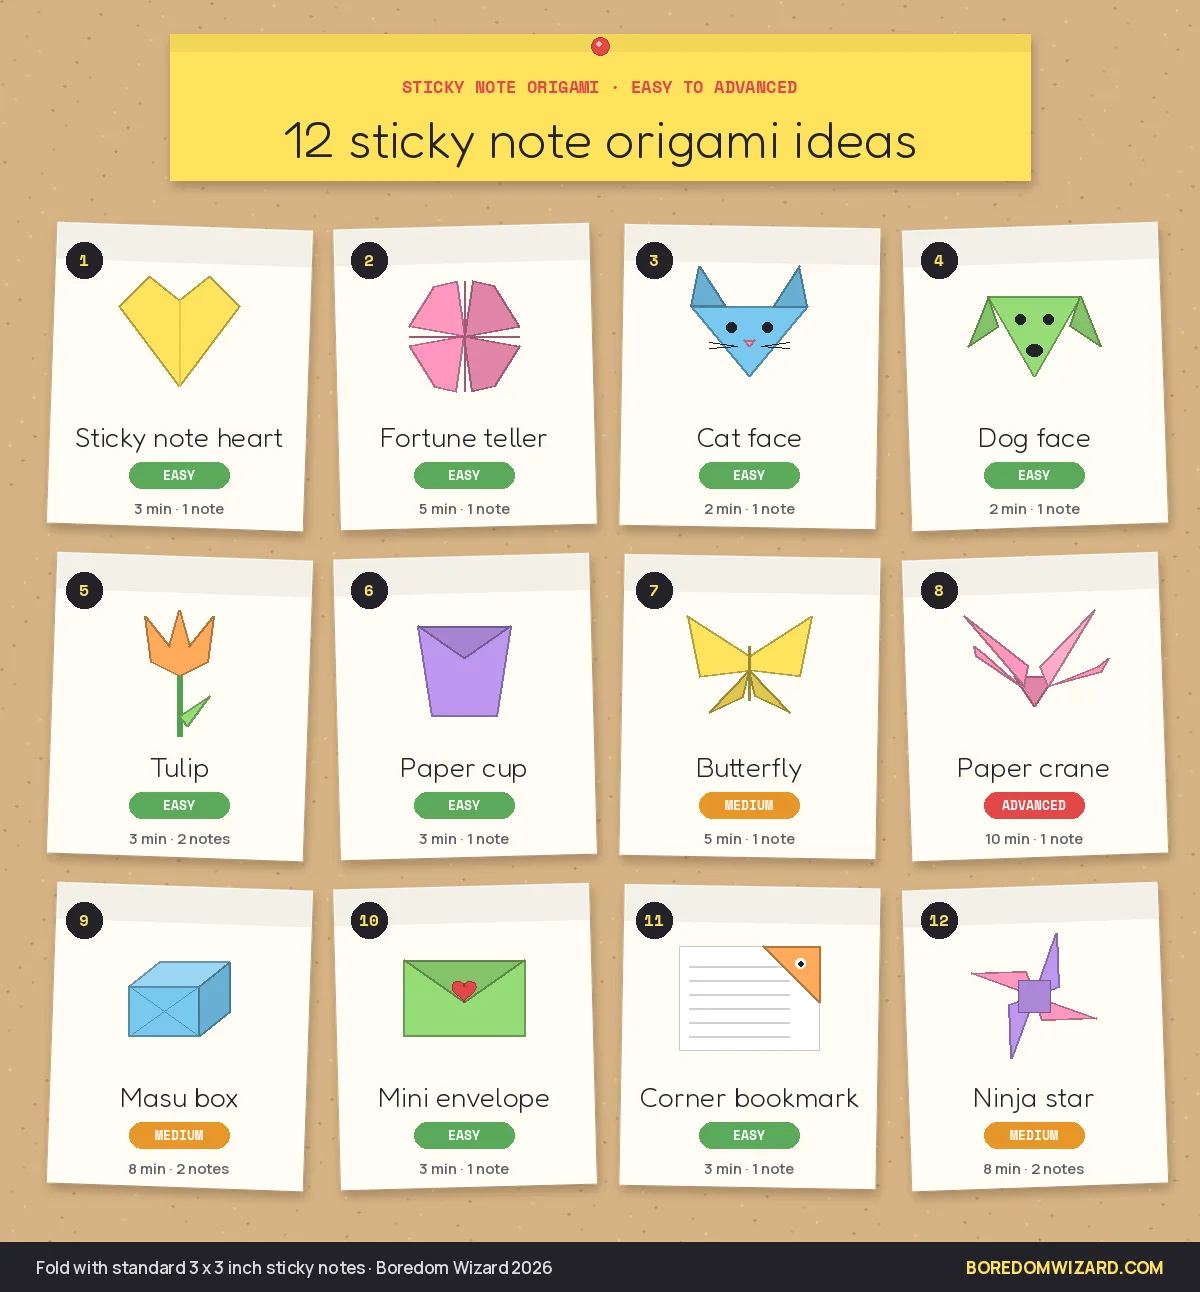
Below are 12 sticky note origami ideas, also called Post-it note origami, from a 2-minute cat face to a paper crane, with sticky note origami step by step diagrams for the most popular ones and no cutting needed. Use the picker to find a fold for the notes and minutes you have, then follow the steps.
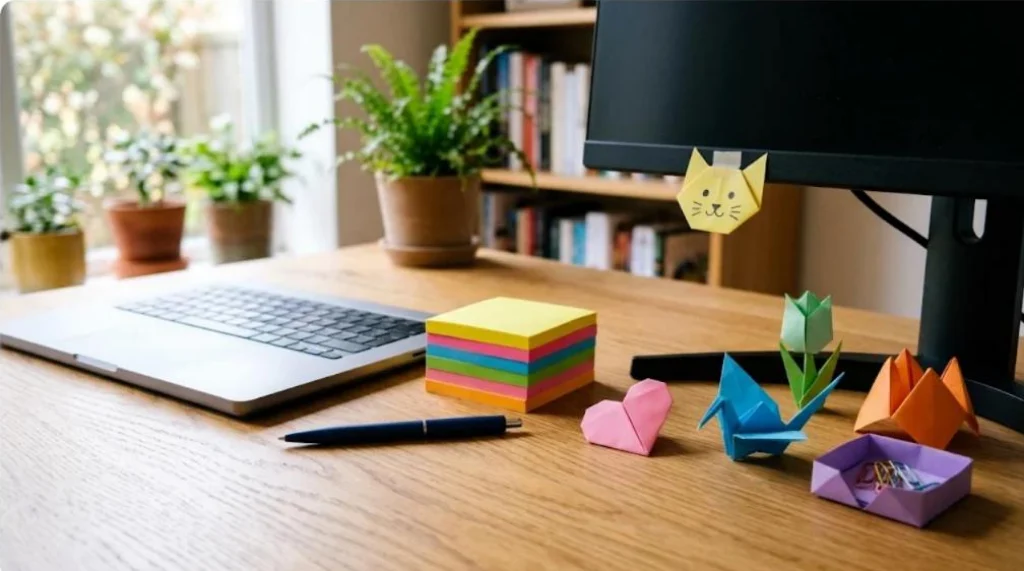
Quick answer: The easiest sticky note origami folds are a heart, a cat face, a dog face, a fortune teller, a tulip, a paper cup, a mini envelope and a corner bookmark, each taking 2 to 5 minutes with one standard 3 by 3 inch note. For a challenge, try a butterfly, a masu box, a two-note ninja star or a paper crane. Start sticky side up, crease every fold sharply and let the sticky strip hold the finished model in place.
What should I fold with a sticky note?
Pick how many sticky notes and minutes you have, and who the fold is for. The picker suggests matching folds from this page.
What should I fold with a sticky note?
Pick how many notes and minutes you have. We match it to the 12 folds below.
Sticky note origami tips before you start
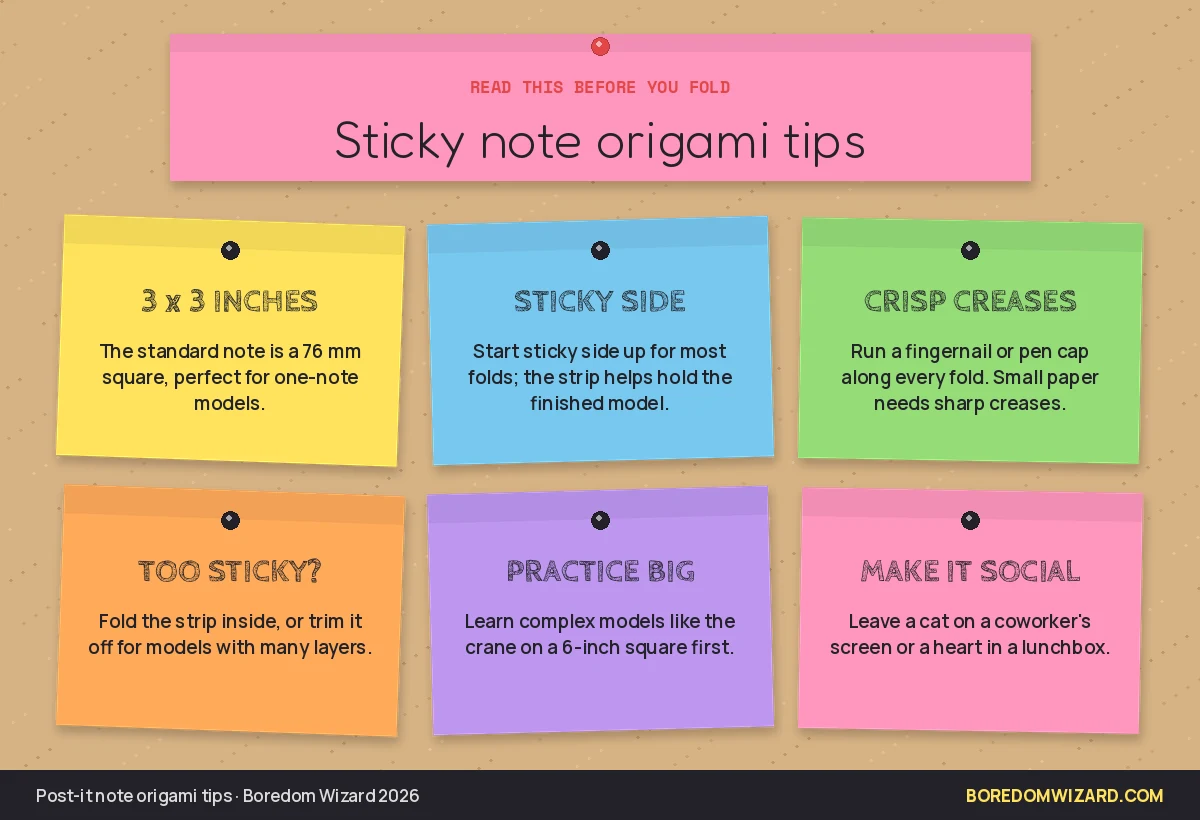
- Size: standard sticky notes, including Post-it notes, are 3 by 3 inches (76 mm). Mini 1.5 inch notes work for tiny charms but are fiddly.
- No cutting: every fold here is sticky note origami with no cutting; the note is already square.
- Sticky side: start sticky side up unless a step says otherwise. The strip usually ends up on the back, where it holds the model to a surface.
- Crease hard: small paper needs sharp folds. Run a fingernail or a pen cap along every crease.
- Too sticky? for models with many layers, like the crane, fold the strip to the inside or trim it off.
Easy sticky note origami for beginners
These easy sticky note origami folds take 2 to 5 minutes and use one note each. They are cute sticky note origami ideas for kids, students and anyone stuck at a desk.
1. Sticky note heart
The sticky note origami heart, or sticky note heart origami, is the most popular fold of all, and the sticky strip lets you leave it anywhere.
Level: Easy. Time: 3 min. You need: 1 sticky note.
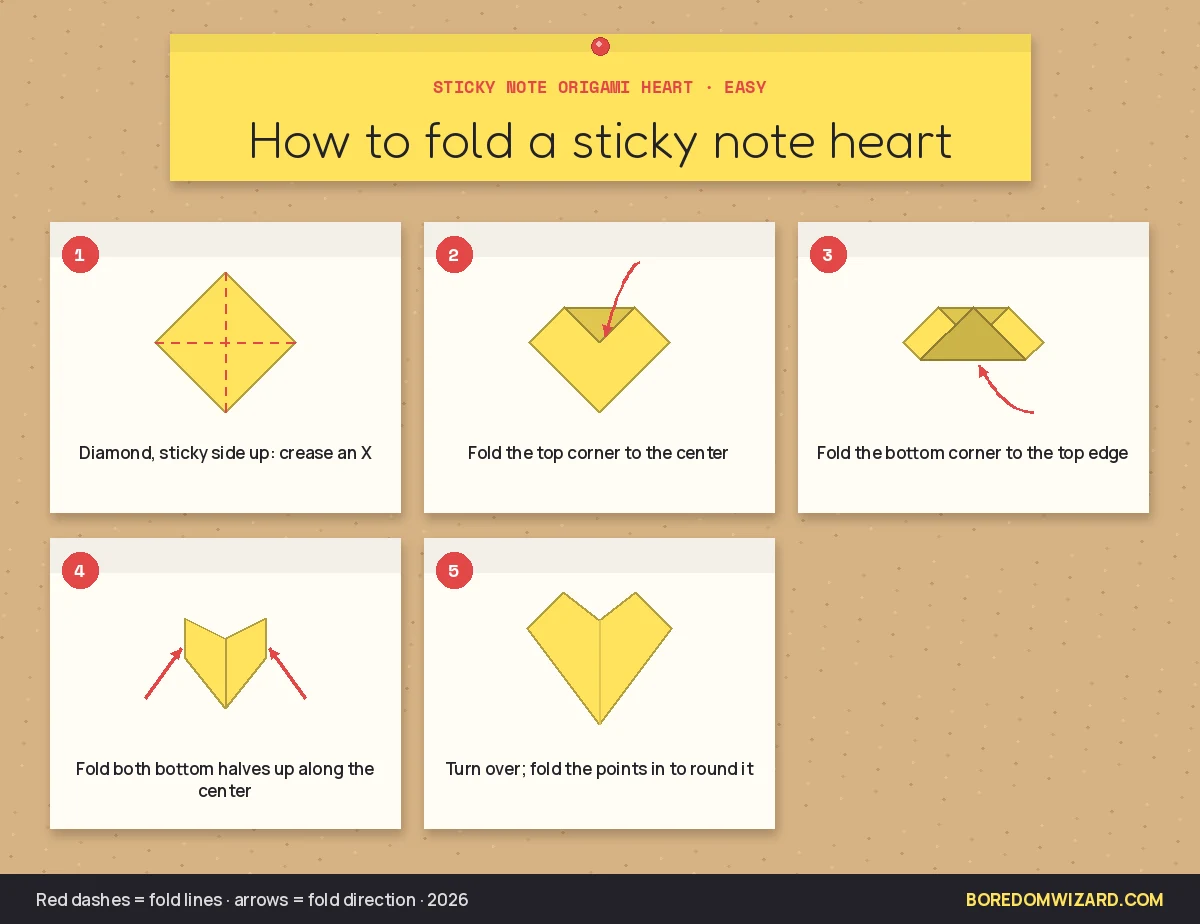
- Turn the note sticky side up into a diamond. Fold it in half corner to corner both ways and unfold, so you have an X crease.
- Fold the top corner down to the center point.
- Fold the bottom corner up to the top edge.
- Fold the right half of the bottom edge up along the center line, then the left half, so both sides stand up into an upside-down heart shape.
- Turn it over. Fold the two top points down a little and fold in the two side corners to round the heart.
Tip: Stick it to a card, lunchbox or monitor; the sticky strip on the back does the work.
2. Fortune teller
A fortune teller is the original sticky note origami fidget: it opens and closes in your fingers.
Level: Easy. Time: 5 min. You need: 1 sticky note.
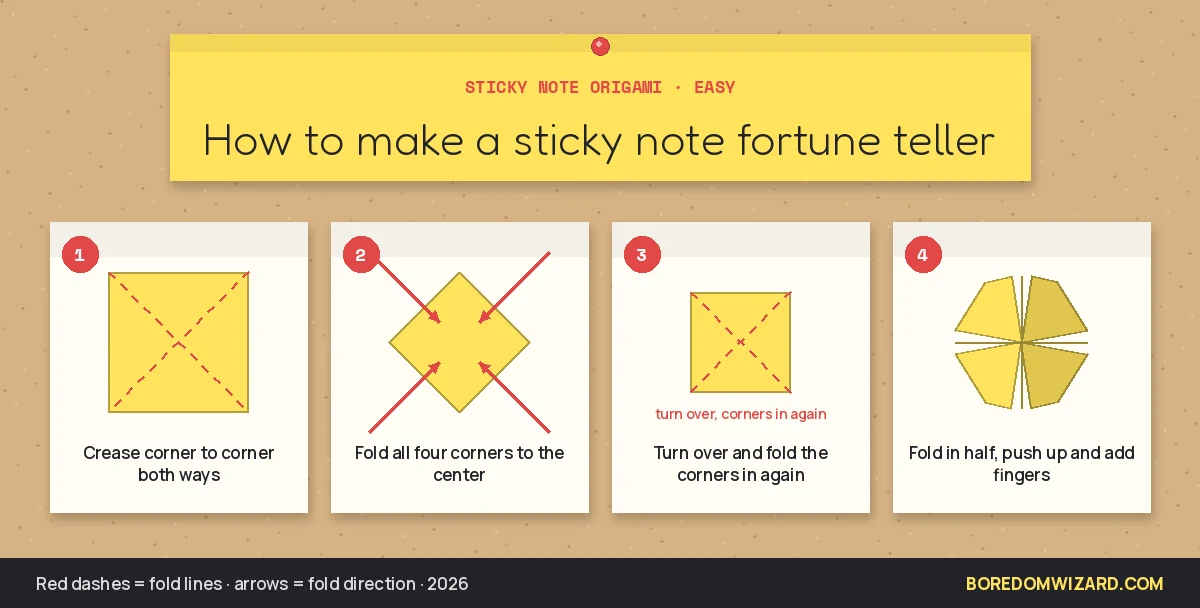
- Fold the note corner to corner both ways and unfold.
- Fold all four corners into the center point.
- Turn it over and fold all four new corners into the center again.
- Write numbers on the eight triangles, and fortunes or dares under the flaps.
- Fold it in half, push the four outer squares up, and slide your thumbs and fingers into the pockets.
Tip: Fill it with mini challenges, like 10 jumping jacks or tell a joke, for a desk break game.
3. Cat face
Level: Easy. Time: 2 min. You need: 1 sticky note.
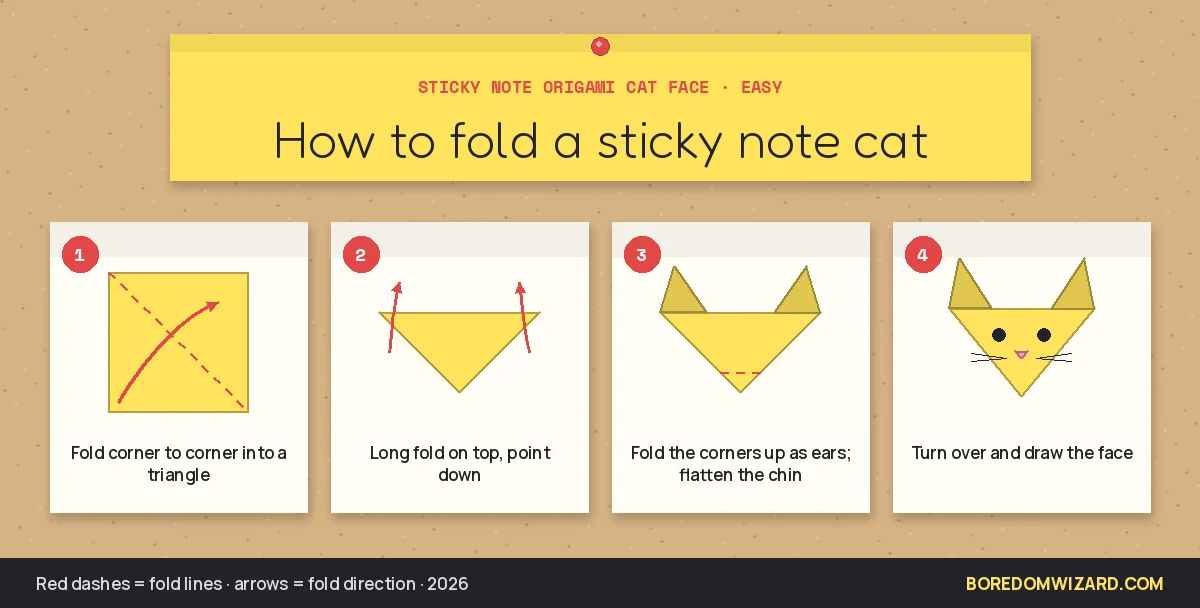
- Fold the note in half corner to corner into a triangle, with the long fold at the top and the point at the bottom.
- Fold the left and right top corners up so they stick out above the top edge as ears.
- Fold the bottom point up a little to flatten the chin.
- Turn it over and draw eyes, a nose and whiskers.
Tip: Make a row of cats in different colors along the edge of your monitor.
4. Dog face
Level: Easy. Time: 2 min. You need: 1 sticky note.
- Fold the note in half corner to corner into a triangle, long fold at the top and point at the bottom.
- Fold the left and right corners down along the sides as floppy ears.
- Fold the bottom point of the front layer up a little for the nose, and fold the back layer’s point behind.
- Turn it the right way up and draw the eyes and a nose.
Tip: Use a brown or yellow note and add a pink tongue with a marker.
5. Tulip
This tulip is the easiest sticky note origami flower; a green note makes the stem.
Level: Easy. Time: 3 min. You need: 2 sticky notes.
- Fold one note in half corner to corner into a triangle, point up.
- Fold the left and right bottom corners up at an angle so their tips rise past the top point as petals.
- Turn it over and fold the side and bottom corners back to tidy the flower.
- Fold a green note into a long thin stem and a leaf, and stick the flower on top.
Tip: Stick a whole garden of tulips along a whiteboard or window.
6. Paper cup
Level: Easy. Time: 3 min. You need: 1 sticky note.
- Fold the note in half corner to corner into a triangle, point up.
- Fold the left corner across so its tip touches the right edge.
- Fold the right corner across so its tip touches the left edge.
- Fold the top front flap down over the front, and the back flap down behind. Open the top into a cup.
Tip: Too small for drinks, but perfect for paper clips, pins and candy.
Useful sticky note origami for your desk
An origami sticky note can be practical too: these two folds hold notes and mark pages.
10. Mini envelope
Level: Easy. Time: 3 min. You need: 1 sticky note.
- Turn the note into a diamond, plain side up.
- Fold the bottom corner up a little past the center.
- Fold the left and right corners in so they overlap in the middle.
- Fold the top corner down as the flap and tuck it under, or let the sticky strip hold it.
Tip: Slip a tiny thank-you note inside for a coworker or a lunchbox surprise.
11. Corner bookmark
Level: Easy. Time: 3 min. You need: 1 sticky note.
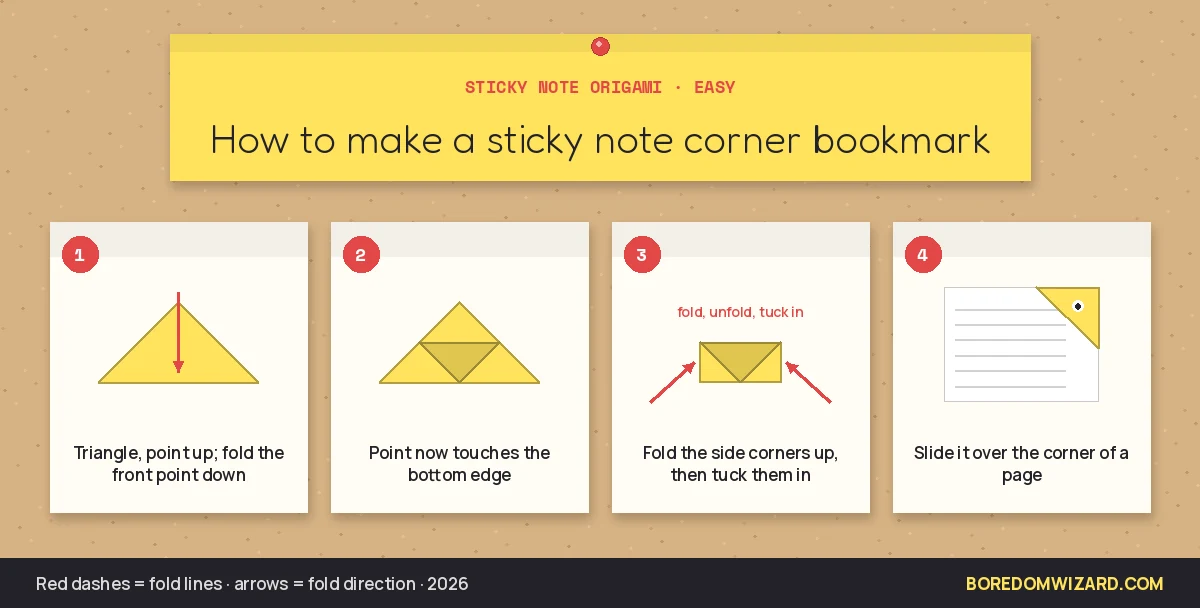
- Fold the note in half corner to corner into a triangle, point up.
- Fold the top point of the front layer down to the bottom edge.
- Fold the left and right corners up to the top point, making a square, then unfold them.
- Tuck those two corners into the pocket behind the front flap. Slide it over the corner of a page.
Tip: Add eyes and teeth to make a monster bookmark that bites the page.
Sticky note origami butterfly, crane and star
Ready for a challenge? These medium and advanced folds use more layers, so take them slowly and crease well.
7. Butterfly
The sticky note origami butterfly starts from a waterbomb base, a basic origami shape worth learning.
Level: Medium. Time: 5 min. You need: 1 sticky note.
- Fold the note in half both ways and corner to corner both ways, then collapse it into a triangle with two flaps on each side (a waterbomb base).
- Fold the two bottom corners of the top layer up to the top point.
- Turn it over and fold the top point down so it sticks out past the bottom edge.
- Fold that small tip back up over the edge to lock it.
- Fold the whole model in half down the middle and open it slightly to shape the wings.
Tip: Use a patterned or bright neon note; the color shows on both wings.
9. Masu box
Level: Medium. Time: 8 min. You need: 2 sticky notes.
- Fold the note corner to corner both ways, then fold all four corners to the center.
- Fold the top and bottom edges to the center line and unfold; repeat with the left and right edges, then unfold the two side triangles.
- Raise the two long sides as walls along the creases.
- Push in the short ends along the creases so they fold inward, and fold the points over the walls into the bottom of the box.
- Make a second box from a slightly larger note, or a note with a little trimmed, for the lid.
Tip: Stick the box to your desk with the sticky strip so it holds paper clips without sliding.
12. Ninja star
This sticky note origami star is a classic ninja star made from two notes and no glue.
Level: Medium. Time: 8 min. You need: 2 sticky notes.
- Fold each note in half, then in half again lengthwise to make two long strips.
- Fold one end of each strip down at 45 degrees and the other end up, making a Z shape. Fold the second strip as a mirror image.
- Fold each piece in half along the middle so the points face opposite ways.
- Lay one piece across the other, fold each point over and tuck it into the pocket of the piece below.
- Turn it over and tuck in the last two points to lock the star.
Tip: Use two different colors so the star looks like a pinwheel.
8. Paper crane
The sticky note origami crane is the hardest fold here, but the most satisfying to leave on a coworker’s desk.
Level: Advanced. Time: 10 min. You need: 1 sticky note.
- Fold the note into a square base: fold it in half both ways, turn over, fold corner to corner both ways, then collapse it into a small square.
- Fold the lower side edges of the top layer to the center line, fold the top triangle down, then unfold these three folds.
- Lift the bottom corner of the top layer up along the creases and flatten it into a long diamond (a petal fold). Turn over and repeat.
- Fold the lower edges of both layers to the center line on each side to make it slim.
- Inside-reverse-fold the two bottom points up to form the neck and tail, then reverse-fold a head.
- Gently pull the wings apart to puff out the body.
Tip: Sticky notes are small, so practice on a larger square first; it gets easier on the second crane.
Want to fold something bigger? Try our money origami guide, our paper airplane designs and more things to make with paper.
Sticky note wall art and desk challenges
Post-it origami is only half the fun. Flat notes make great wall art too:
- Pixel mosaics: stick notes in a grid to make an emoji, a heart or a game character on a window or office wall. Plan it on graph paper first, or borrow a design from our pixel art ideas.
- Flower wall: fold eight tulips or hearts in different colors and arrange them in a circle as one big flower.
- Desk zoo challenge: fold a cat, a dog and a crane in five minutes each, and challenge a friend or coworker to beat your time.
- Kindness notes: fold a heart or envelope, write a short thank-you inside and leave it for someone.
Why sticky note origami beats scrolling when you are bored
When boredom hits, most of us grab a phone. But a 2024 set of experiments by University of Toronto researchers found that skipping between videos made people more bored, not less. Folding does the opposite: it keeps your hands and attention on one small task, gives you a finished object in minutes, and lets your mind reset.
That makes sticky note origami one of the best quick boredom breaks for work and school. For more ideas, see what to do when bored at work, things to do when bored in class and things to draw when bored.
| Where you are | Best sticky note folds |
|---|---|
| At your desk | Cat face, paper cup, corner bookmark, fortune teller |
| In class | Heart, dog face, mini envelope, ninja star |
| With kids | Fortune teller, tulip, cat and dog faces, cup |
| As a gift or note | Heart, mini envelope, tulip, crane |
Fold an origami heart from one sticky note in five steps and about 3 minutes.
Total Time: 3 minutes
Crease an X
Turn the note sticky side up into a diamond, fold it corner to corner both ways and unfold.
Fold the top corner
Fold the top corner down to the center point.
Fold the bottom corner
Fold the bottom corner up to the top edge.
Fold the halves up
Fold the right and left halves of the bottom edge up along the center line.
Round the heart
Turn it over and fold the two top points and the side corners in to round the heart.
Natty’s take: Keep a pad of colorful sticky notes next to your laptop. The next time you reach for your phone out of boredom, fold a cat instead. It takes two minutes, it makes someone smile, and you come back to work fresher.
Sticky note origami FAQ
Ready for bigger blooms? Fold a tulip, lotus or lily with our origami flowers guide.
What is easy sticky note origami?
Easy sticky note origami includes a heart, a cat face, a dog face, a fortune teller, a tulip, a paper cup, a mini envelope and a corner bookmark. Each uses one note and takes 2 to 5 minutes.
How do you make a sticky note origami heart?
Turn the note into a diamond, crease an X, fold the top corner to the center, fold the bottom corner to the top edge, fold both bottom halves up along the center line, then turn it over and fold the points in to round it.
Can you do origami with sticky notes?
Yes. Sticky notes are already square, so they work for most simple origami. Fold sticky side up, crease firmly, and fold the strip inside or trim it for models with many layers.
What size are sticky notes for origami?
Standard sticky notes, including Post-it notes, are 3 by 3 inches, or 76 mm square. That is ideal for one-note models like hearts, cats and fortune tellers.
Do you need to cut sticky notes for origami?
No. All the folds in this guide are sticky note origami with no cutting, because each note is already a square.
What is the hardest sticky note origami?
The paper crane is the hardest common sticky note fold because it uses petal folds and reverse folds on small paper. Practice it on a larger square first.
How do you make a sticky note origami flower?
Fold a note into a triangle with the point up, fold the two bottom corners up past the top as petals, turn it over and tidy the corners, then add a stem made from a green note.
What can you make with sticky notes when bored?
When bored you can fold sticky notes into hearts, animals, fortune tellers, boxes and stars, or stick flat notes on a wall to make pixel art and mosaics.
Updated November 2026. Supervise young children with small paper pieces.