Paper Squishy Ideas: 50 Cute Designs with Free Templates (2026
Paper squishies are the craft that looks impossible until you make one and realise it takes 10 minutes. Two pieces of paper, some tape, a handful of cotton balls, and you have a soft, squeezable, satisfyingly squishy toy that you designed and coloured yourself. No glue gun, no sewing, no special skills. Just paper, scissors, tape and something to stuff it with.
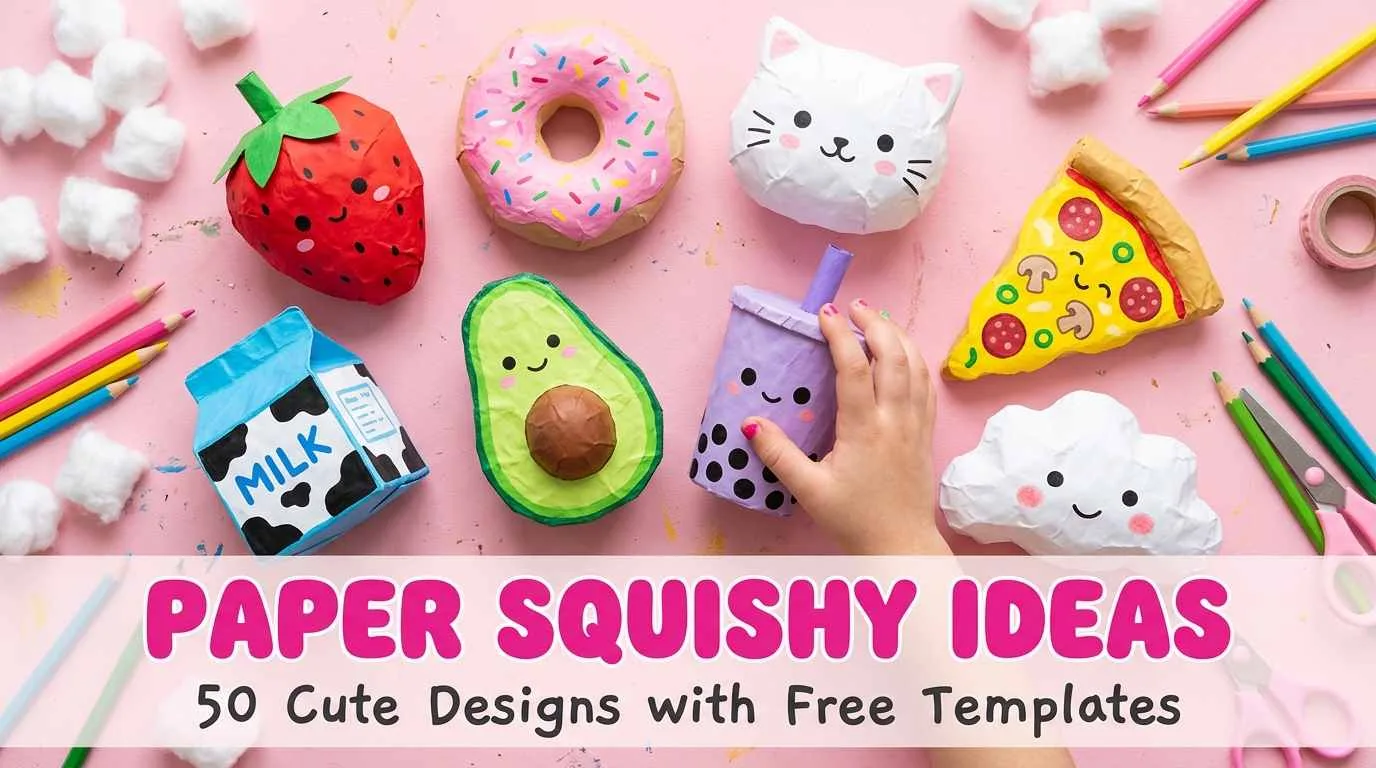
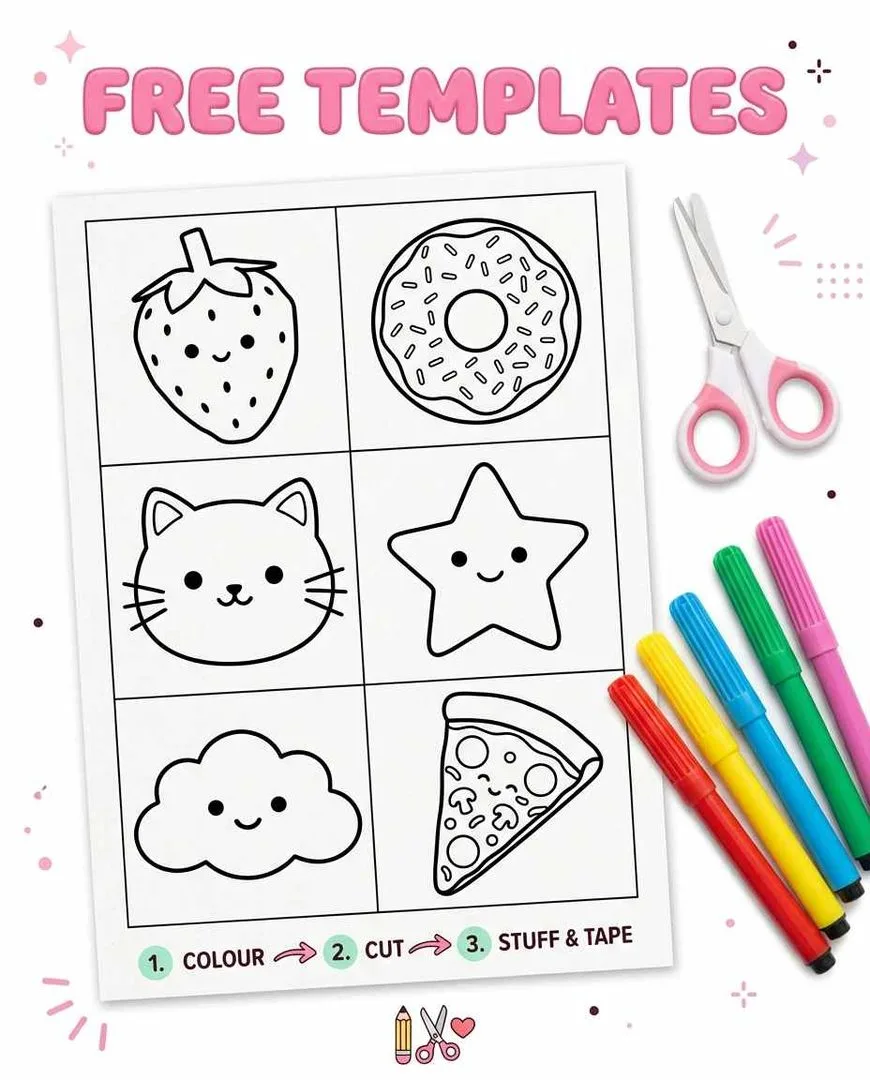
This guide has 50 paper squishy ideas sorted by theme — food, kawaii characters, animals, easy beginner shapes and advanced 3D designs — plus a complete step-by-step tutorial for making your first one and a filling guide that compares every stuffing option. Every design on this list can be drawn freehand or traced from a free template.
A paper squishy is a handmade soft toy made from paper, filled with cotton balls, tissue paper, plastic bags or foam. You draw and colour a design on two matching pieces of paper, tape or glue the edges together leaving a gap, stuff the filling through the gap, and seal it shut. The result is a squeezable, lightweight toy that springs back to shape. Paper squishies went viral on YouTube in 2019 and have remained one of the most-searched kids’ craft projects ever since — with 11,000 monthly searches for ideas alone.
How to make a paper squishy — step by step
This method works for every single design on this page. Learn it once and you can make any shape.
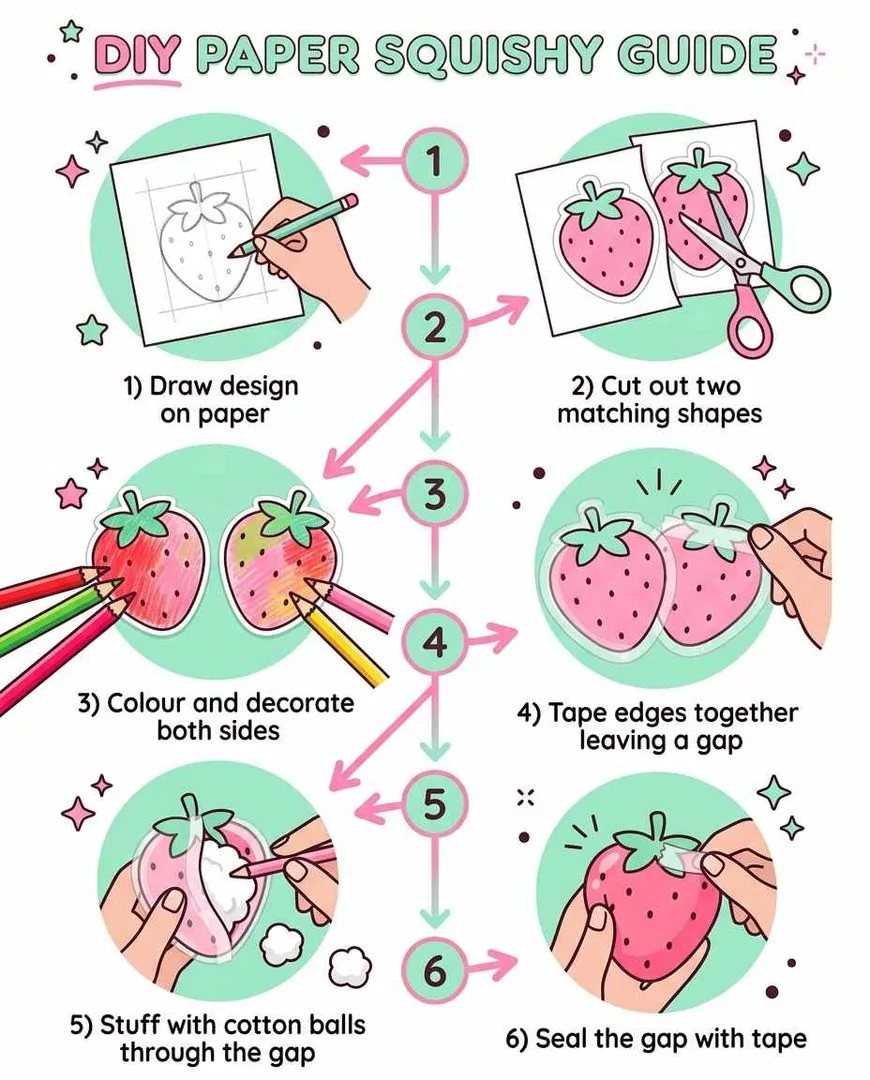
- Step 1: Draw your design. Draw the outline of your squishy on a piece of paper. Keep shapes simple and rounded — circles, ovals and soft curves work best. Sharp corners do not squish well and are harder to seal.
- Step 2: Cut two matching shapes. Place your drawing on top of a second piece of paper and cut through both layers at once so the front and back are identical. Leave a 5mm border around the design for the taping edge.
- Step 3: Colour and decorate both sides. Colour the front with your design (the face, the details, the pattern) and the back with a plain version or a matching colour. Colour BEFORE taping — colouring after stuffing is much harder.
- Step 4: Tape the edges. Place the front and back together (coloured sides facing out) and tape around the entire edge using clear packing tape. Leave a 3–4cm gap at the bottom for stuffing. Press the tape firmly so no filling escapes.
- Step 5: Stuff it. Push your filling through the gap. Cotton balls are the standard — pull them apart slightly so they fill evenly without lumps. Do not overstuff. The squishy should compress when squeezed and spring back, not feel like a rock.
- Step 6: Seal the gap. Once filled, tape the gap shut. Smooth the tape over the opening so the seam is invisible. Squeeze it a few times to distribute the filling evenly.
✨ THE PACKING TAPE SECRET: Use clear packing tape, not regular sticky tape. Packing tape is wider (covers more edge per strip), stronger (no splitting when squeezed), and creates a slight stretch that makes the squishy feel more satisfying. This is the #1 tip that separates a paper squishy that lasts from one that falls apart.
Paper squishy filling guide — which stuffing is best?
The filling determines how the squishy feels when you squeeze it. Different fillings create different textures:
🧶 COTTON BALLS — The standard. Soft, springy, cheap, available everywhere. Pull them apart slightly before stuffing so the fill is even. Best for: most designs, especially food and character squishies. Squish feel: soft and bouncy.
🧻 TISSUE PAPER — Crumple sheets into loose balls and stuff. Creates a rustly, crinkly sound when squeezed. Lighter than cotton. Best for: light squishies, squishies you want to hang as decorations. Squish feel: crinkly and light.
🛍️ PLASTIC BAGS — Cut plastic shopping bags into strips and scrunch them. Creates a slower, denser squish that stays compressed slightly longer before springing back. Best for: realistic slow-rise squishies. Squish feel: dense and slow-rise.
☁️ POLYESTER STUFFING — The same filling used in stuffed animals. The most professional feel but costs more than cotton balls. Buy a small bag from a craft store. Best for: large squishies, gift-quality pieces. Squish feel: plush and luxurious.
🧽 FOAM SCRAPS — Cut up an old sponge or foam packing material. Creates the most realistic slow-rise squishy texture. Best for: advanced makers chasing that real-squishy feel. Squish feel: slow-rise, closest to commercial squishies.
Food paper squishy ideas
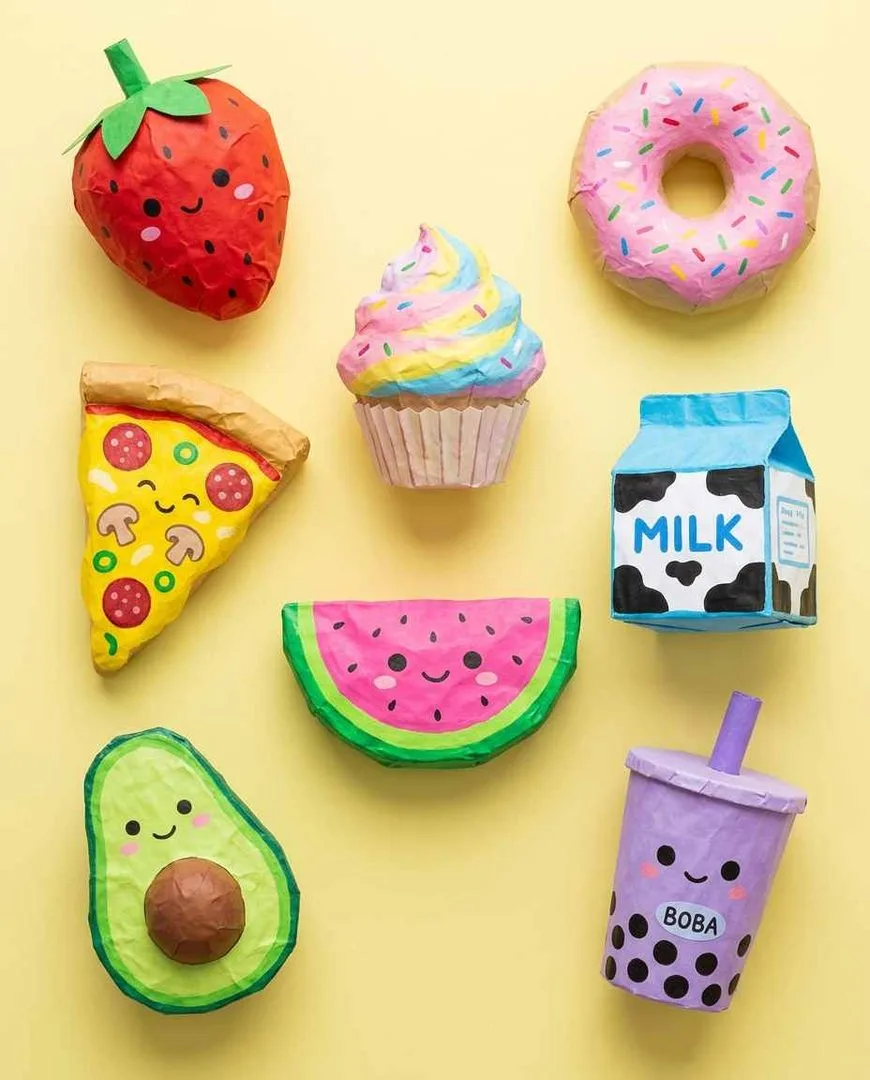
Food designs are the most popular paper squishies by a wide margin. The round, smooth shapes are easy to draw, fun to colour, and instantly recognisable.
1. Strawberry
The perfect first paper squishy. Draw a strawberry shape (a rounded triangle), colour it red with tiny yellow seed dots, add a green leaf top. The simple shape teaches you the entire process in 10 minutes. The seeds are the only detail work, and they are just dots.
✨ TIP: Draw the leaf top slightly larger than you think — it shrinks visually once the body is stuffed and puffed.
2. Frosted donut
Draw a circle with a hole in the centre (or without — a filled donut is easier). Colour the base light brown, add pink frosting on top and multicoloured sprinkle dots. The donut is the #1 most-made paper squishy online because the shape is simple and the decorating is endlessly customisable.
✨ TIP: Make the frosting drip slightly over the edges of the donut. The drip effect is what makes it look like real frosting rather than a flat colour.
3. Pizza slice
A triangle with a curved crust edge. Colour the crust golden brown, the base orange-red for sauce, add yellow cheese shading and small red pepperoni circles. Layer the colours: sauce first, cheese on top, pepperoni last.
✨ TIP: Curve the bottom edge of the triangle so the slice looks like it is drooping from its own weight. A perfectly straight pizza slice looks stiff.
4. Boba tea cup
A cup shape with a dome lid, a straw poking through the top, and dark circles for tapioca pearls visible through the cup. Colour the tea light brown, the pearls dark brown or black, and the straw pink or striped.
5. Avocado half
An oval with a large circle in the centre for the pit. Colour the outer edge dark green, the flesh light green fading to yellow near the pit, and the pit brown. The colour gradient is the entire design.
6. Cupcake
A cupcake liner base (zigzag lines for the ridges) with a swirled frosting top. Colour the liner any pattern and pile the frosting high with sprinkles. The taller the frosting, the more satisfying the squishy.
7. Watermelon slice
A half-circle with a green rind, white inner rind, and pink-red flesh with black seed dots. One of the fastest food squishies to colour.
8. Milk carton
A rectangle with a peaked top (the carton fold), a small circular pour hole, and a label design. Colour as any flavour: pink for strawberry milk, brown for chocolate, white for regular.
9. Ice cream cone
A triangle waffle cone (crosshatch pattern for texture) topped with round scoops in any flavour. Stack two or three scoops. Add a cherry on top.
10. Sushi roll
A circle viewed from the end: black nori ring on the outside, white rice layer inside, colourful filling in the centre (orange salmon, green avocado, red tuna).
11. Taco
A half-circle folded shape with layers of filling visible from the open top: brown meat, yellow cheese shreds, green lettuce, red tomato, white sour cream.
12. Candy bar
A rectangle with a wrapper partially peeled back, revealing the chocolate inside. Colour the wrapper as any real candy brand (or invent your own).
13. Popcorn box
A trapezoid box shape (wider at the top) filled with rounded popcorn kernel shapes overflowing from the top. Red and white striped box, yellow popcorn.
14. Egg (sunny side up)
A blobby circle of white with a perfect yellow yolk circle in the centre. The simplest food squishy — two colours, one shape, done in five minutes.
15. Cookie
A circle with brown chip dots and a slightly scalloped edge to show where the dough spread. Colour in warm golden brown with darker brown chips.
✨ COLOUR TIP: Use markers for bright, bold colours and coloured pencils for shading and gradients. The best food squishies use both: markers for the base colour and pencils for the shadows and highlights that make the food look three-dimensional.
Kawaii and cute paper squishy ideas
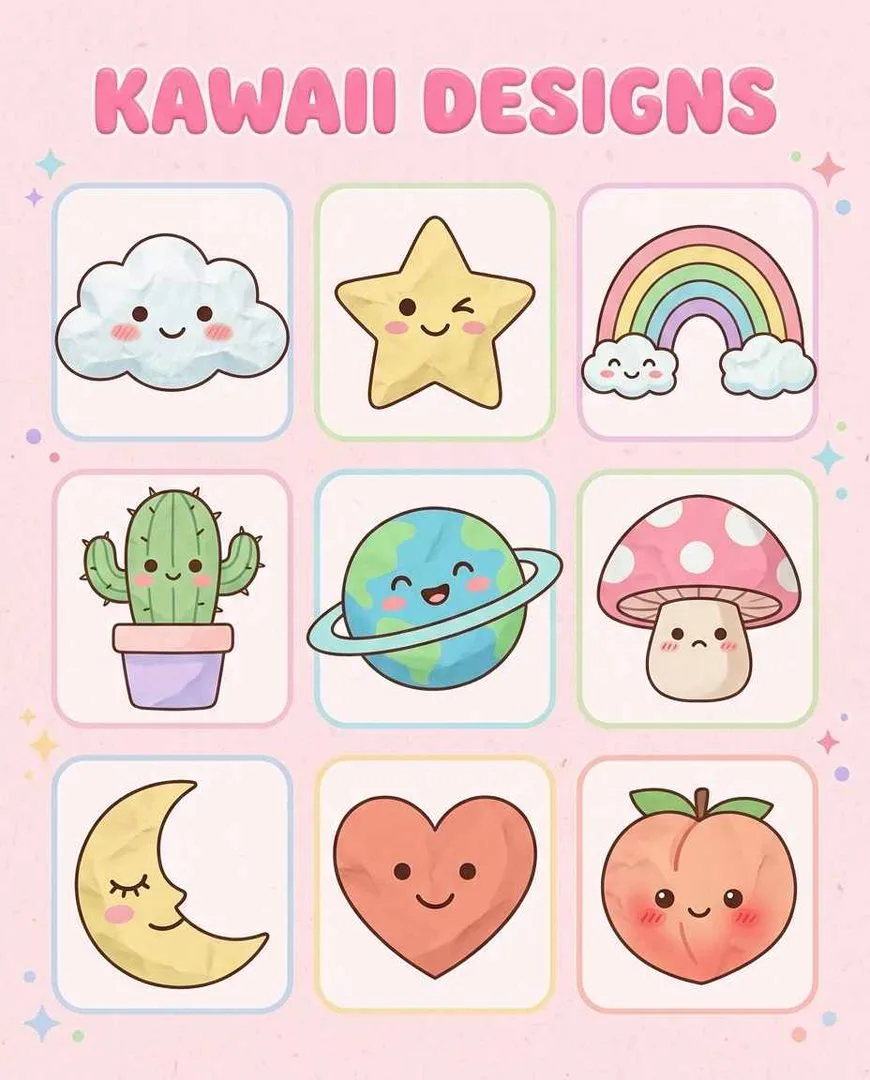
Add a face to anything and it becomes kawaii. Two dot eyes, a tiny curved mouth, and optional pink circle cheeks. That is the entire formula. Apply it to any object.
16. Smiling cloud
A fluffy cloud shape (bumpy top, flat bottom) with a kawaii face: two dot eyes, a small curved smile, pink circle cheeks. Colour white or light blue. The flat bottom makes this one of the easiest shapes to tape and seal. Hang it from a string for a room decoration.
✨ TIP: Use white paper and leave the cloud uncoloured for a clean look, or use very light blue pencil shading on the edges only for a subtle 3D effect.
17. Winking star
A five-pointed star with one eye open (a dot), one eye closed (a curved line), and a small smile. Colour yellow or gradient yellow-to-orange. The star points are the only tricky part — round them slightly so they do not tear when stuffed.
18. Rainbow with a face
A half-circle rainbow (red, orange, yellow, green, blue, purple stripes) with a kawaii face on the centre stripe. Add two small cloud shapes at each end of the base.
19. Happy cactus in a pot
A small pot shape at the bottom, a round cactus body with arms, and a kawaii face on the main body. Pink flower on top. Draw the pot separately or as one piece with the cactus.
20. Blushing peach
A peach shape (a circle with a small cleft at the top and a leaf), coloured in gradient from yellow to pink-orange with deep pink circle cheeks. The blush on the peach doubles as the kawaii face blush.
21. Shy mushroom
A domed cap on a short stem. The face goes on the stem, the cap gets white polka dots. Red, pink or pastel purple for the cap colour.
22. Sleeping moon
A crescent moon shape with closed eyes (two curved lines) and a peaceful mouth. Colour yellow or pale gold. Add tiny stars around it.
23. Cat face
A circle with two pointed ear triangles at the top, whisker lines, a small triangle nose, and kawaii eyes. Colour any cat colour: orange tabby, black, calico, grey.
24. Panda face
A white circle with black eye patches, black ears, and a small nose. The simplest animal face because the design is just circles on a circle.
25. Heart with face
A heart shape with a kawaii face in the centre. Colour pink, red, or gradient. The most popular Valentine’s Day paper squishy and the easiest seasonal design.
26. Smiling sun
A circle with triangular rays around the edge and a big happy face. Colour the circle yellow and the rays orange or gold.
27. Raindrop
A teardrop shape with a face. Colour light blue with a white highlight spot near the top to show the light catching the water.
Animal paper squishy ideas
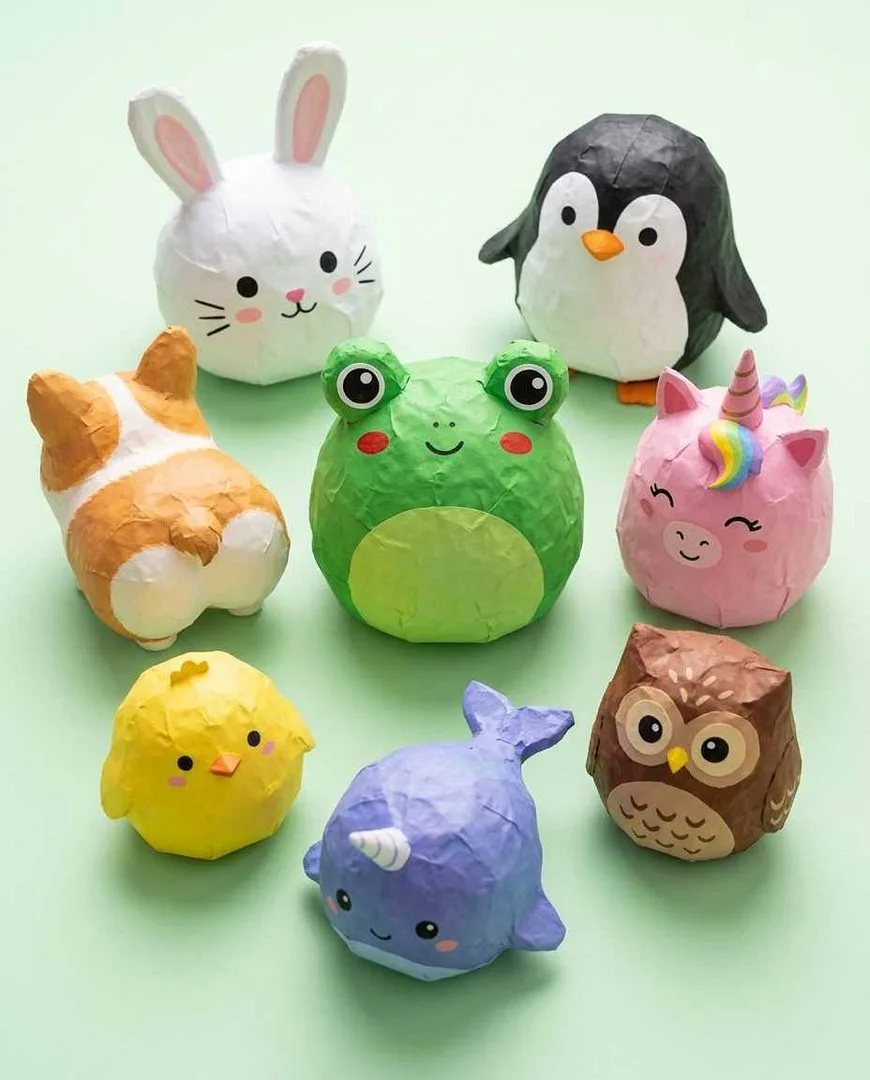
Round, chunky animal shapes work best because they squish well and the proportions are forgiving. The chubbier the animal, the better the squishy.
28. Frog
A round green body with two large circle eyes on top, a wide smile, and small front legs. Frogs are naturally round, which makes them the ideal paper squishy animal shape.
29. Bunny
An oval body with two long ears at the top, a small cotton-tail circle on the back, and a kawaii face. White, pink or pastel purple. The ears should be thick enough to stuff.
30. Penguin
A rounded body — black sides, white belly, orange beak and feet, small flippers. The tuxedo pattern (black body, white front) is the main detail.
31. Corgi butt
The back view of a corgi: a round fluffy butt, a small heart-shaped tail, two short back legs, and two ear tips visible over the top of the head. This design went viral on TikTok and remains one of the most-requested paper squishies.
32. Unicorn
A round face with a spiralling horn on top, a colourful mane along one side, closed happy eyes, and small ears. Rainbow mane is classic; pastel mane is trendy.
33. Chick
A round yellow body, a small orange beak, two dot eyes, tiny wing shapes on the sides, and two orange feet at the bottom. The fastest animal squishy to draw and colour.
34. Owl
A round body with two large circle eyes (concentric circles for the iris effect), a small beak, and feather-pattern details on the belly. Brown, grey or colourful.
35. Narwhal
An oval body with a small spiralling horn, a curved tail fin, and a kawaii face. Colour light blue or grey with a white belly. The horn is the design feature.
Easy paper squishy ideas for beginners
These shapes have no tricky curves, no thin parts that tear, and no complex colouring. If you have never made a paper squishy before, start here.
36. Circle smiley face
A plain circle with a happy face. That is it. Colour yellow for a classic smiley or any colour you like. The absolute simplest paper squishy possible, and it still feels satisfying to squeeze.
37. Square emoji
A rounded square (like a phone emoji) with any emoji face: heart eyes, laughing-crying, sunglasses cool, tongue out. Easier to cut than a circle because straight edges are more forgiving.
38. Fluffy cloud
A cloud blob with no face. Just a soft, white, squeezable cloud. No colouring needed if you use white paper. A five-minute project.
39. Simple heart
A basic heart shape, coloured red or pink. No face, no details. Cut two hearts, tape, stuff, done. The fastest paper squishy you can make.
40. Star
A five-pointed star. Colour yellow, gold or any colour. Slight rounding on the points prevents tearing. No face needed, though adding one makes it kawaii.
41. Popsicle
A rectangle on a stick. The rectangle is the ice cream (any colour), the stick is a small rectangle below it. Simple shape, easy to colour, and the stick gives it a handle.
42. Ball
A circle. Colour it as a basketball (orange with curved lines), a soccer ball (white with black pentagons), a tennis ball (green-yellow with white curves), or a plain bouncy ball in any colour.
43. Candy
A circle with twisted wrapper ends on each side (like a wrapped hard candy). Colour the wrapper in stripes or a solid colour. The wrapper ends are the only detail.
Advanced and 3D paper squishy designs
These use multiple panels, folded constructions or extra details that create a more three-dimensional, realistic squishy. They take longer but the results are noticeably more impressive.
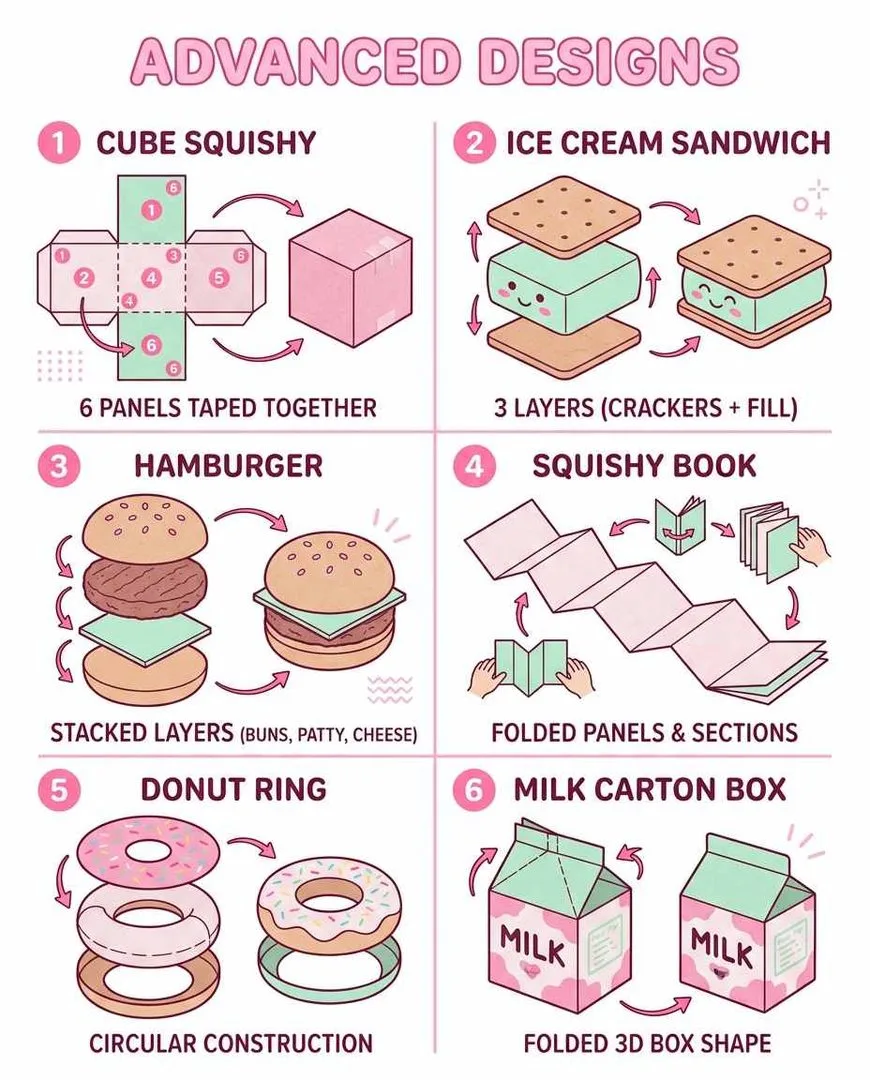
44. Cube squishy
Six square panels taped together into a cube, each face decorated differently. Stuff through the last open face and seal. A Minecraft block (grass, diamond ore, TNT) is the most popular cube squishy design.
45. Hamburger stack
Three separate layers: a top bun (half-circle), a filling layer (lettuce, cheese, patty drawn on a rectangle), and a bottom bun. Stack and tape together. The layers create genuine 3D thickness.
46. Ice cream sandwich
Two rectangle “cookie” panels with a coloured “ice cream” strip between them, creating a sandwiched three-layer construction. Colour the cookies brown and the ice cream pink, green or white.
47. Squishy blind bag
Make a small paper squishy inside a sealed paper envelope decorated as a mystery bag. The recipient tears open the envelope to discover the squishy inside. A paper squishy and a surprise, combined.
48. Stacked pancakes
Three or four circular “pancake” squishies stacked and taped together, with a pat of yellow butter on top and brown syrup lines dripping down the sides. Each pancake is its own mini squishy.
49. Bento box
A rectangular box divided into sections, each containing a different tiny food item: a rice ball, a sausage octopus, a piece of broccoli, a cherry tomato. The sections are drawn, not separate squishies, but the visual is impressive.
50. Squishy phone
A rectangle shaped and coloured like a smartphone, with a “screen” showing a drawn app layout, a home button, and a camera dot. Add a kawaii face on the screen for the full effect.
Paper squishy ideas: FAQ
What can I put in a paper squishy?
Cotton balls (the standard — soft, springy, cheap), tissue paper (crinkly and light), scrunched plastic bag strips (dense, slow-rise feel), polyester stuffing (plush, professional feel), or cut-up foam scraps (closest to the feel of a commercial squishy). Cotton balls are the best starting point for beginners. Pull them apart slightly before stuffing for an even fill without lumps.
How do I make a paper squishy?
Draw your design on paper, cut two matching shapes, colour both sides, tape the edges together leaving a gap, stuff the filling through the gap, and seal it shut with tape. The full step-by-step tutorial with tips is at the top of this article. Most designs take 10–15 minutes from start to finished squishy.
What filling is best for paper squishies?
Cotton balls are the best all-round filling: they are cheap, available everywhere, create a satisfying bounce-back squish, and distribute evenly inside the paper shell. For a more realistic slow-rise feel, use scrunched plastic bag strips or foam scraps. For a crinkly, sensory squishy, use tissue paper. The filling comparison chart is in the filling guide section above.
How do you make paper squishies without tape?
Use a glue stick instead of tape. Run a line of glue around the edges, press together, and let it dry before stuffing (leave a gap for the filling). White school glue also works but takes longer to dry. Tape is faster and stronger, but glue creates a cleaner edge with no visible tape lines.
What are the most popular paper squishy designs?
Food squishies dominate: strawberry, donut, pizza slice, boba tea and avocado are the five most-made designs. After food, kawaii faces (cloud, star, heart), animals (frog, bunny, cat) and emoji squares are the most popular. The strawberry is the single most-made paper squishy worldwide because the shape is simple and the result is instantly recognisable.
Are paper squishies safe for kids?
Yes. Paper squishies use paper, tape and cotton balls — no toxic materials, no small detachable parts (the filling is sealed inside), and no heat tools. Children aged 6+ can make them independently. Younger children may need help with cutting and taping. The only consideration is that very young children should not tear open a paper squishy and access the loose cotton filling.
How long do paper squishies last?
With packing tape, a paper squishy lasts weeks to months of regular squeezing. The tape creates a semi-waterproof, tear-resistant shell. Regular sticky tape is weaker and may split after heavy use. Laminating the paper before assembly creates the most durable squishy, but it is not necessary for casual use.
Pick a shape, grab the scissors, and make your first squishy in 10 minutes
The strawberry (idea 1) takes 10 minutes and teaches you the entire process. The donut (idea 2) is the most fun to decorate. The smiling cloud (idea 13) is the fastest. Any of those is your starting point. By the time you finish your third paper squishy, you will be designing your own shapes without a template, and the collection will start growing faster than you expected.
For more hands-on crafts, air dry clay ideas has 50 no-kiln projects, things to bedazzle has 50 rhinestone projects, things to draw when bored has 100 drawing prompts sorted by mood, and things to do when bored is the master list for when the squishies are done and you need the next thing.