Rubik’s Cube Algorithms: From Your First Solve to 2-Look CFOP
Rubik’s cube algorithms look like secret code: R U R' U', F R U R' U' F'. But each one is just a short, repeatable list of turns that moves a few pieces and leaves everything else alone. Learn six of them and you can solve the cube. Learn about twenty and you’re solving it like a speedcuber.
This guide gives you every algorithm in that path, in order, with pictures. You’ll learn to read the notation, climb our 7-step Layer-by-Layer Ladder to your first full solve, and then upgrade to 2-look OLL and PLL. We checked every single algorithm move by move in a cube simulator before publishing, so they work exactly as written.
Quick answer: Beginners need 6 Rubik’s cube algorithms to solve a 3×3: R' D' R D for corners, U R U' R' U' F' U F (and its mirror) for the middle layer, F R U R' U' F' for the yellow cross, R U R' U R U2 R' U to match edges and U R U' L' U R' U' L to place corners. Faster solvers add about 15 more (2-look OLL and PLL); full CFOP uses 78.
Free Rubik’s cube algorithms cheat sheet (PDF)
4 printable pages: notation chart, the 7-step beginner method, 2-look OLL and 2-look PLL with pictures. US Letter. No signup.
How many Rubik’s cube algorithms do you need?
Fewer than you think. The number depends on how fast you want to go, not on how smart you are. Here’s the whole path at a glance:
| Level | Method | Algorithms | What it gets you |
|---|---|---|---|
| First solve | Beginner layer by layer | 6 | A solved cube, usually in 1 to 3 minutes |
| Getting faster | 2-look OLL + 2-look PLL | +15 | Fewer moves, much less waiting |
| Next step | A-perms, J-perms, more PLLs | +3 to +15 | One-look endings on common cases |
| Speedcubing | Full CFOP (57 OLL + 21 PLL) | 78 | Last layer in one look every time |
Most people should stop at the first two rows for a while. Getting really comfortable with about 20 algorithms beats half-knowing 78.
How to read Rubik’s cube algorithm notation
Every algorithm uses the same alphabet. Hold the cube with one color on top and one facing you, and keep it that way. Each letter names a face, and a plain letter means turn that face clockwise, as if you were looking straight at it.
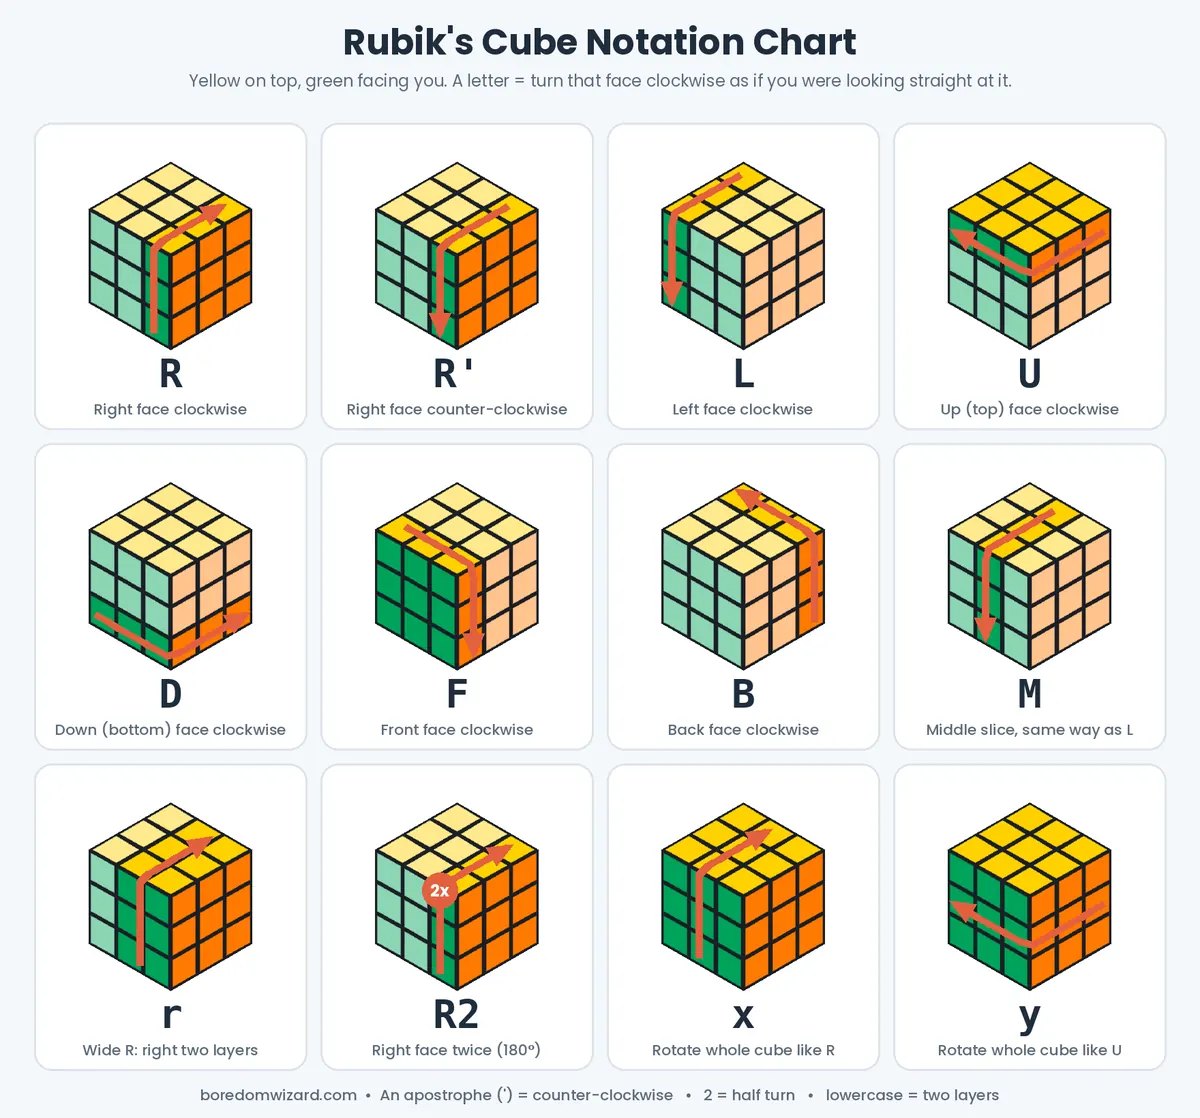
- R, L, U, D, F, B: Right, Left, Up (top), Down (bottom), Front and Back faces.
- Apostrophe (‘): turn that face counter-clockwise. Say
R'as “R prime.” - 2: turn that face twice (180°). Direction doesn’t matter.
- Lowercase (r, f): a wide move. Turn that face and the middle layer next to it together.
- M, E, S: the middle slices. M turns like L, E turns like D, S turns like F.
- x, y, z: turn the whole cube in your hands. x follows R, y follows U, z follows F.
The trick that helps most beginners: for R, the front of the right side moves up. For L, the front of the left side moves down. For U, the front of the top layer moves left. Get those three right and the rest falls into place.
The Layer-by-Layer Ladder: 7 rungs to your first solve
We call the beginner method the Layer-by-Layer Ladder because you climb it one rung at a time and never skip ahead. Each rung only cares about a few pieces. Everything you’ve already solved either stays put or comes back by the end of the algorithm.
Two rules make it work. First, keep track of which face is on top; the ladder flips the cube once, after rung 2. Second, judge a piece by its centers. Centers never move relative to each other, so the center color tells you what color a face will be when it’s solved.
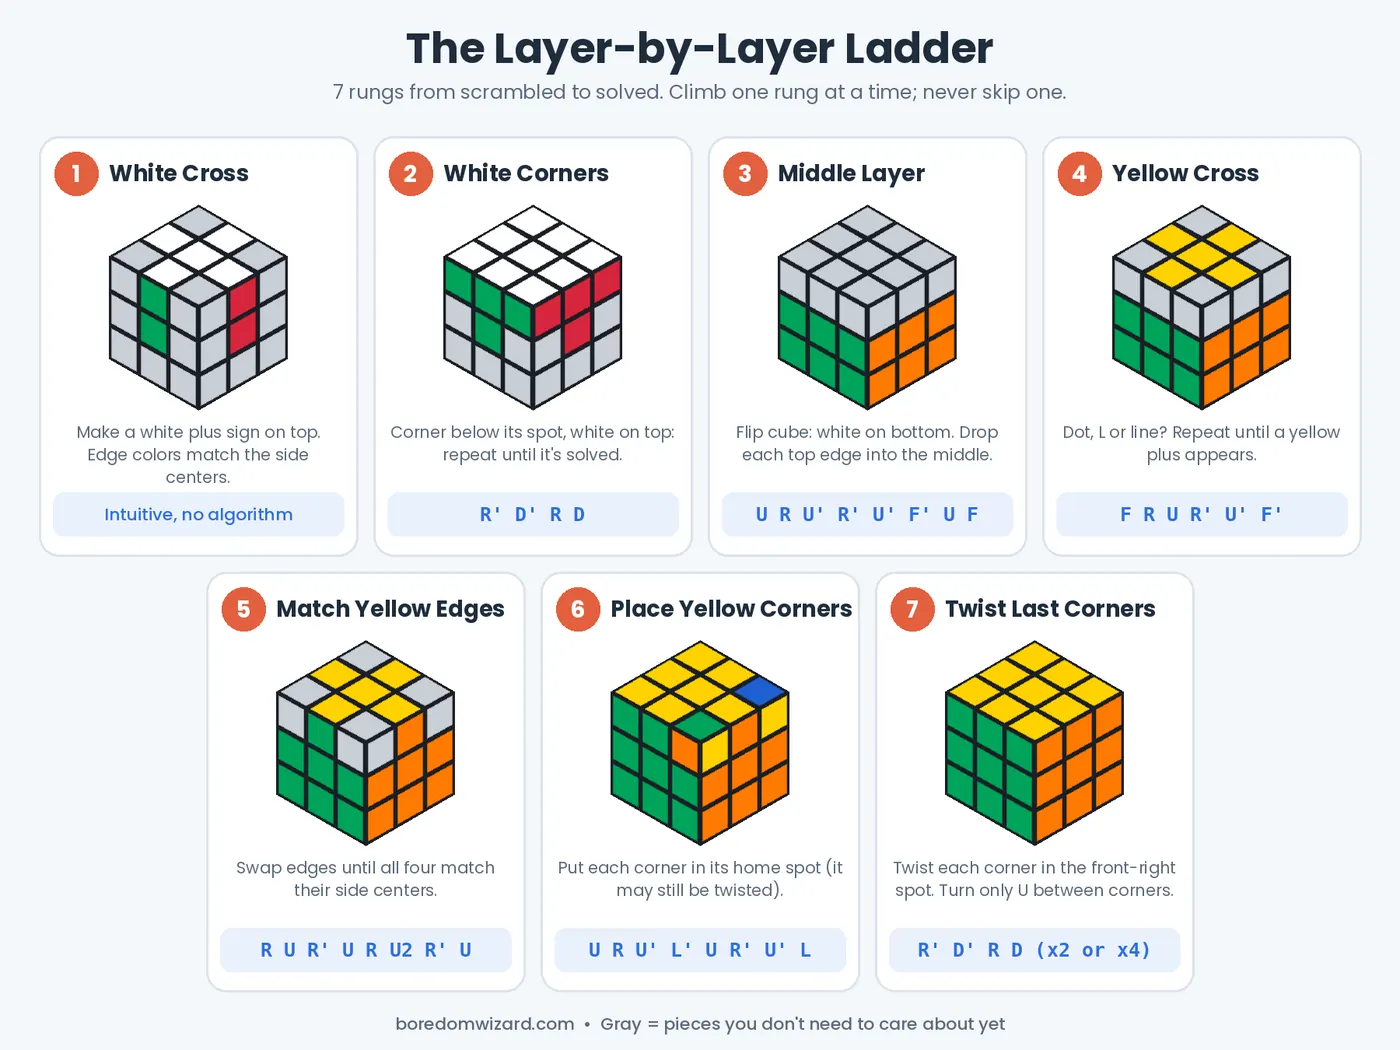
Rung 1: Make the white cross (no algorithm)
Hold the cube with the white center on top. Your goal is a white plus sign where each white edge’s other color matches the center on its side. The easiest way is the daisy method:
- Flip the cube so the yellow center is on top.
- Bring the four white edges up around the yellow center, white stickers facing up. It looks like a flower with a yellow middle.
- Turn the top until one petal’s side color matches the center below it. Turn that face twice (for the front,
F2). The petal drops to the bottom. - Repeat for all four petals, then flip the cube so the white cross is on top again.
Rung 2: Solve the white corners with R’ D’ R D
White cross still on top. Find a corner with white on it in the bottom layer. Turn the bottom layer until that corner sits directly below the spot where it belongs (its two other colors match the two side centers there). Turn the whole cube so that spot is at the front-right-top.
Now repeat R' D' R D until the corner pops in with white on top. It always takes 1, 3 or 5 tries. If a white corner is stuck in the top layer in the wrong spot, hold it at the front-right and do the algorithm once to drop it into the bottom layer.
Rung 3: Middle layer algorithms (right and left)
Flip the cube over so white is on the bottom and yellow is on top. You’ll keep yellow on top for the rest of the solve.
Find an edge in the top layer with no yellow on it. Turn the top until that edge’s front color matches the center below it, so it forms an upside-down T. Then look at its top color:
- Top color matches the right center:
U R U' R' U' F' U F - Top color matches the left center:
U' L' U L U F U' F'
If every top edge has yellow but the middle layer still isn’t done, an edge is stuck in the wrong slot or flipped. Hold that slot at the front-right, do the right-hand algorithm once to pop it out, then insert it properly.
Rung 4: Yellow cross with F R U R’ U’ F’
Ignore the yellow corners. Look at the yellow edges on top. You’ll see a dot, an L shape, a line or a full cross:
- Dot: do
F R U R' U' F'once. You’ll get an L or a line. - L shape: turn the top until the two yellow edges point to the back and the left (12 and 9 o’clock), then do it.
- Line: turn the top so the line runs left to right, then do it.
Rung 5: Match the yellow edges with R U R’ U R U2 R’ U
Turn the top until at least two yellow edges match the centers on their sides. If the two matching edges are next to each other, hold them at the back and right and do R U R' U R U2 R' U. If they’re across from each other, do the algorithm once from any side, then try again.
Rung 6: Put the yellow corners in place
A corner is “in place” when its three colors match the three centers around it, even if it’s twisted. Find one, hold it at the front-right-top, and do U R U' L' U R' U' L. Repeat until all four are in place. If none are in place yet, do it once from anywhere and look again.
Rung 7: Twist the last corners
Hold the cube with an unsolved corner at the front-right-top. Repeat R' D' R D until that corner’s yellow faces up (2 or 4 times). The bottom layers will look scrambled. Don’t panic and don’t rotate the cube. Turn only the top layer to bring the next unsolved corner to the front-right, and repeat. When the last corner twists in, everything below snaps back. Turn the top once more to finish.
Why rung 7 feels like magic: six rounds of R' D' R D bring a cube back to exactly where it started. Each corner takes two or four rounds, and because the twists on the last layer always add up correctly, the total lands on a multiple of six. That’s why the bottom layers come home on their own.
Rubik’s cube algorithms cheat sheet (free PDF)
The fastest way to memorize Rubik’s cube algorithms is to stop looking them up on your phone. Print the free cheat sheet (grab it from the download button at the top of this guide), keep it next to you, and glance at it only when you’re stuck. After a few days you’ll notice you haven’t looked at rung 3 in a while. That’s the goal.
Learn triggers, not letters
Long Rubik’s cube algorithms are built from a few short chunks called triggers. Learn these four and most algorithms shrink from 14 letters to three or four chunks you already know:
| Trigger | Moves | Where you’ll see it |
|---|---|---|
| The “sexy move” | R U R' U' | Yellow cross, OLL, T-perm |
| Sledgehammer | R' F R F' | OLL corners, F2L |
| Sune | R U R' U R U2 R' | Rung 5, OLL corners |
| Anti-Sune | R U2 R' U' R U' R' | OLL corners |
Yes, “sexy move” is its real name in the cubing world. Practice it until your right hand does it without thinking; it’s the backbone of F R U R' U' F', f R U R' U' f' and the T-perm.
2-look OLL algorithms: make the top yellow in two steps
OLL means “orient last layer”: getting the whole top face yellow. The beginner method does this in two rungs plus a lot of R' D' R D. 2-look OLL does it in two quick looks with 9 algorithms. You’ll already know two of them.
Step 1: the yellow cross (3 cases)
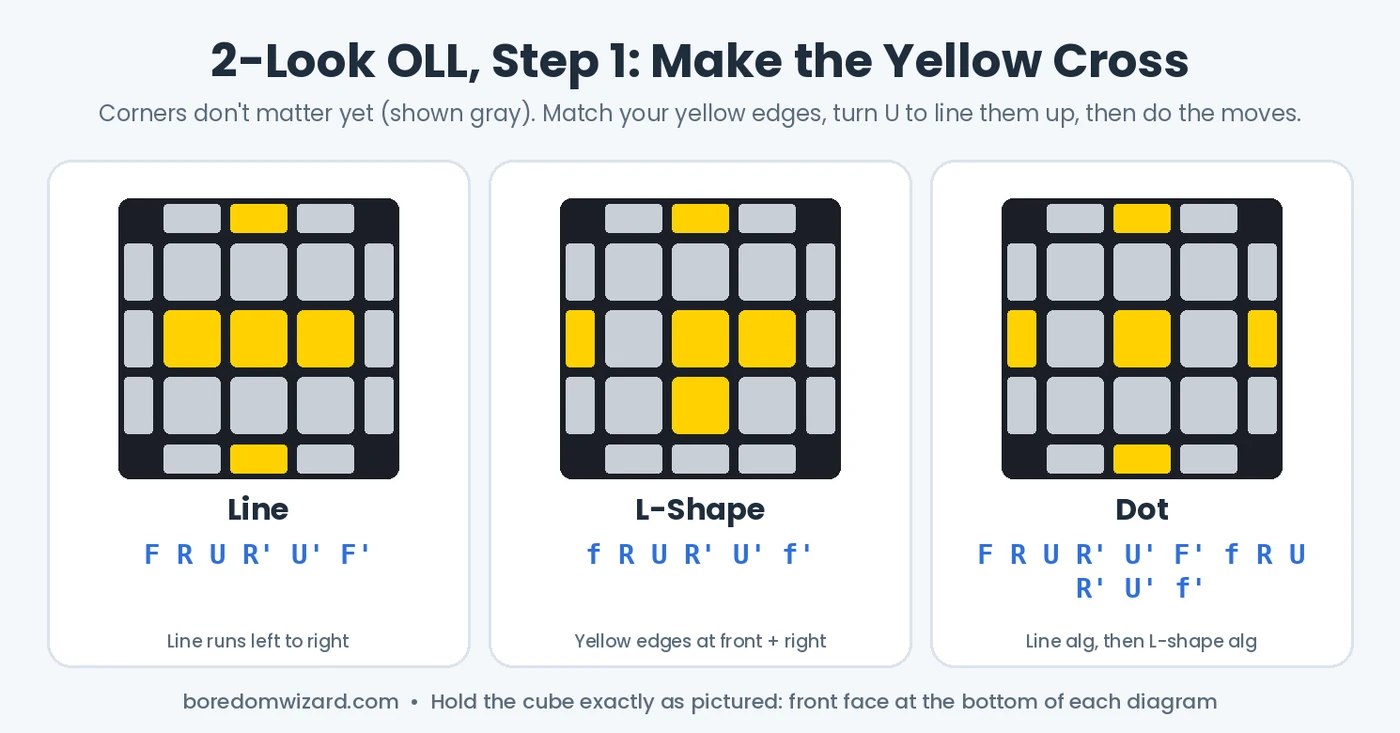
| Case | Algorithm | How to hold it |
|---|---|---|
| Line | F R U R' U' F' | Line runs left to right |
| L-shape | f R U R' U' f' | Yellow edges point to the front and right |
| Dot | F R U R' U' F' f R U R' U' f' | Any angle |
Notice the L-shape algorithm uses a small f (front two layers) and wants the L pointing toward you. That’s different from the beginner version in rung 4, so don’t mix them up.
Step 2: yellow corners (7 cases)
Once you have a yellow cross, count the yellow corners on top and check where the yellow side stickers point. Turn the top until your cube matches one picture exactly, then do its algorithm.
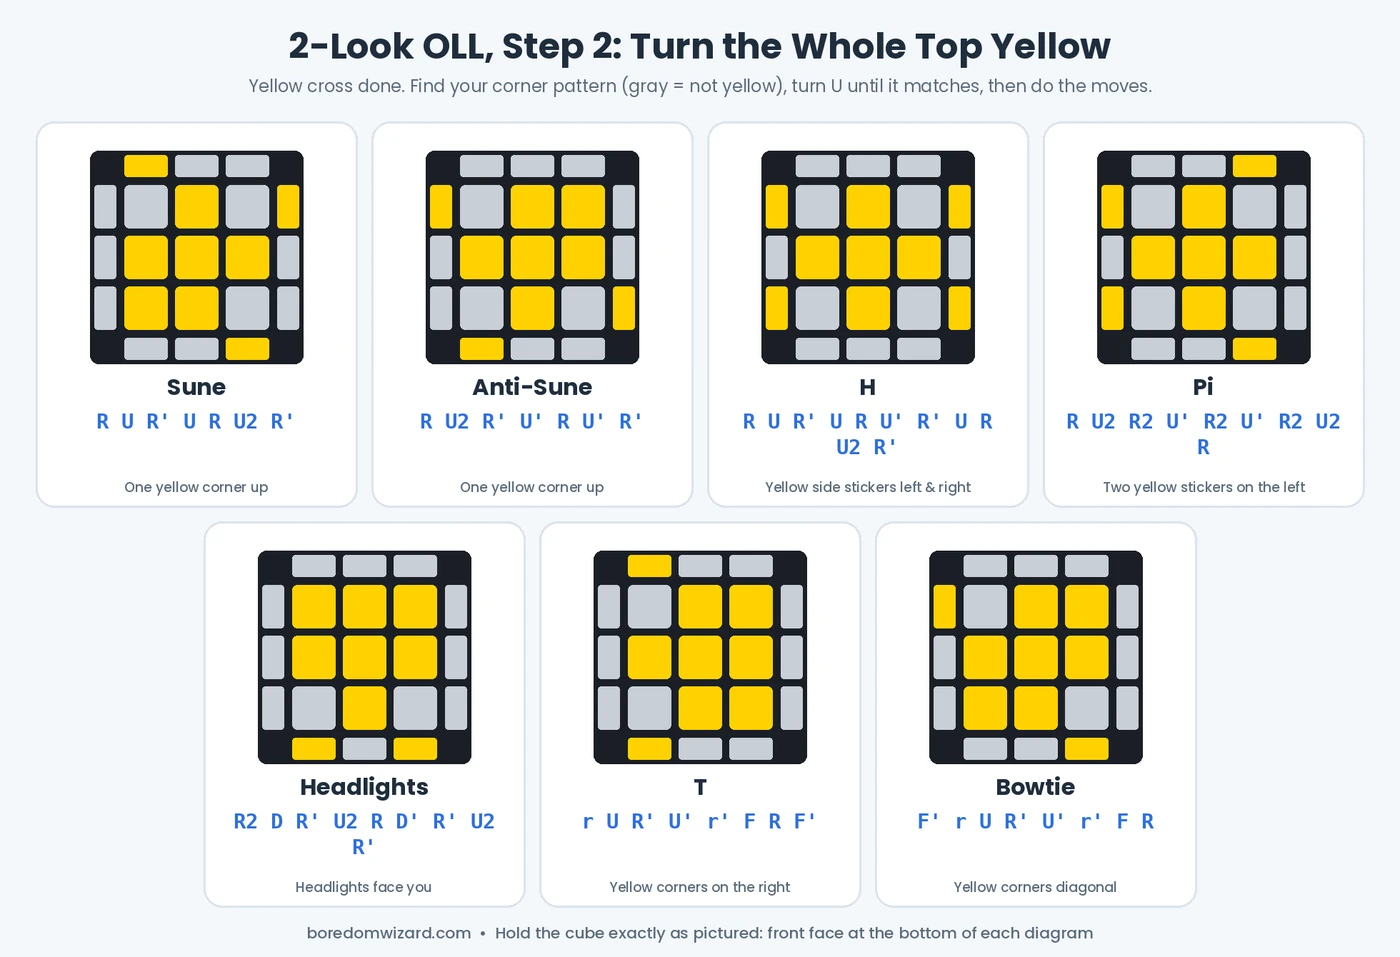
| Case | Algorithm | Spot it by |
|---|---|---|
| Sune | R U R' U R U2 R' | 1 yellow corner up, at front-left |
| Anti-Sune | R U2 R' U' R U' R' | 1 yellow corner up, at back-right |
| H | R U R' U R U' R' U R U2 R' | No yellow corners up; yellow on left and right sides |
| Pi | R U2 R2 U' R2 U' R2 U2 R | No yellow corners up; two yellow stickers on the left |
| Headlights | R2 D R' U2 R D' R' U2 R' | Back corners yellow; headlights face you |
| T | r U R' U' r' F R F' | Right-side corners yellow |
| Bowtie | F' r U R' U' r' F R | Two yellow corners on a diagonal |
2-look PLL algorithms: finish the last layer
PLL means “permute last layer”: moving the yellow pieces to their correct spots once the top is all yellow. 2-look PLL uses 6 algorithms: two for the corners, then four for the edges.
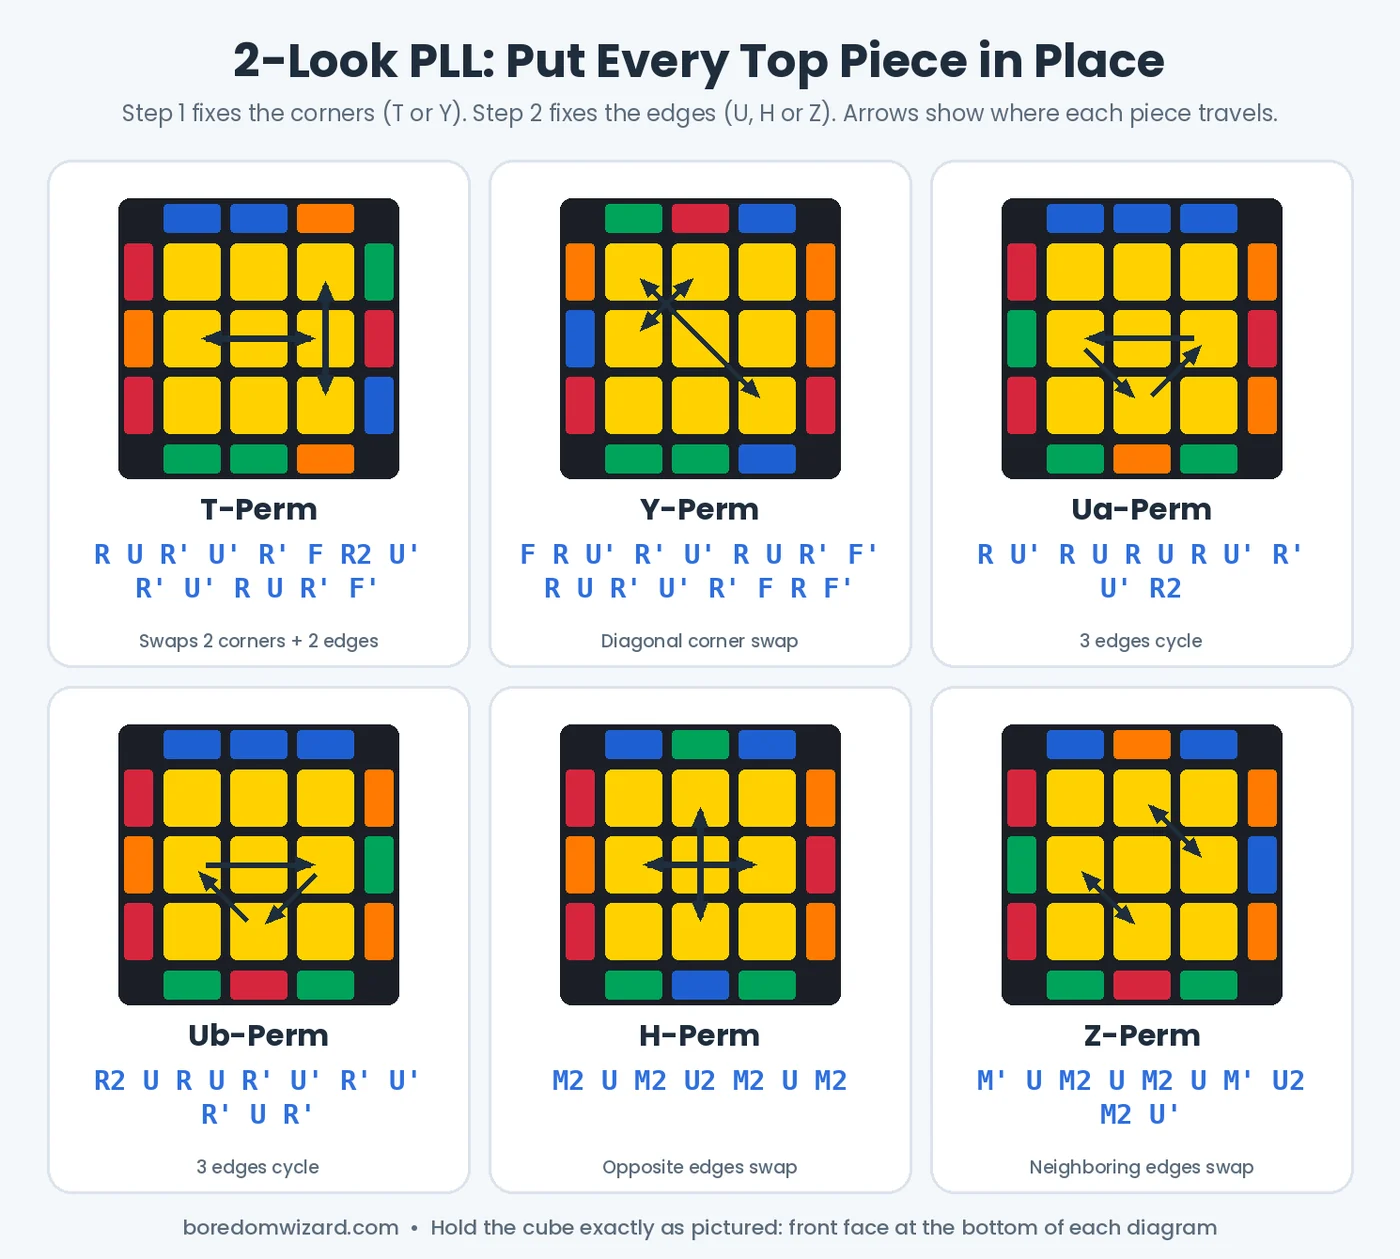
Step 1: corners (T-perm or Y-perm)
Look for headlights: two corners on the same side with matching side colors.
- Headlights on one side: hold them on the left and do the T-perm,
R U R' U' R' F R2 U' R' U' R U R' F'. - No headlights anywhere: do the Y-perm from any angle,
F R U' R' U' R U R' F' R U R' U' R' F R F'. - Headlights on all four sides: corners are done. Go to step 2.
Step 2: edges (U, H or Z)
- One side fully solved: hold it at the back. If the front edge needs to go right, do the Ua-perm,
R U' R U R U R U' R' U' R2. If it needs to go left, do the Ub-perm,R2 U R U R' U' R' U' R' U R'. - No solved side, edges swap straight across: H-perm,
M2 U M2 U2 M2 U M2. - No solved side, neighbors swap: hold it so the front edge belongs on the left and do the Z-perm,
M' U M2 U M2 U M' U2 M2 U'.
Turn the top layer once more if needed, and the cube is solved.
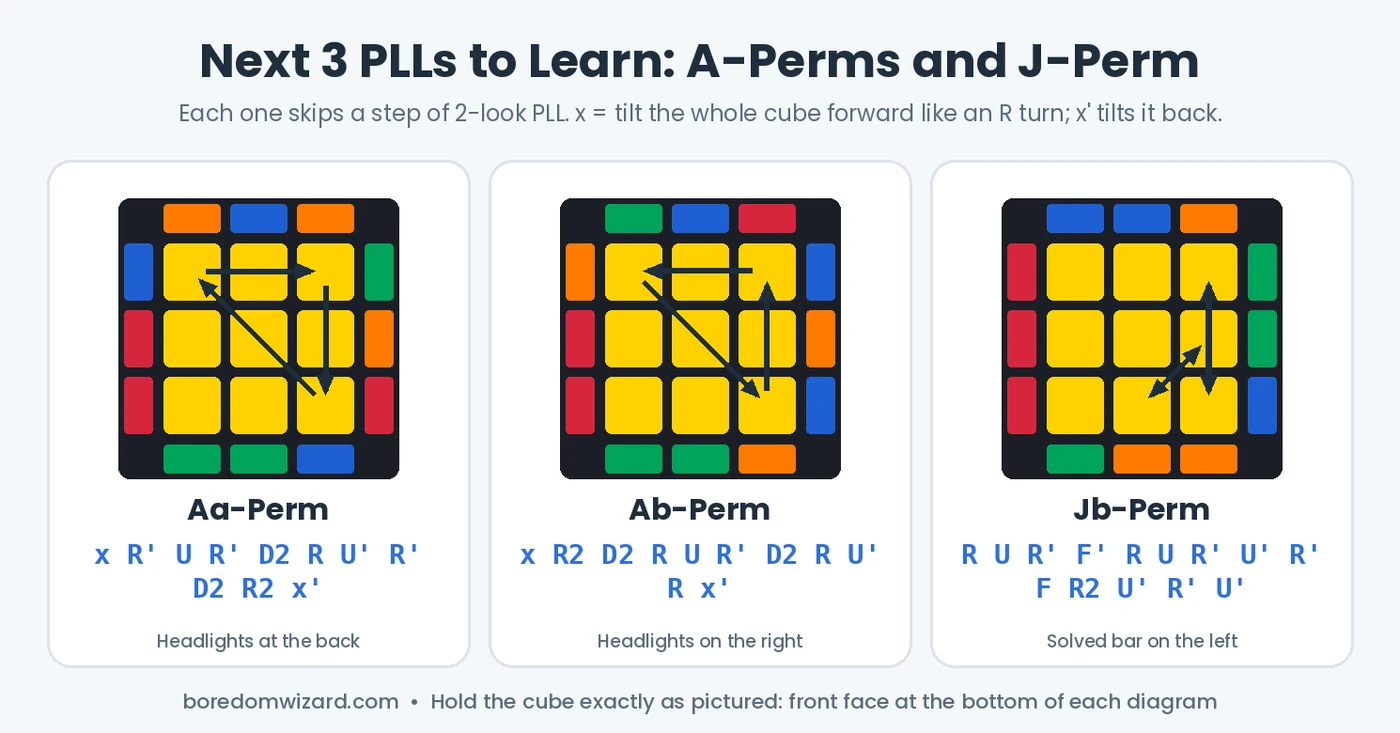
Next 3 PLLs to learn: A-perms and the J-perm
These three Rubik’s cube algorithms show up constantly and let you skip a step. The A-perms cycle three corners when the edges are already solved; the Jb-perm fixes a corner and an edge in one go.
Full CFOP: when to learn all 78 Rubik’s cube algorithms
CFOP (Cross, F2L, OLL, PLL) is the method most speedcubers use. The full set is 57 OLL and 21 PLL algorithms. Its middle step, F2L, solves a corner and an edge together and is mostly learned by understanding rather than memorizing.
Here’s a sensible order: get 2-look OLL and PLL smooth, learn intuitive F2L, then add the remaining PLLs (there are only 21, and you’ll see them every solve), and save full OLL for last. The official records keep falling; in 2026 the 3×3 single-solve world record dropped below 3 seconds for the first time and now stands at 2.51 seconds (see the WCA records). You don’t need to chase that, but it shows how far the same algorithms can take you.
How long does it take to learn Rubik’s cube algorithms?
Most people solve their first cube with beginner Rubik’s cube algorithms within a weekend of steady practice. After that, speed comes from doing the same algorithms without stopping to think.
| When | Focus | Practice |
|---|---|---|
| Days 1–2 | Notation and rungs 1–3 | Solve the first two layers again and again |
| Days 3–4 | Rungs 4–7 | Full solves with the cheat sheet nearby |
| Week 2 | No cheat sheet | 10 solves a day; time them |
| Weeks 3–4 | 2-look OLL | Learn 2 new cases a day, drill triggers |
| Month 2 | 2-look PLL + A/J perms | Replace beginner rungs 4–7 entirely |
A cube is also one of the best things to pack in your analog bag: no battery, fits in a pocket, and five minutes of practice beats five minutes of scrolling.
Rubik’s cube patterns: fun algorithms to show off
Not every algorithm solves something. Pattern algorithms turn a solved cube into a design. Start from a solved cube with white on top and green in front:
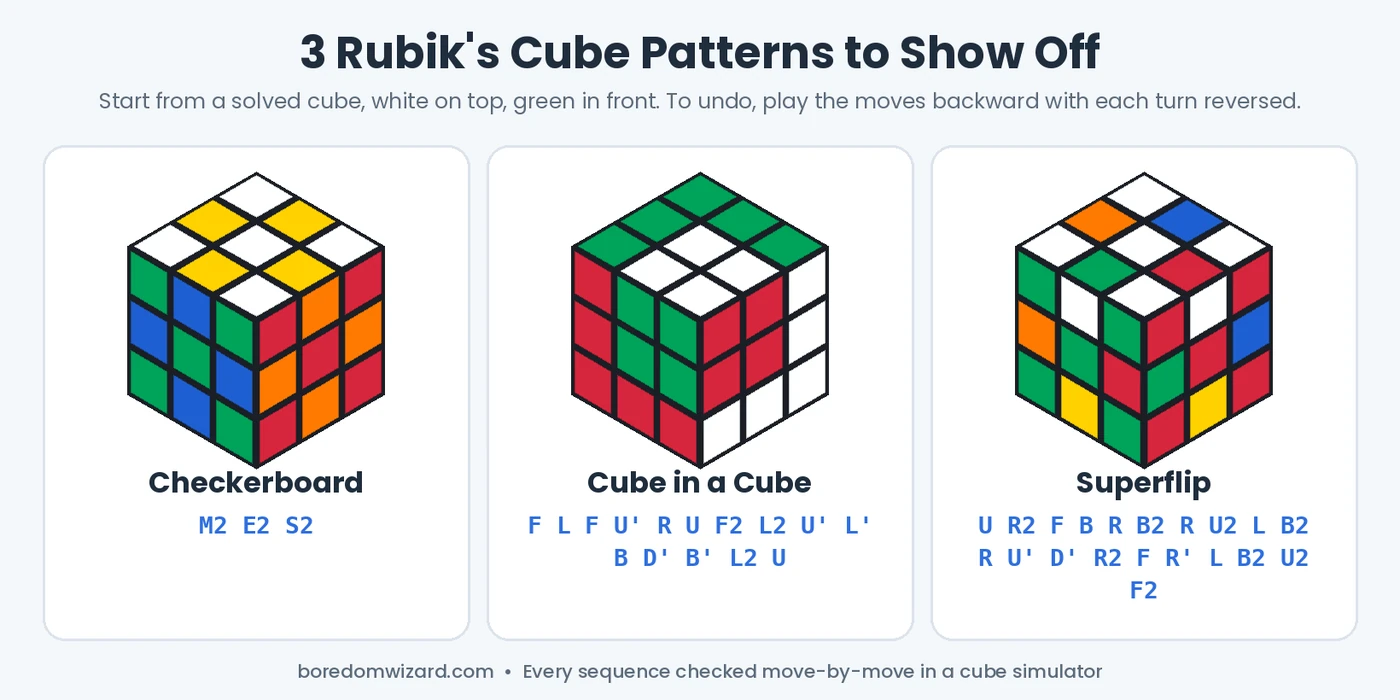
- Checkerboard:
M2 E2 S2. Do it again to undo it. - Cube in a cube:
F L F U' R U F2 L2 U' L' B D' B' L2 U. - Superflip:
U R2 F B R B2 R U2 L B2 R U' D' R2 F R' L B2 U2 F2. Every edge is flipped in place. It was the first position proven to need 20 moves, and 20 is the most any position needs, a number cubers call God’s number (cube20.org).
Common mistakes when learning Rubik’s cube algorithms
- Turning the cube mid-algorithm: your front face must stay your front face until the last move. If you lose track, restart the rung.
- Mixing up R and R’: say it out loud. “R” is the right side going up, “R prime” is down.
- Rotating the whole cube in rung 7: turn only the top. Rotating the cube is the #1 reason the last step “breaks” the cube.
- One corner twisted on an otherwise solved cube: no algorithm can fix that. Someone (or a fall) twisted a corner by hand; twist it back the same way.
- A stiff, catchy cube: a smooth magnetic 3×3 makes every algorithm easier to execute and is cheap these days.
Like puzzles that reward patience? Try learning how to play mahjong or fold a few paper airplane designs for a different kind of hands-on challenge.
Rubik’s cube algorithms FAQ
How many algorithms do you need to solve a Rubik’s cube?
Six. The beginner layer-by-layer method uses R’ D’ R D, the two middle-layer algorithms, F R U R’ U’ F’, R U R’ U R U2 R’ U and U R U’ L’ U R’ U’ L. Speedcubers who use full CFOP know 78 last-layer algorithms.
What is the easiest Rubik’s cube algorithm?
R’ D’ R D (or its cousin R U R’ U’, the “sexy move”). It’s four moves long, easy on the hands and used in several steps of the beginner method.
How do you make all sides of a Rubik’s cube the same color?
Solve it one layer at a time: white cross, white corners, middle layer, yellow cross, yellow edges, yellow corners in place, then twist the yellow corners. Each of those seven steps uses one short algorithm from this guide.
What does R U R’ U’ mean on a Rubik’s cube?
Turn the right face clockwise, the top face clockwise, the right face counter-clockwise, then the top face counter-clockwise. It’s the most common trigger in cubing.
What are OLL and PLL?
They’re the last two steps of the CFOP speedsolving method. OLL (orient last layer) makes the top face one color. PLL (permute last layer) moves those pieces to their correct spots. The 2-look versions need about 15 algorithms in total.
Is there one algorithm that solves the whole Rubik’s cube?
No. There are about 43 quintillion possible positions, so a solve always depends on what you see. What you can do is learn a handful of algorithms and apply them in the right order.
How many algorithms are in full CFOP?
78: 57 for OLL and 21 for PLL. Most cubers learn all 21 PLLs first because they come up on every solve.
Can you get faster without learning more algorithms?
Yes. Look ahead to your next step while finishing the current one, turn with your fingers instead of your wrists, and practice the beginner algorithms until they flow. Many people get under a minute this way.
Start climbing the ladder
Print the cheat sheet, learn the notation, and climb the Layer-by-Layer Ladder one rung at a time. Once you’ve solved the cube a few times without help, pick up 2-look OLL and PLL and watch your times drop. If you want to test yourself against other cubers, the WCA lists official competitions all over the US, and beginners are welcome.
Looking for your next skill after the cube? Take our hobby quiz to find one that fits you.